> ## Documentation Index
> Fetch the complete documentation index at: https://www.integrate.io/docs/llms.txt
> Use this file to discover all available pages before exploring further.
# ETL: Connecting via Universal OAuth
> Set up a universal OAuth connection in Integrate.io ETL to access any REST API that supports OAuth 2.0 authentication for data extraction.
## Universal OAuth Connection Guide
Universal OAuth is a flexible authentication service that allows you to connect to any OAuth-based API. This guide explains the three authentication methods available and how to use them with REST API components.
## Overview
When working with modern APIs, most services require authentication to access their data. Universal OAuth supports three authentication methods:
* **OAuth 2.0** - The standard authorization flow where you log in through the provider's website
* **Client Credentials** - Server-to-server authentication using API keys
* **Custom Auth** - Flexible option for non-standard authentication endpoints
Once authenticated, your connection can be used in REST API Source and Destination components to read from or write to any API.
## OAuth 2.0 (Authorization Code Flow)
This is the most common authentication method used by services like Google, GitHub, Slack, Salesforce, and many others. It provides secure access without sharing your password with third-party applications.
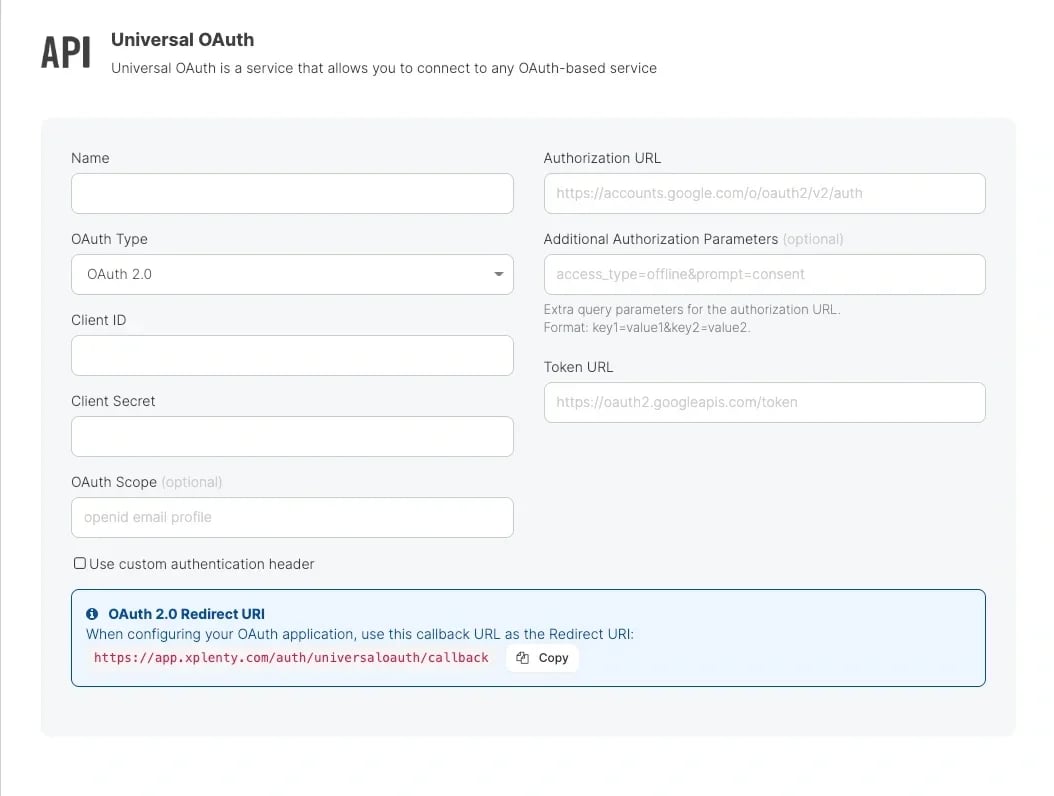 ### How It Works
Enter your Client ID, Client Secret, and the provider's OAuth URLs
A popup window opens showing the provider's login page
Sign in to your account and grant permission to access your data
The popup closes and your connection is ready to use
### Configuration Fields
| Field | Description | Example |
| -------------------------------------------------- | ---------------------------------------------------------------------------- | -------------------------------------------------------------------------------------------- |
| **Name** | A friendly name for your connection | My Google Analytics |
| **Authorization URL** | The provider's authorization endpoint where users log in | [https://accounts.google.com/o/oauth2/v2/auth](https://accounts.google.com/o/oauth2/v2/auth) |
| **Token URL** | The endpoint that exchanges the authorization code for an access token | [https://oauth2.googleapis.com/token](https://oauth2.googleapis.com/token) |
| **Client ID** | Your application's unique identifier (from the provider's developer console) | 123456789.apps.googleusercontent.com |
| **Client Secret** | Your application's secret key (keep this confidential) | GOCSPX-xxxxxxxxxx |
| **OAuth Scope** (optional) | Permissions your app needs (space-separated list) | openid email profile |
| **Additional Authorization Parameters** (optional) | Extra parameters for the authorization request | access\_type=offline\&prompt=consent |
**Redirect URI:** When setting up your OAuth application with the provider, use this callback URL:
`https://app.xplenty.com/auth/universaloauth/callback`
### Security Features
Universal OAuth implements industry-standard security measures:
* **PKCE (Proof Key for Code Exchange)** - Prevents authorization code interception attacks
* **State Parameter** - Protects against cross-site request forgery (CSRF) attacks
* **Automatic Token Refresh** - Tokens are automatically refreshed before they expire (when refresh tokens are available)
## Client Credentials
Client Credentials authentication is designed for server-to-server communication where no user interaction is required. This is commonly used for backend services, automated processes, and APIs that don't access user-specific data.
### How It Works
Enter your Client ID, Client Secret, and the provider's OAuth URLs
A popup window opens showing the provider's login page
Sign in to your account and grant permission to access your data
The popup closes and your connection is ready to use
### Configuration Fields
| Field | Description | Example |
| -------------------------------------------------- | ---------------------------------------------------------------------------- | -------------------------------------------------------------------------------------------- |
| **Name** | A friendly name for your connection | My Google Analytics |
| **Authorization URL** | The provider's authorization endpoint where users log in | [https://accounts.google.com/o/oauth2/v2/auth](https://accounts.google.com/o/oauth2/v2/auth) |
| **Token URL** | The endpoint that exchanges the authorization code for an access token | [https://oauth2.googleapis.com/token](https://oauth2.googleapis.com/token) |
| **Client ID** | Your application's unique identifier (from the provider's developer console) | 123456789.apps.googleusercontent.com |
| **Client Secret** | Your application's secret key (keep this confidential) | GOCSPX-xxxxxxxxxx |
| **OAuth Scope** (optional) | Permissions your app needs (space-separated list) | openid email profile |
| **Additional Authorization Parameters** (optional) | Extra parameters for the authorization request | access\_type=offline\&prompt=consent |
**Redirect URI:** When setting up your OAuth application with the provider, use this callback URL:
`https://app.xplenty.com/auth/universaloauth/callback`
### Security Features
Universal OAuth implements industry-standard security measures:
* **PKCE (Proof Key for Code Exchange)** - Prevents authorization code interception attacks
* **State Parameter** - Protects against cross-site request forgery (CSRF) attacks
* **Automatic Token Refresh** - Tokens are automatically refreshed before they expire (when refresh tokens are available)
## Client Credentials
Client Credentials authentication is designed for server-to-server communication where no user interaction is required. This is commonly used for backend services, automated processes, and APIs that don't access user-specific data.
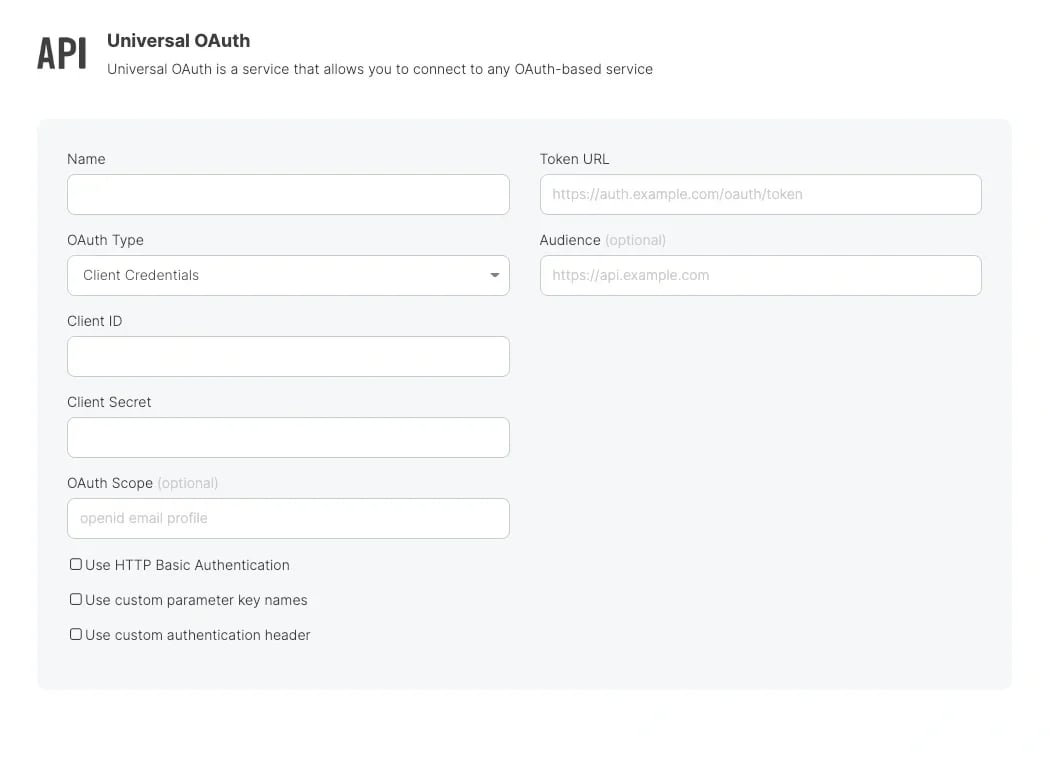 ### How It Works
Provide your Client ID and Client Secret
The system directly requests an access token from the provider
No popup or user login required
### Configuration Fields
| Field | Description | Required |
| ----------------- | --------------------------------------------------------------------------- | -------- |
| **Name** | A friendly name for your connection | Yes |
| **Token URL** | The endpoint to request access tokens | Yes |
| **Client ID** | Your application's identifier | Yes |
| **Client Secret** | Your application's secret key | Yes |
| **OAuth Scope** | Permissions to request | No |
| **Audience** | The intended recipient of the token (required by some providers like Auth0) | No |
### Advanced Options
* **Use HTTP Basic Authentication** - Send credentials in the Authorization header instead of the request body (required by some providers)
* **Use custom parameter key names** - Some APIs use non-standard parameter names for client credentials
### When to Use Client Credentials
* Accessing APIs that don't require user authorization
* Machine-to-machine communication
* Background jobs and automated processes
* APIs that use API keys or service accounts
## Custom Auth
Custom Auth provides maximum flexibility for APIs that don't follow standard OAuth patterns. You can configure any HTTP request to obtain an access token from any endpoint.
### How It Works
Provide your Client ID and Client Secret
The system directly requests an access token from the provider
No popup or user login required
### Configuration Fields
| Field | Description | Required |
| ----------------- | --------------------------------------------------------------------------- | -------- |
| **Name** | A friendly name for your connection | Yes |
| **Token URL** | The endpoint to request access tokens | Yes |
| **Client ID** | Your application's identifier | Yes |
| **Client Secret** | Your application's secret key | Yes |
| **OAuth Scope** | Permissions to request | No |
| **Audience** | The intended recipient of the token (required by some providers like Auth0) | No |
### Advanced Options
* **Use HTTP Basic Authentication** - Send credentials in the Authorization header instead of the request body (required by some providers)
* **Use custom parameter key names** - Some APIs use non-standard parameter names for client credentials
### When to Use Client Credentials
* Accessing APIs that don't require user authorization
* Machine-to-machine communication
* Background jobs and automated processes
* APIs that use API keys or service accounts
## Custom Auth
Custom Auth provides maximum flexibility for APIs that don't follow standard OAuth patterns. You can configure any HTTP request to obtain an access token from any endpoint.
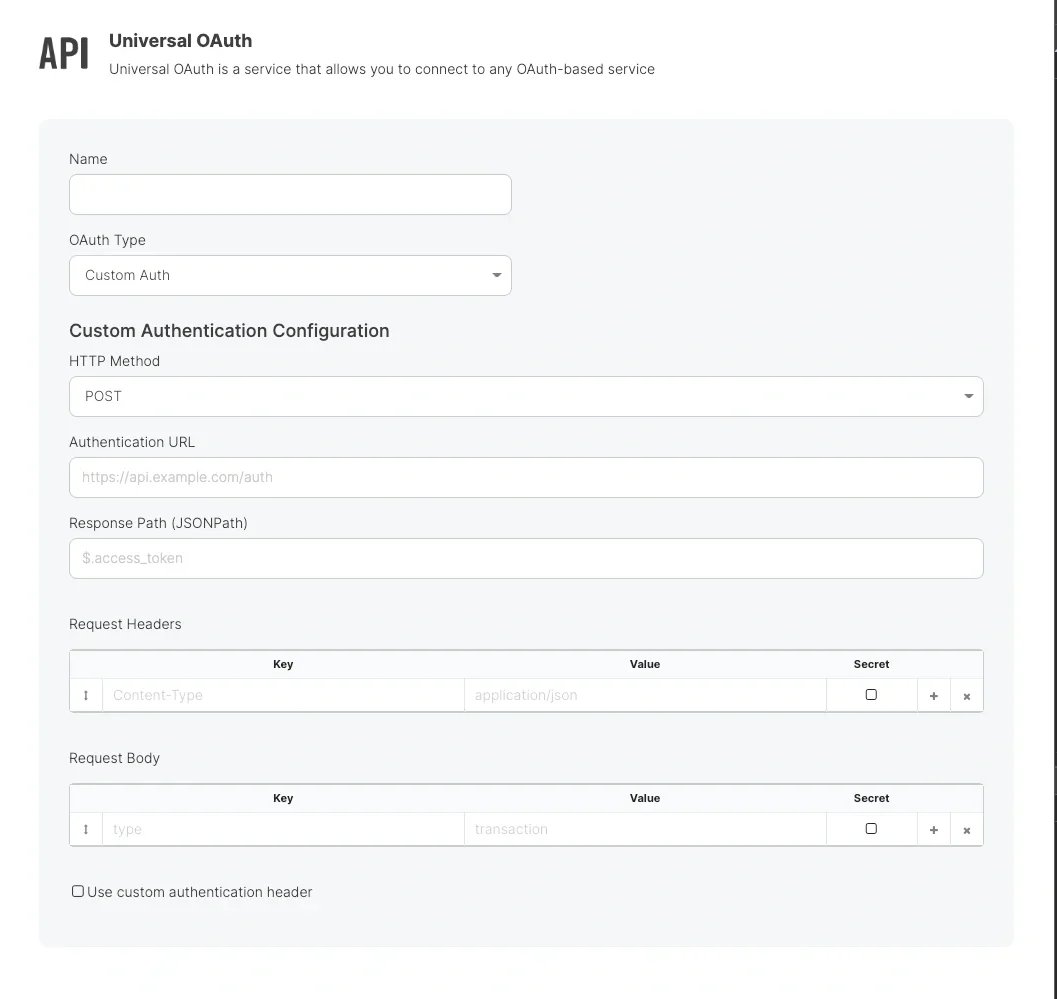 ### How It Works
Specify the HTTP method, URL, headers, and body
Tell the system where to find the access token in the response
The system makes the configured request and extracts the token
### Configuration Fields
| Field | Description | Example |
| ---------------------------- | ---------------------------------------------------- | ------------------------------------------------------------------------ |
| **HTTP Method** | The request method (GET, POST, PUT, PATCH) | POST |
| **Authentication URL** | The endpoint that returns the access token | [https://api.example.com/auth/token](https://api.example.com/auth/token) |
| **Response Path (JSONPath)** | The path to extract the token from the JSON response | \$.access\_token |
| **Request Headers** | Custom headers to include in the request | Content-Type: application/json |
| **Request Body** | Key-value pairs to send in the request body | grant\_type: client\_credentials |
### Understanding Response Path (JSONPath)
The Response Path tells the system where to find the access token in the API's response. Use dot notation to navigate nested JSON structures:
**Example Response:**
```json theme={null}
{
"status": "success",
"data": {
"access_token": "eyJhbGciOiJIUzI1NiIs...",
"expires_in": 3600
}
}
```
**Response Path:** `$.data.access_token`
#### Path Examples
| Response Structure | Path |
| ---------------------------------------------- | --------------------------- |
| `{"access_token": "..."}` | `$.access_token` |
| `{"data": {"token": "..."}}` | `$.data.token` |
| `{"auth": {"credentials": {"bearer": "..."}}}` | `$.auth.credentials.bearer` |
### When to Use Custom Auth
* APIs with non-standard authentication endpoints
* Legacy APIs that don't follow OAuth 2.0
* APIs requiring custom headers or body parameters
* Token endpoints that return tokens in non-standard response formats
## Custom Authentication Header
By default, the access token obtained from any authentication flow (OAuth 2.0, Client Credentials, or Custom Auth) is sent as a **Bearer token** in the `Authorization` header:
Authorization: Bearer eyJhbGciOiJIUzI1NiIs...
Some APIs require the token to be sent using a different header name or format. For example, Shopify uses `X-Shopify-Access-Token` instead of `Authorization: Bearer`. The **"Use custom authentication header"** checkbox allows you to customize how the token is sent.
### How to Configure
Check the **"Use custom authentication header"** checkbox (available on all three OAuth types)
Enter the **Header Name** - the HTTP header to use for authentication
Optionally enter a **Header Prefix** - the text placed before the token value. Leave empty to send the token without any prefix.
### Configuration Fields
| Field | Description | Default |
| ---------------------------- | ------------------------------------------------------------------------------ | ------------- |
| **Header Name** | The HTTP header name used for authentication | Authorization |
| **Header Prefix** (optional) | Text placed before the token. Leave empty for no prefix (token sent directly). | Bearer |
### Examples
| Provider | Header Name | Header Prefix | Resulting Header |
| ---------------------------- | ---------------------- | ------------- | --------------------------------- |
| Default (most APIs) | *unchecked* | *unchecked* | `Authorization: Bearer {token}` |
| Shopify | X-Shopify-Access-Token | *(empty)* | `X-Shopify-Access-Token: {token}` |
| Custom API with token prefix | X-API-Key | Token | `X-API-Key: Token {token}` |
## Using Your Connection in REST API Components
Once you've created a Universal OAuth connection, you can use it in REST API Source and Destination components to authenticate your API requests.
### How Authentication Works
When you select a Universal OAuth connection in a REST API component:
1. The system retrieves the stored access token from your connection
2. The token is automatically added to your API requests using the configured authentication header (default: `Authorization: Bearer {token}`)
3. If a custom authentication header is configured, the token is sent using the specified header name and prefix instead
4. Your request is sent to the API with proper authentication
**Default Request Header:**
Authorization: Bearer eyJhbGciOiJIUzI1NiIsInR5cCI6IkpXVCJ9...
**Custom Header Example (Shopify):**
X-Shopify-Access-Token: shpua\_ff47f0800268bf212f8...
### Setting Up a REST API Source
Add a REST API Source component to your pipeline
In the **Choose input connection** section, select **Connection**
Choose your Universal OAuth connection from the dropdown
Configure your API endpoint URL and other settings
The authentication is handled automatically
### Token Refresh
For connections that support refresh tokens (OAuth 2.0 flow with providers that issue refresh tokens), the system automatically refreshes expired tokens before making API calls. This ensures uninterrupted access to your data.
**Note:**
Some providers (like GitHub OAuth Apps) don't provide refresh tokens. In these cases, you may need to re-authenticate when the token expires.
## Troubleshooting
### Common Issues
| Issue | Possible Cause | Solution |
| --------------------------- | ------------------------------------------------- | ------------------------------------------------------------------------------------------------------------ |
| Popup blocked | Browser blocking popup windows | Allow popups for app.xplenty.com in your browser settings |
| Invalid redirect URI | Callback URL not registered with provider | Add `https://app.xplenty.com/auth/universaloauth/callback` to your OAuth app's allowed redirect URIs |
| Token exchange failed | Invalid Client ID or Secret | Verify your credentials match those in the provider's developer console |
| Custom Auth: Path not found | Incorrect Response Path | Check the actual API response structure and update the path accordingly |
| Access denied | Insufficient scopes | Add the required scopes to your OAuth configuration |
| 401 with valid token | API requires a non-standard authentication header | Enable "Use custom authentication header" and configure the correct header name and prefix for your provider |
### Testing Your Connection
After creating a connection, you can test it by:
Creating a REST API Source component
Selecting your connection
Configuring a simple GET request to a known endpoint (e.g., user profile endpoint)
Checking if the response returns valid data
## Supported Providers
Universal OAuth works with any OAuth 2.0 compliant provider. Here are some commonly used services:
* Google (Analytics, Sheets, Drive)
* GitHub
* GitLab
* Slack
* Salesforce
* HubSpot
* Shopify
* Stripe
* Dropbox
* Box
* Microsoft (Azure, Office 365)
* Zoom
* Twitch
* Spotify
* QuickBooks
* Zendesk
* And many more...
For providers not listed, you can configure Universal OAuth manually using the provider's OAuth documentation.
## Security Best Practices
* **Keep secrets confidential** - Never share your Client Secret or access tokens
* **Use minimal scopes** - Only request the permissions your integration actually needs
* **Regularly review connections** - Remove unused connections to minimize security exposure
* **Monitor for unauthorized access** - Check your provider's security logs for suspicious activity
### How It Works
Specify the HTTP method, URL, headers, and body
Tell the system where to find the access token in the response
The system makes the configured request and extracts the token
### Configuration Fields
| Field | Description | Example |
| ---------------------------- | ---------------------------------------------------- | ------------------------------------------------------------------------ |
| **HTTP Method** | The request method (GET, POST, PUT, PATCH) | POST |
| **Authentication URL** | The endpoint that returns the access token | [https://api.example.com/auth/token](https://api.example.com/auth/token) |
| **Response Path (JSONPath)** | The path to extract the token from the JSON response | \$.access\_token |
| **Request Headers** | Custom headers to include in the request | Content-Type: application/json |
| **Request Body** | Key-value pairs to send in the request body | grant\_type: client\_credentials |
### Understanding Response Path (JSONPath)
The Response Path tells the system where to find the access token in the API's response. Use dot notation to navigate nested JSON structures:
**Example Response:**
```json theme={null}
{
"status": "success",
"data": {
"access_token": "eyJhbGciOiJIUzI1NiIs...",
"expires_in": 3600
}
}
```
**Response Path:** `$.data.access_token`
#### Path Examples
| Response Structure | Path |
| ---------------------------------------------- | --------------------------- |
| `{"access_token": "..."}` | `$.access_token` |
| `{"data": {"token": "..."}}` | `$.data.token` |
| `{"auth": {"credentials": {"bearer": "..."}}}` | `$.auth.credentials.bearer` |
### When to Use Custom Auth
* APIs with non-standard authentication endpoints
* Legacy APIs that don't follow OAuth 2.0
* APIs requiring custom headers or body parameters
* Token endpoints that return tokens in non-standard response formats
## Custom Authentication Header
By default, the access token obtained from any authentication flow (OAuth 2.0, Client Credentials, or Custom Auth) is sent as a **Bearer token** in the `Authorization` header:
Authorization: Bearer eyJhbGciOiJIUzI1NiIs...
Some APIs require the token to be sent using a different header name or format. For example, Shopify uses `X-Shopify-Access-Token` instead of `Authorization: Bearer`. The **"Use custom authentication header"** checkbox allows you to customize how the token is sent.
### How to Configure
Check the **"Use custom authentication header"** checkbox (available on all three OAuth types)
Enter the **Header Name** - the HTTP header to use for authentication
Optionally enter a **Header Prefix** - the text placed before the token value. Leave empty to send the token without any prefix.
### Configuration Fields
| Field | Description | Default |
| ---------------------------- | ------------------------------------------------------------------------------ | ------------- |
| **Header Name** | The HTTP header name used for authentication | Authorization |
| **Header Prefix** (optional) | Text placed before the token. Leave empty for no prefix (token sent directly). | Bearer |
### Examples
| Provider | Header Name | Header Prefix | Resulting Header |
| ---------------------------- | ---------------------- | ------------- | --------------------------------- |
| Default (most APIs) | *unchecked* | *unchecked* | `Authorization: Bearer {token}` |
| Shopify | X-Shopify-Access-Token | *(empty)* | `X-Shopify-Access-Token: {token}` |
| Custom API with token prefix | X-API-Key | Token | `X-API-Key: Token {token}` |
## Using Your Connection in REST API Components
Once you've created a Universal OAuth connection, you can use it in REST API Source and Destination components to authenticate your API requests.
### How Authentication Works
When you select a Universal OAuth connection in a REST API component:
1. The system retrieves the stored access token from your connection
2. The token is automatically added to your API requests using the configured authentication header (default: `Authorization: Bearer {token}`)
3. If a custom authentication header is configured, the token is sent using the specified header name and prefix instead
4. Your request is sent to the API with proper authentication
**Default Request Header:**
Authorization: Bearer eyJhbGciOiJIUzI1NiIsInR5cCI6IkpXVCJ9...
**Custom Header Example (Shopify):**
X-Shopify-Access-Token: shpua\_ff47f0800268bf212f8...
### Setting Up a REST API Source
Add a REST API Source component to your pipeline
In the **Choose input connection** section, select **Connection**
Choose your Universal OAuth connection from the dropdown
Configure your API endpoint URL and other settings
The authentication is handled automatically
### Token Refresh
For connections that support refresh tokens (OAuth 2.0 flow with providers that issue refresh tokens), the system automatically refreshes expired tokens before making API calls. This ensures uninterrupted access to your data.
**Note:**
Some providers (like GitHub OAuth Apps) don't provide refresh tokens. In these cases, you may need to re-authenticate when the token expires.
## Troubleshooting
### Common Issues
| Issue | Possible Cause | Solution |
| --------------------------- | ------------------------------------------------- | ------------------------------------------------------------------------------------------------------------ |
| Popup blocked | Browser blocking popup windows | Allow popups for app.xplenty.com in your browser settings |
| Invalid redirect URI | Callback URL not registered with provider | Add `https://app.xplenty.com/auth/universaloauth/callback` to your OAuth app's allowed redirect URIs |
| Token exchange failed | Invalid Client ID or Secret | Verify your credentials match those in the provider's developer console |
| Custom Auth: Path not found | Incorrect Response Path | Check the actual API response structure and update the path accordingly |
| Access denied | Insufficient scopes | Add the required scopes to your OAuth configuration |
| 401 with valid token | API requires a non-standard authentication header | Enable "Use custom authentication header" and configure the correct header name and prefix for your provider |
### Testing Your Connection
After creating a connection, you can test it by:
Creating a REST API Source component
Selecting your connection
Configuring a simple GET request to a known endpoint (e.g., user profile endpoint)
Checking if the response returns valid data
## Supported Providers
Universal OAuth works with any OAuth 2.0 compliant provider. Here are some commonly used services:
* Google (Analytics, Sheets, Drive)
* GitHub
* GitLab
* Slack
* Salesforce
* HubSpot
* Shopify
* Stripe
* Dropbox
* Box
* Microsoft (Azure, Office 365)
* Zoom
* Twitch
* Spotify
* QuickBooks
* Zendesk
* And many more...
For providers not listed, you can configure Universal OAuth manually using the provider's OAuth documentation.
## Security Best Practices
* **Keep secrets confidential** - Never share your Client Secret or access tokens
* **Use minimal scopes** - Only request the permissions your integration actually needs
* **Regularly review connections** - Remove unused connections to minimize security exposure
* **Monitor for unauthorized access** - Check your provider's security logs for suspicious activity