> ## Documentation Index
> Fetch the complete documentation index at: https://www.integrate.io/docs/llms.txt
> Use this file to discover all available pages before exploring further.
# ETL: Connecting to Gmail
> Authorize Integrate.io ETL to access your Gmail account using OAuth and extract email metadata and contents into your data pipelines for analysis.
[Integrate.io](http://integrate.io/) ETL can read CSV file attachments from your Gmail inbox and ingest them into your ETL pipelines. This article details how to set up the Gmail connection in [Integrate.io](http://integrate.io/) ETL.
## A) Set Up the Gmail (Gmail) Service Account Connection:
**This connector uses a Google Service Account with domain-wide delegation for authentication.**
## Step 1: Create a GCP Project
Access your [Google Cloud Console](https://console.cloud.google.com/).
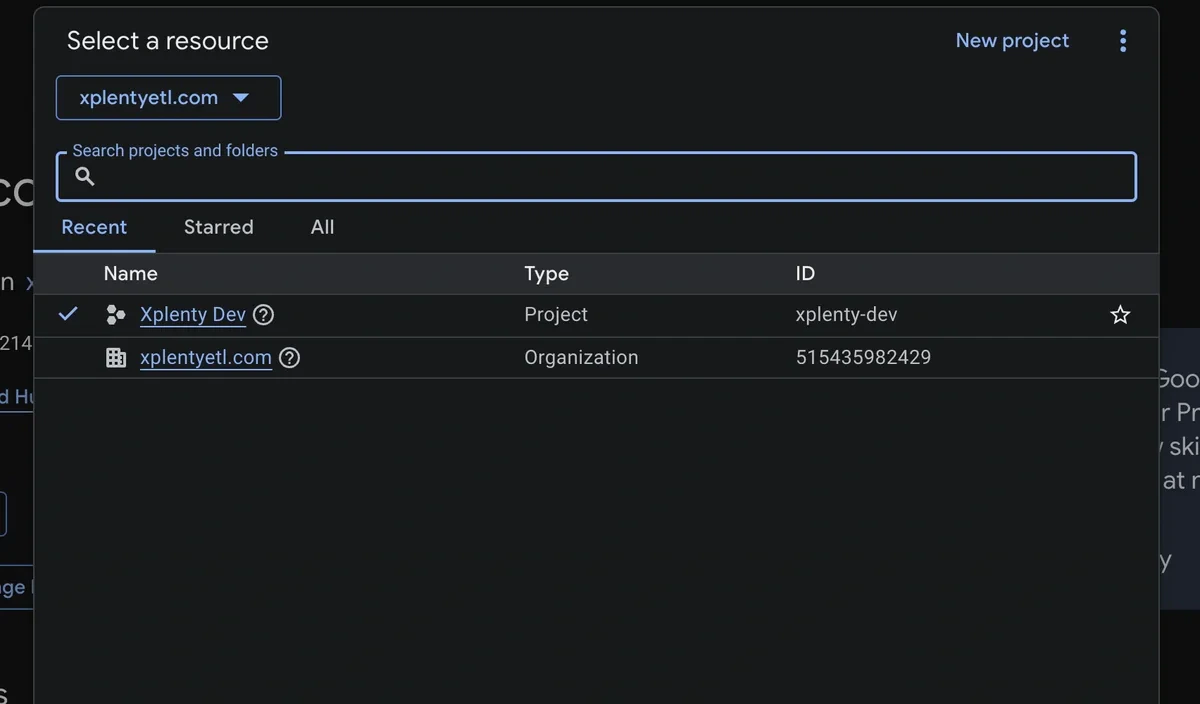
Click the project dropdown at the top of the page and select existing project or create a **New Project**.
If a new project is created, enter a project name (e.g. `my-gmail-connector`) and click **Create**. Make sure the newly created project is selected in the project dropdown before proceeding.
 ## Step 2: Enable the Gmail API
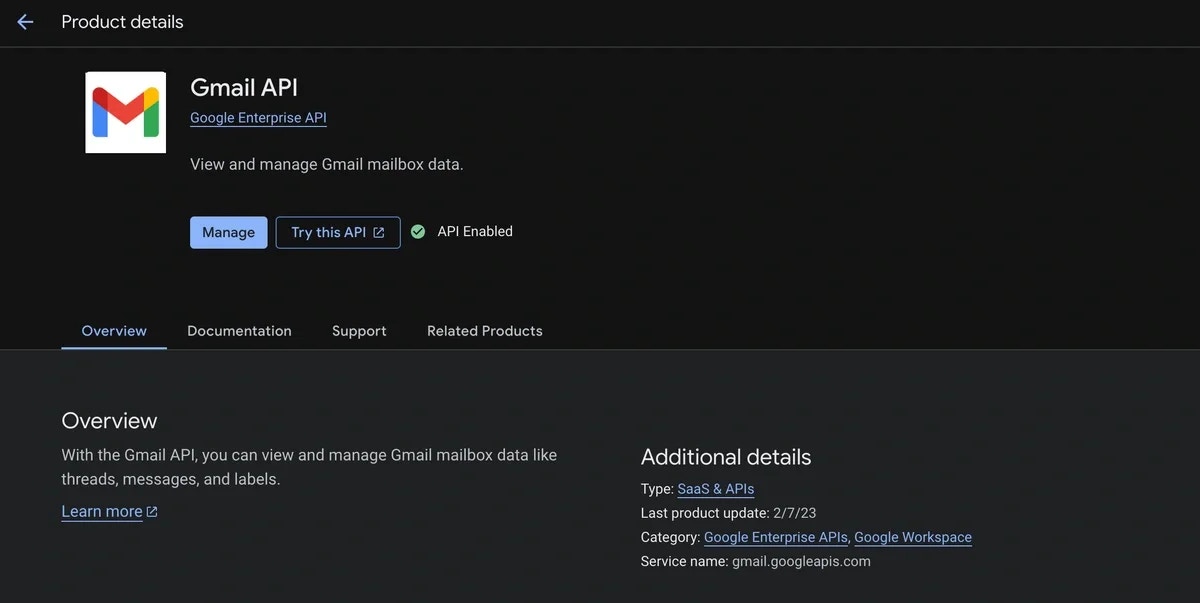
In the left sidebar, navigate to **APIs & Services → Library**.
Search for **Gmail API**.
Click the Gmail API result and click **Enable**.
## Step 2: Enable the Gmail API
In the left sidebar, navigate to **APIs & Services → Library**.
Search for **Gmail API**.
Click the Gmail API result and click **Enable**.
 ## Step 3: Create a Service Account
In the left sidebar, navigate to **IAM & Admin → Service Accounts**.
## Step 3: Create a Service Account
In the left sidebar, navigate to **IAM & Admin → Service Accounts**.
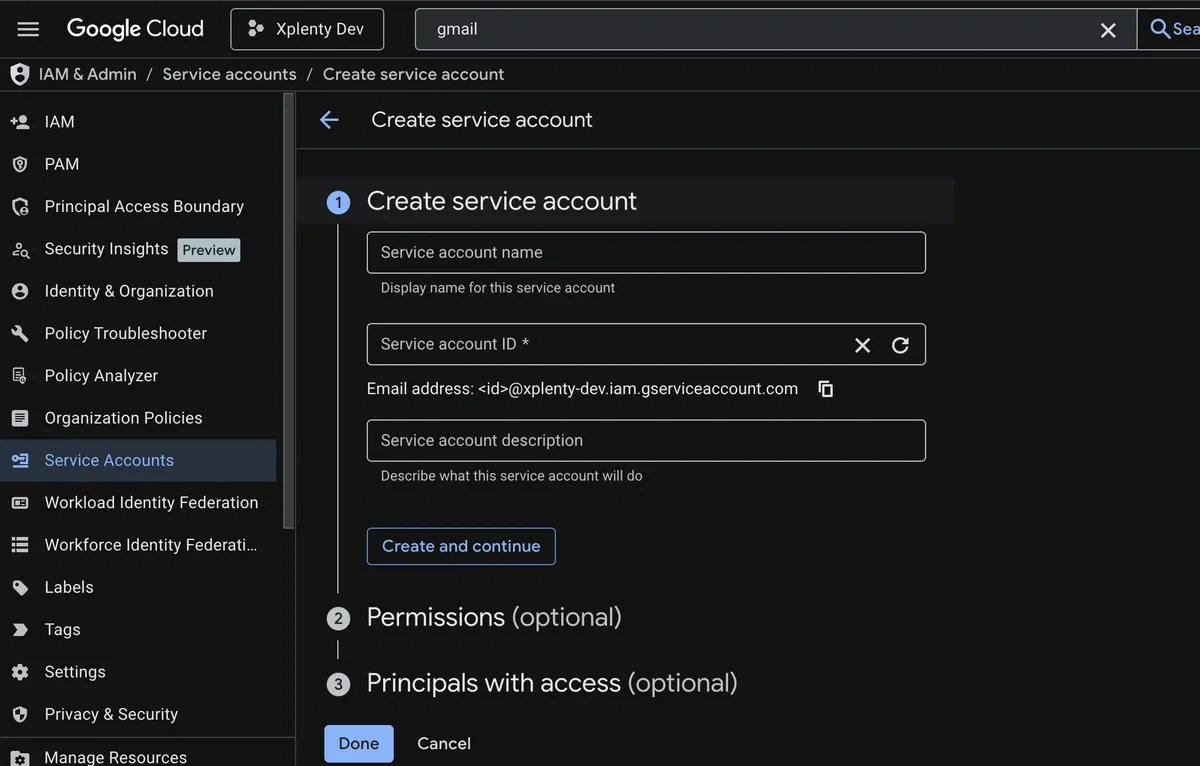 Click **+ Create Service Account**.
Fill in the service account details:
* **Name**: e.g. `gmail-connector-reader`
* **Description**: e.g. `Service account for Integrate.io Gmail CSV connector`
Click **Create and Continue**.
Skip the optional role grant steps. Gmail access is controlled via domain-wide delegation, not IAM roles.
Click **Done**.
## Step 4: Enable Domain-Wide Delegation
From the **Service Accounts** list, click the service account you just created.
Go to the **Details** tab.
Scroll down to **Advanced settings** and find the **Domain-wide Delegation** section.
Click **Enable Google Workspace Domain-wide Delegation**.
Enter a product name (e.g. `Integrate.io Gmail Connector`) and click **Save**.
Note the **Client ID** displayed. This is the long numeric ID (e.g. `118304762983475829341`) you will need in Step 6.
**Finding the Client ID**: The Client ID is also available inside the JSON key file downloaded in Step 5, under the `client_id` field.
## Step 5: Download the JSON Key
Still on the service account page, go to the **Keys** tab.
Click **Add Key → Create new key**.
Select **JSON** and click **Create**.
A `.json` key file will be automatically downloaded to your machine. Keep this file secure; it contains the private key used to authenticate the service account.
The JSON file will contain a structure similar to:
```
{
"type": "service_account",
"project_id": "your-project",
"private_key_id": "...",
"private_key": "-----BEGIN RSA PRIVATE KEY-----\\n...",
"client_email": "gmail-connector-reader@your-project.iam.gserviceaccount.com",
"client_id": "118304762983475829341",
...
}
```
This is the file you will upload to [Integrate.io](http://integrate.io/) in Step 7.
## Step 6: Authorize the Scope in Google Workspace Admin
This step requires **Google Workspace Admin** access to the organization whose Gmail you want to connect. If you are setting this up for a client, this step must be completed by their Workspace administrator.
Go to [admin.google.com](http://admin.google.com/) and sign in as a Workspace admin.
Navigate to **Security → Access and data control → API controls**.
Click **Manage Domain-Wide Delegation**.
Click **Add new**.
Enter the following:
* **Client ID**: The numeric Client ID from Step 4 (e.g. `118304762983475829341`)
* **OAuth scopes**: `https://www.googleapis.com/auth/gmail.readonly`
Click **Authorize**.
Click **+ Create Service Account**.
Fill in the service account details:
* **Name**: e.g. `gmail-connector-reader`
* **Description**: e.g. `Service account for Integrate.io Gmail CSV connector`
Click **Create and Continue**.
Skip the optional role grant steps. Gmail access is controlled via domain-wide delegation, not IAM roles.
Click **Done**.
## Step 4: Enable Domain-Wide Delegation
From the **Service Accounts** list, click the service account you just created.
Go to the **Details** tab.
Scroll down to **Advanced settings** and find the **Domain-wide Delegation** section.
Click **Enable Google Workspace Domain-wide Delegation**.
Enter a product name (e.g. `Integrate.io Gmail Connector`) and click **Save**.
Note the **Client ID** displayed. This is the long numeric ID (e.g. `118304762983475829341`) you will need in Step 6.
**Finding the Client ID**: The Client ID is also available inside the JSON key file downloaded in Step 5, under the `client_id` field.
## Step 5: Download the JSON Key
Still on the service account page, go to the **Keys** tab.
Click **Add Key → Create new key**.
Select **JSON** and click **Create**.
A `.json` key file will be automatically downloaded to your machine. Keep this file secure; it contains the private key used to authenticate the service account.
The JSON file will contain a structure similar to:
```
{
"type": "service_account",
"project_id": "your-project",
"private_key_id": "...",
"private_key": "-----BEGIN RSA PRIVATE KEY-----\\n...",
"client_email": "gmail-connector-reader@your-project.iam.gserviceaccount.com",
"client_id": "118304762983475829341",
...
}
```
This is the file you will upload to [Integrate.io](http://integrate.io/) in Step 7.
## Step 6: Authorize the Scope in Google Workspace Admin
This step requires **Google Workspace Admin** access to the organization whose Gmail you want to connect. If you are setting this up for a client, this step must be completed by their Workspace administrator.
Go to [admin.google.com](http://admin.google.com/) and sign in as a Workspace admin.
Navigate to **Security → Access and data control → API controls**.
Click **Manage Domain-Wide Delegation**.
Click **Add new**.
Enter the following:
* **Client ID**: The numeric Client ID from Step 4 (e.g. `118304762983475829341`)
* **OAuth scopes**: `https://www.googleapis.com/auth/gmail.readonly`
Click **Authorize**.
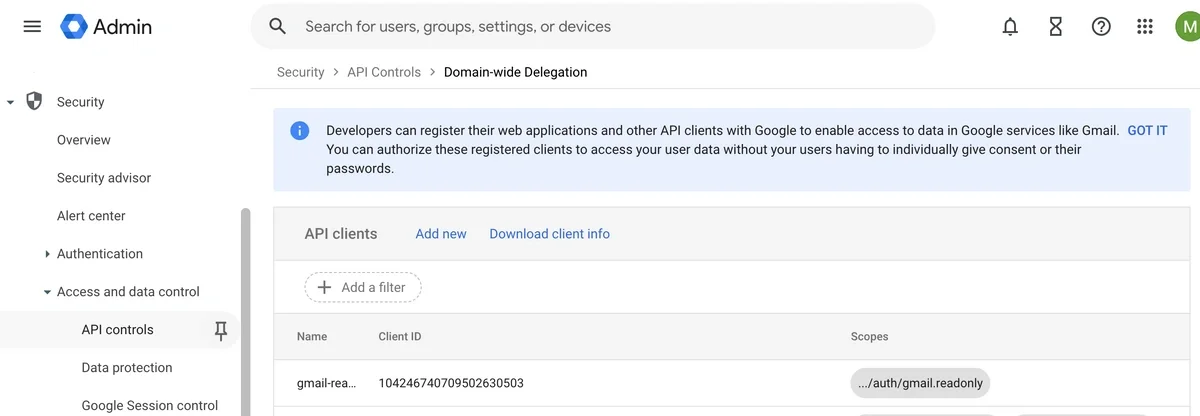 This authorizes the service account to impersonate users in the domain and access their Gmail data on behalf of [Integrate.io](http://integrate.io/).
## Step 7: Create Gmail Connection on Integrate.io ETL
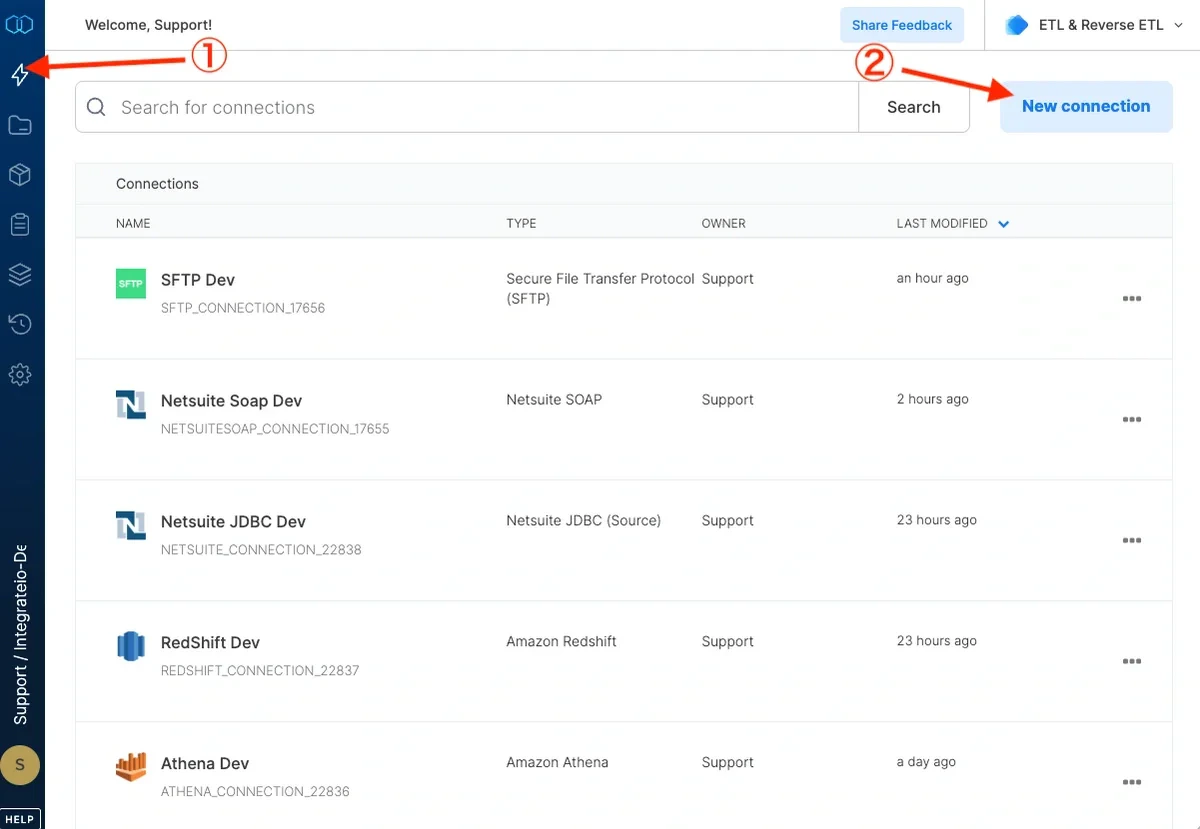
Navigate to the **Connections** tab and click **Gmail.**
This authorizes the service account to impersonate users in the domain and access their Gmail data on behalf of [Integrate.io](http://integrate.io/).
## Step 7: Create Gmail Connection on Integrate.io ETL
Navigate to the **Connections** tab and click **Gmail.**
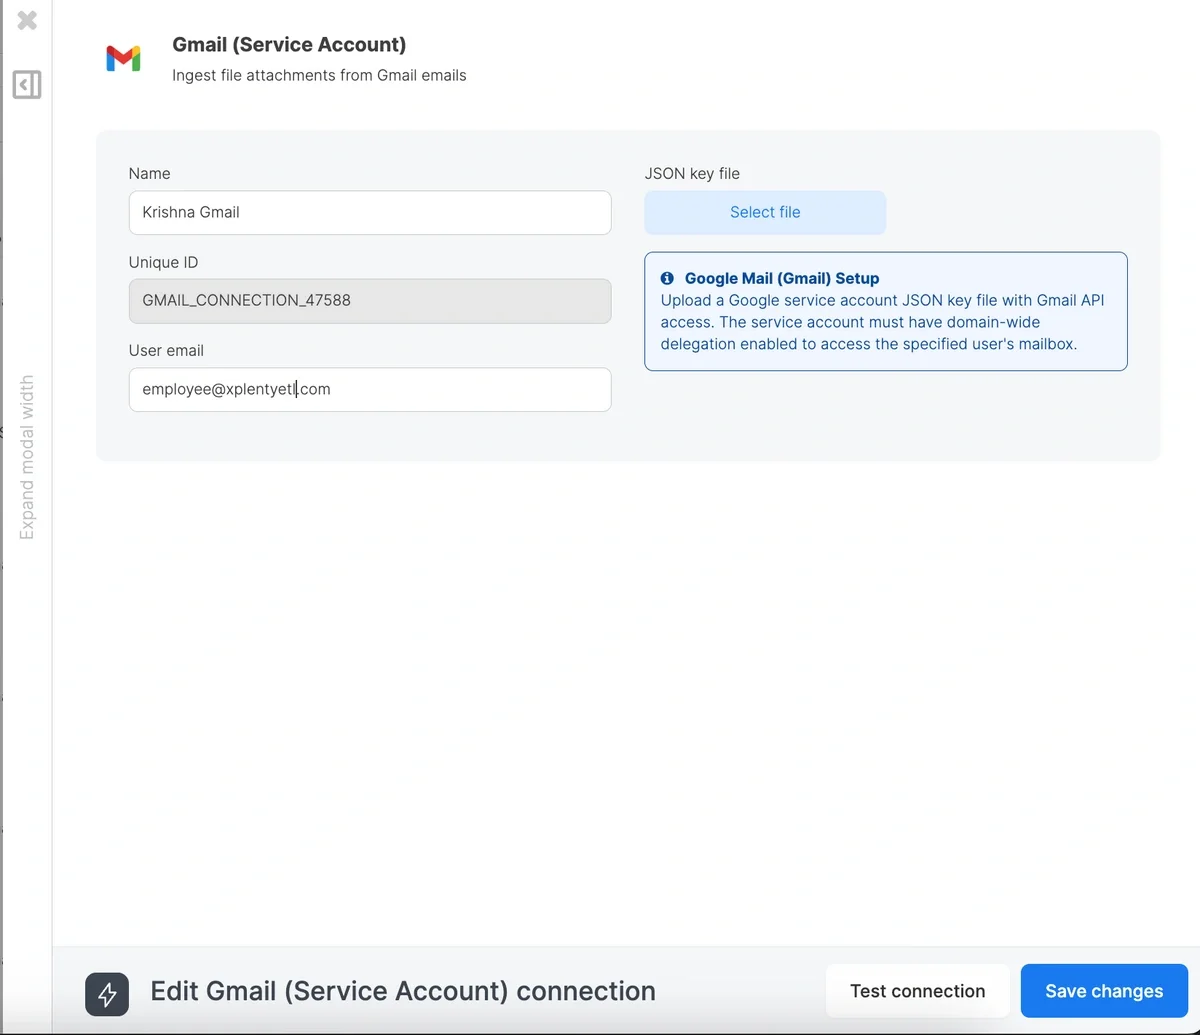
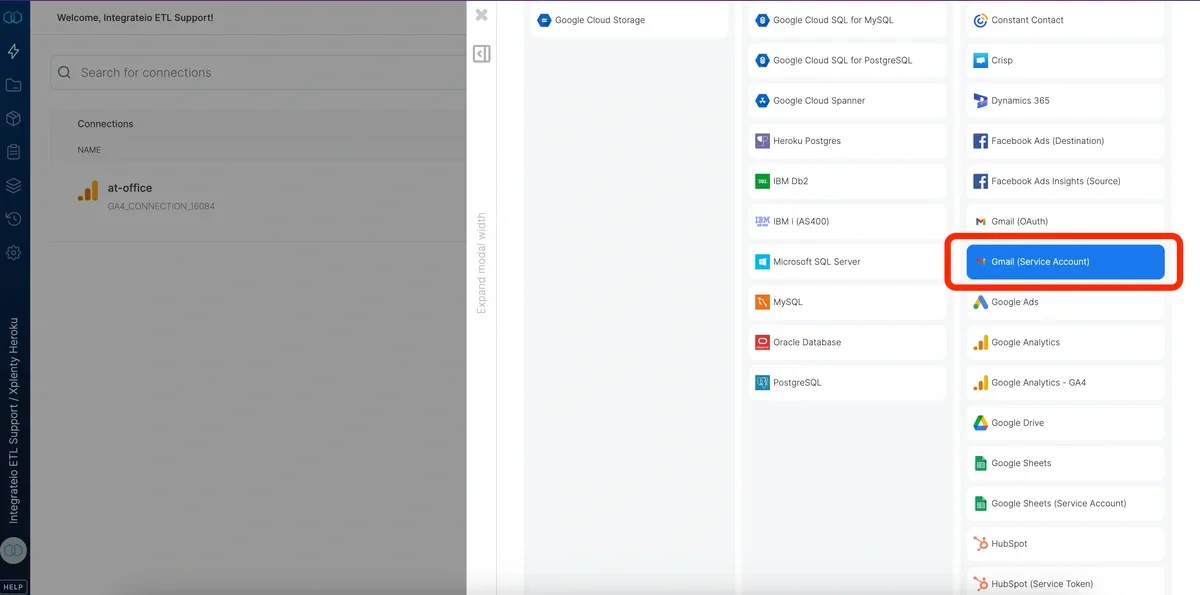 Fill up the Connection Name
Upload the JSON key you generated from Step 1.
Click **Test Connection** and **Create Connection**
Fill up the Connection Name
Upload the JSON key you generated from Step 1.
Click **Test Connection** and **Create Connection**
 ## B) Gmail OAuth Connection:
As an alternative to Service Account authentication, Integrate.io ETL also supports connecting to Gmail via OAuth 2.0. This is the recommended method when you don't have Google Workspace Admin access or want to connect a personal Gmail account.
## Steps: Create Gmail (OAuth) Connection on Integrate.io ETL
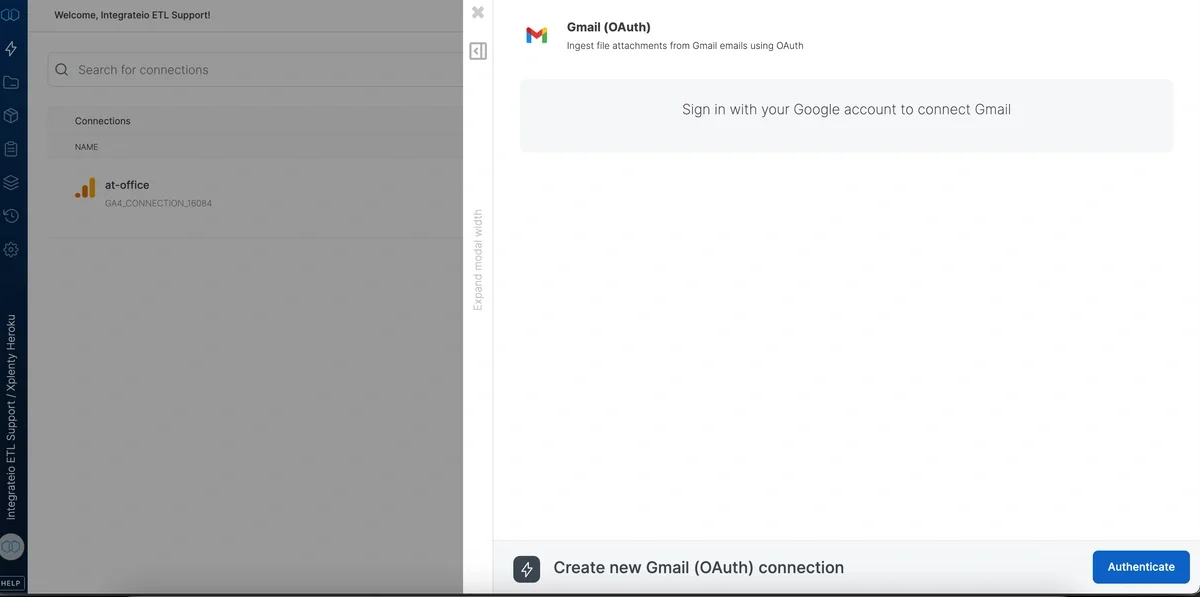
Navigate to the Connections tab and click + New connection.
Search for and select **Gmail (OAuth)**.
Click Authenticate.
A Google sign-in popup will appear. Select the Google account you want to connect.
Review the requested permissions:
Once authentication completes, fill in the Connection Name (e.g. My Gmail OAuth).
Click Test Connection to verify, then click Create Connection.
## B) Gmail OAuth Connection:
As an alternative to Service Account authentication, Integrate.io ETL also supports connecting to Gmail via OAuth 2.0. This is the recommended method when you don't have Google Workspace Admin access or want to connect a personal Gmail account.
## Steps: Create Gmail (OAuth) Connection on Integrate.io ETL
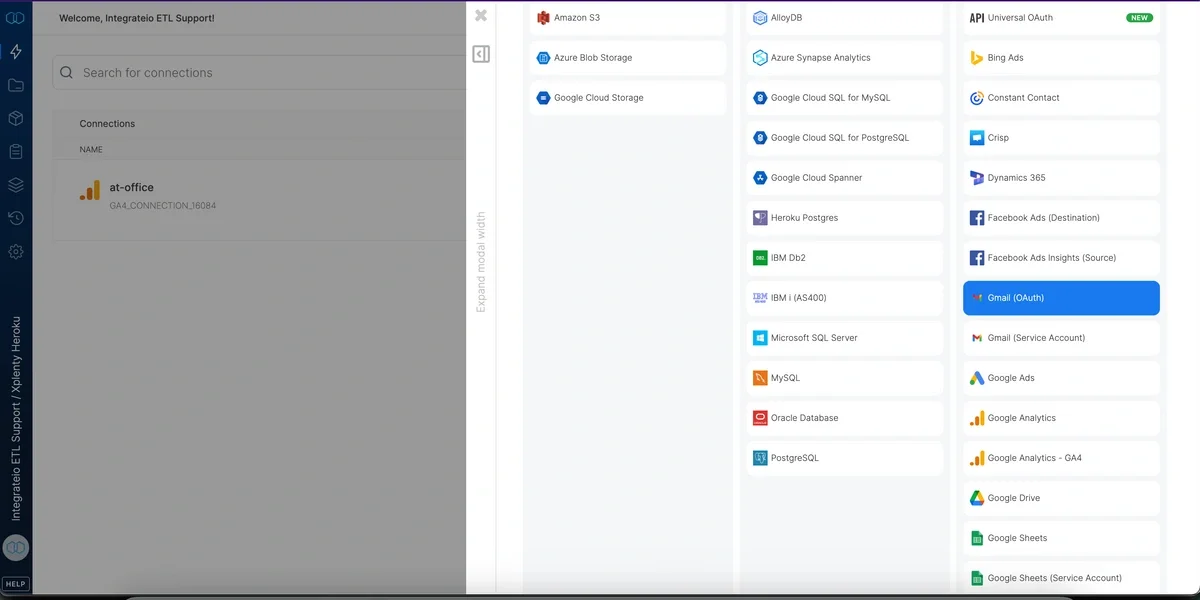
Navigate to the Connections tab and click + New connection.
Search for and select **Gmail (OAuth)**.
Click Authenticate.
A Google sign-in popup will appear. Select the Google account you want to connect.
Review the requested permissions:
Once authentication completes, fill in the Connection Name (e.g. My Gmail OAuth).
Click Test Connection to verify, then click Create Connection.
 ## Token Refresh:
Once created, the connection is automatically maintained:
* Access tokens are refreshed every 30 minutes in the background
* If a token expires during a job run, it is automatically renewed using the stored refresh token
* Use Test Connection on the connection detail page to manually verify the token is still valid
## Using the Connection in Dataflows:
The Gmail OAuth connection works with the same Gmail source component as the Service Account version. In the package designer
Add a Gmail (Gmail) source component to your dataflow
In the connection dropdown, select your Gmail OAuth connection (both Service Account and OAuth connections appear in the same dropdown)
Configure the Gmail search query, filename pattern, and CSV settings as usual
## Revoking Access
To revoke Integrate.io's access to your Gmail:
Visit Google Account Permissions
Find Integrate.io in the list and click Remove Access
Alternatively, delete the connection from Integrate.io's Connections page -- this also invalidates the refresh token.
## Token Refresh:
Once created, the connection is automatically maintained:
* Access tokens are refreshed every 30 minutes in the background
* If a token expires during a job run, it is automatically renewed using the stored refresh token
* Use Test Connection on the connection detail page to manually verify the token is still valid
## Using the Connection in Dataflows:
The Gmail OAuth connection works with the same Gmail source component as the Service Account version. In the package designer
Add a Gmail (Gmail) source component to your dataflow
In the connection dropdown, select your Gmail OAuth connection (both Service Account and OAuth connections appear in the same dropdown)
Configure the Gmail search query, filename pattern, and CSV settings as usual
## Revoking Access
To revoke Integrate.io's access to your Gmail:
Visit Google Account Permissions
Find Integrate.io in the list and click Remove Access
Alternatively, delete the connection from Integrate.io's Connections page -- this also invalidates the refresh token.