> ## Documentation Index
> Fetch the complete documentation index at: https://www.integrate.io/docs/llms.txt
> Use this file to discover all available pages before exploring further.
# ETL: Connecting Through a Firewall
> Configure firewall rules to allow Integrate.io ETL access to your database server. Whitelist IP addresses or set up SSH tunnel access.
Integrate.io ETL can access your database or file server, allowing you to read and write data easily, regardless of their whereabouts - on the cloud, hosted or on premise. There are three ways to do so:
1. [**Directly**](#direct-connection) by whitelisting Integrate.io ETL's IP
2. Through an [**SSH tunnel**](#ssh-tunnel)
3. Through a [**Reverse SSH tunnel**](#reverse-ssh-tunnel)
### Direct Connection
Provide Integrate.io ETL access to your server from Integrate.io ETL's network:
* Allow access to your server's host and port from [Integrate.io ETL's IP addresses](/docs/etl/integrateio-etls-ip-list/).
* Create a user and grant it minimum permissions required for Integrate.io ETL to read or write data from the server.
* See these articles for details of setting up secure access for [Amazon Relational Database Service](/docs/etl/allowing-integrateio-direct-access-to-relational-databases-on-amazon-web-services-rds/) (RDS) and for [Amazon Redshift](/docs/etl/allowing-integrateio-etl-access-to-my-redshift-cluster/).
### SSH Tunnel
SSH Tunnel lets you connect Integrate.io ETL to your database or file server through a bastion host or a tunnel server. This connection type is used if you are unable to add an inbound firewall rule to your data warehouse, or your data warehouse IP address is on an internal network (no outside network access).
#### Creating Integrate.io ETL Connection
SSH Tunnel connection is supported on database connections and SFTP.
On the dashboard **Connections**, click **New Connection** and choose a connection to use.
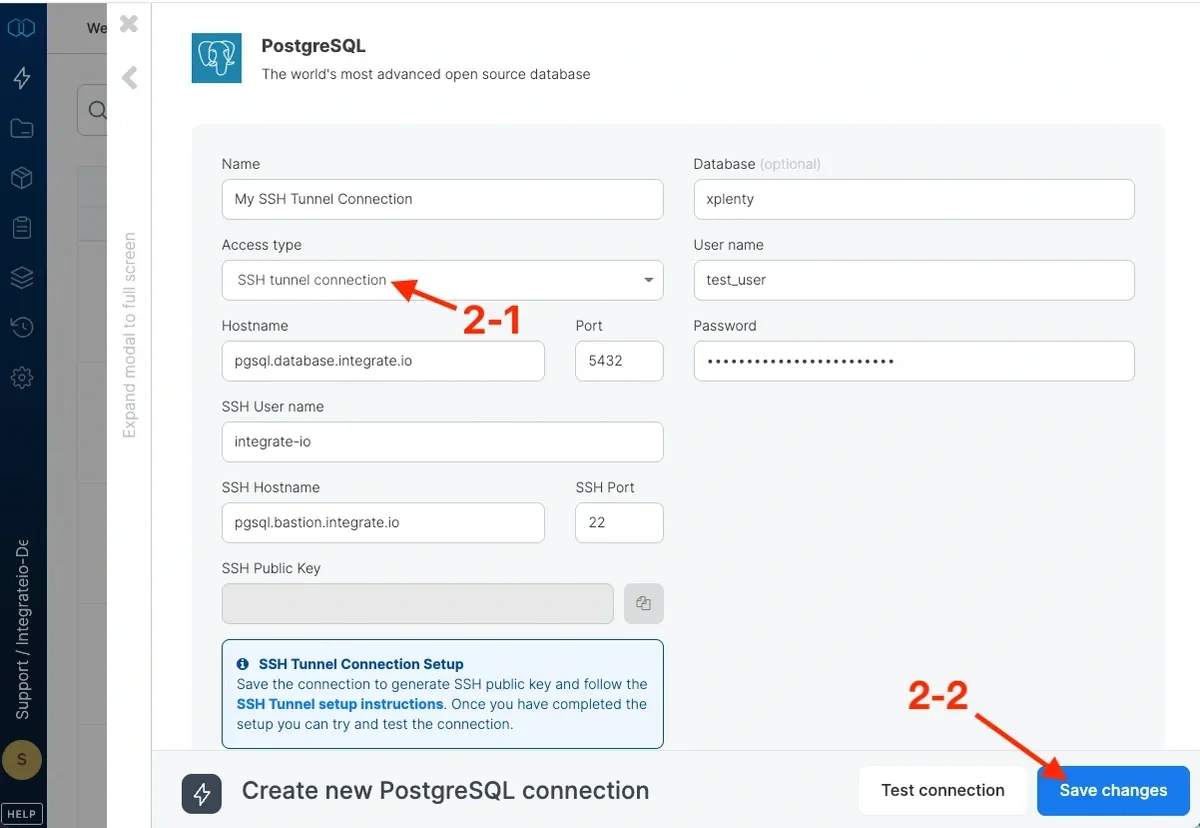
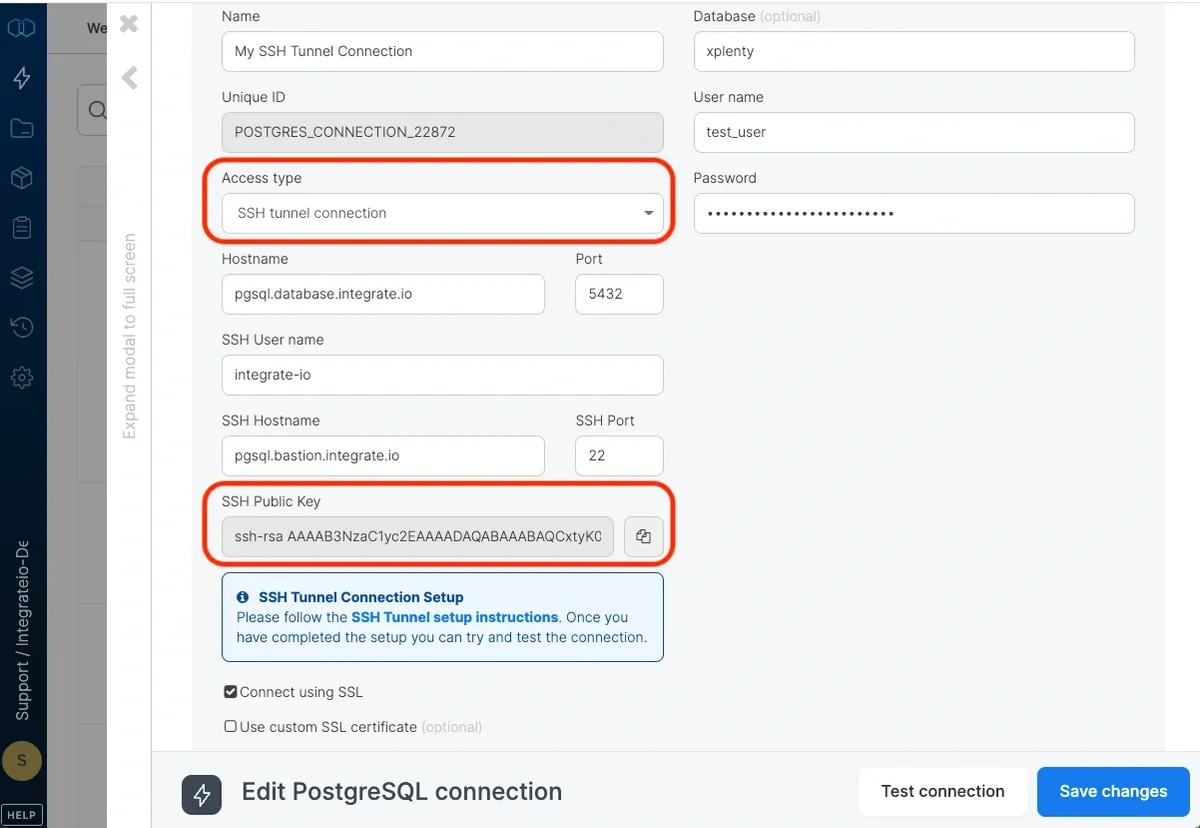
Choose **SSH tunnel connection** as Access type and supply your connection and tunnel host details. Then Click **Create Connection** to generate a unique SSH public key for your connection.
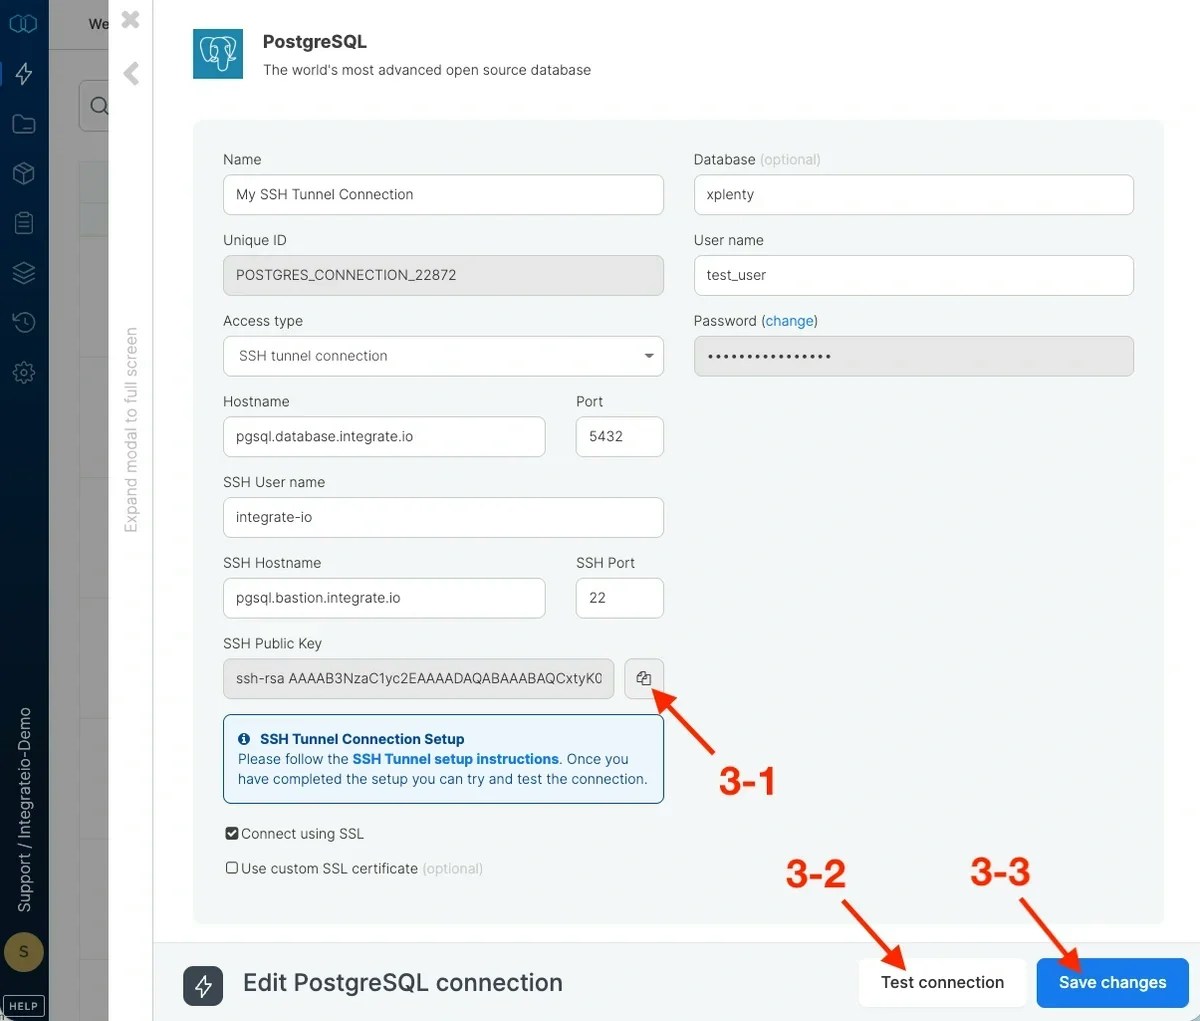
 Copy the SSH Public key by clicking the copy button and prepare your tunnel host for access. Once your tunnel host is prepared, click **Test connection** and **Create connection** once the connection is successful.
 #### Preparing the Tunnel Host
You will need to prepare your host (either bastion host or tunnel server) by creating an integrate.io ETL user and adding the connection's public key to the **integrate-io \~/.ssh/authorized\_keys** file. Here's how:
Create group integrate-io:
```bash theme={null}
sudo groupadd integrate-io
```
Create user integrate-io and its home directory:
```bash theme={null}
sudo useradd -m -g integrate-io integrate-io
```
Switch to the integrate-io user:
```bash theme={null}
sudo su - integrate-io
```
Create the .ssh directory and change permission:
```bash theme={null}
mkdir ~/.ssh && chmod 700 ~/.ssh
```
Create the authorized\_keys file and change permission:
```bash theme={null}
touch ~/.ssh/authorized_keys && chmod 600 ~/.ssh/authorized_keys
```
Using your favorite text editor, add your connection's public key to the **authorized\_keys**.
#### Preparing the Tunnel Host
You will need to prepare your host (either bastion host or tunnel server) by creating an integrate.io ETL user and adding the connection's public key to the **integrate-io \~/.ssh/authorized\_keys** file. Here's how:
Create group integrate-io:
```bash theme={null}
sudo groupadd integrate-io
```
Create user integrate-io and its home directory:
```bash theme={null}
sudo useradd -m -g integrate-io integrate-io
```
Switch to the integrate-io user:
```bash theme={null}
sudo su - integrate-io
```
Create the .ssh directory and change permission:
```bash theme={null}
mkdir ~/.ssh && chmod 700 ~/.ssh
```
Create the authorized\_keys file and change permission:
```bash theme={null}
touch ~/.ssh/authorized_keys && chmod 600 ~/.ssh/authorized_keys
```
Using your favorite text editor, add your connection's public key to the **authorized\_keys**.
 Allow access to your server's host and port from [Integrate.io ETL's IP addresses](/docs/etl/integrateio-etls-ip-list/).
**IMPORTANT:**
If you use OpenSSH with updated versions, the use of RSA keys are [disabled by default](https://docs.aws.amazon.com/linux/al2023/ug/ssh-host-keys-disabled.html). To enable the use of RSA keys, you must modify your `/etc/ssh/sshd_config` and add the following lines:
```bash theme={null}
PubkeyAcceptedAlgorithms=+ssh-rsa,ssh-rsa-cert-v01@openssh.com
HostKeyAlgorithms=+ssh-rsa,ssh-rsa-cert-v01@openssh.com
```
AWS-hosted SSH servers and RedHat version 9+ servers may need this command if they continue to get an error:
```bash theme={null}
sudo update-crypto-policies --set LEGACY
sudo ssh-keygen -A
```
### Reverse SSH Tunnel
You can also connect to Integrate.io ETL through reverse SSH Tunnel if you are unable to provide direct port access to your instance. We recommend that you use **autossh** which starts an instance of SSH client and monitors it, restarting it as necessary should it die or stop passing traffic. In order to allow Integrate.io ETL to connect to your server through an SSH tunnel, you have to complete the following steps:
#### Prerequisite
[Add a public key in your user settings](/docs/etl/managing-your-ssh-keys/). The public key will be propagated to all Integrate.io ETL servers in up to 30 minutes.
#### Creating Integrate.io ETL Connection
On the dashboard **Connections**, click **New Connection** and choose a connection to use.
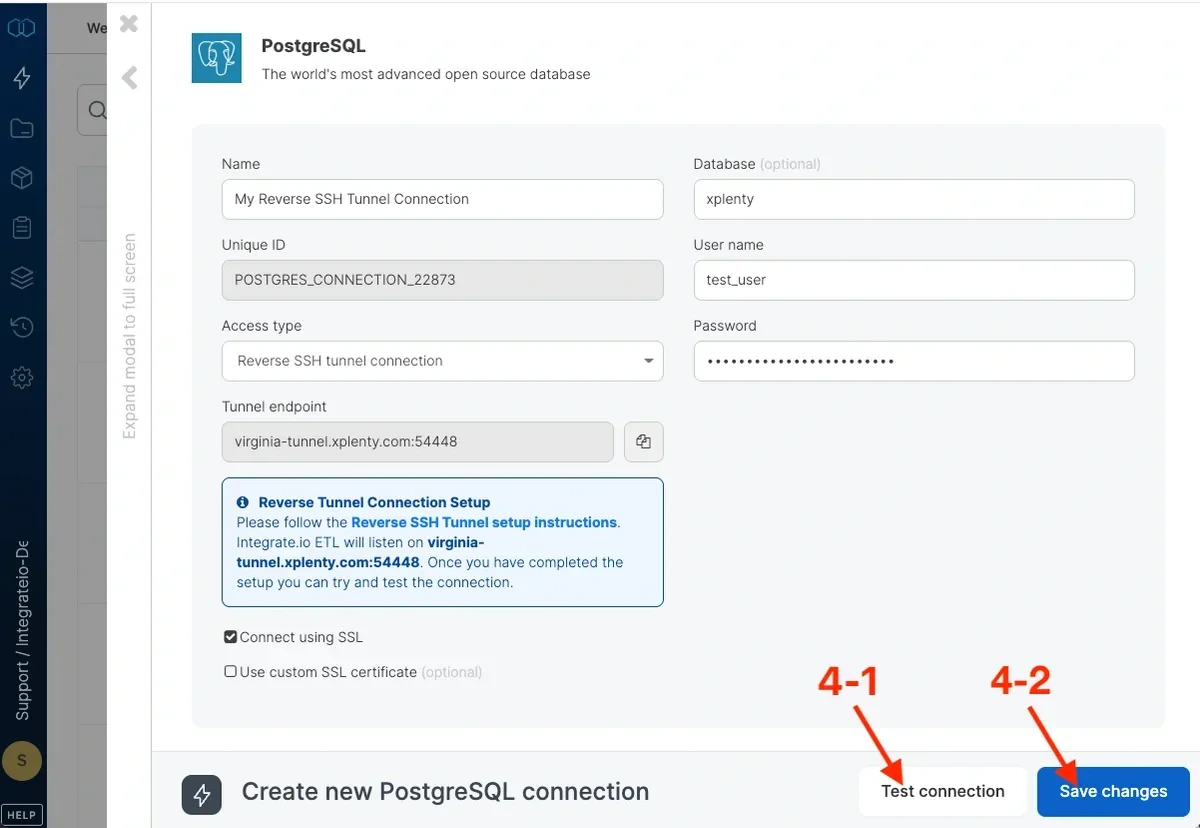
Choose **Reverse SSH tunnel connection** as Access type and supply your connection's username and port.
Click **Create connection.**
Allow access to your server's host and port from [Integrate.io ETL's IP addresses](/docs/etl/integrateio-etls-ip-list/).
**IMPORTANT:**
If you use OpenSSH with updated versions, the use of RSA keys are [disabled by default](https://docs.aws.amazon.com/linux/al2023/ug/ssh-host-keys-disabled.html). To enable the use of RSA keys, you must modify your `/etc/ssh/sshd_config` and add the following lines:
```bash theme={null}
PubkeyAcceptedAlgorithms=+ssh-rsa,ssh-rsa-cert-v01@openssh.com
HostKeyAlgorithms=+ssh-rsa,ssh-rsa-cert-v01@openssh.com
```
AWS-hosted SSH servers and RedHat version 9+ servers may need this command if they continue to get an error:
```bash theme={null}
sudo update-crypto-policies --set LEGACY
sudo ssh-keygen -A
```
### Reverse SSH Tunnel
You can also connect to Integrate.io ETL through reverse SSH Tunnel if you are unable to provide direct port access to your instance. We recommend that you use **autossh** which starts an instance of SSH client and monitors it, restarting it as necessary should it die or stop passing traffic. In order to allow Integrate.io ETL to connect to your server through an SSH tunnel, you have to complete the following steps:
#### Prerequisite
[Add a public key in your user settings](/docs/etl/managing-your-ssh-keys/). The public key will be propagated to all Integrate.io ETL servers in up to 30 minutes.
#### Creating Integrate.io ETL Connection
On the dashboard **Connections**, click **New Connection** and choose a connection to use.
Choose **Reverse SSH tunnel connection** as Access type and supply your connection's username and port.
Click **Create connection.**
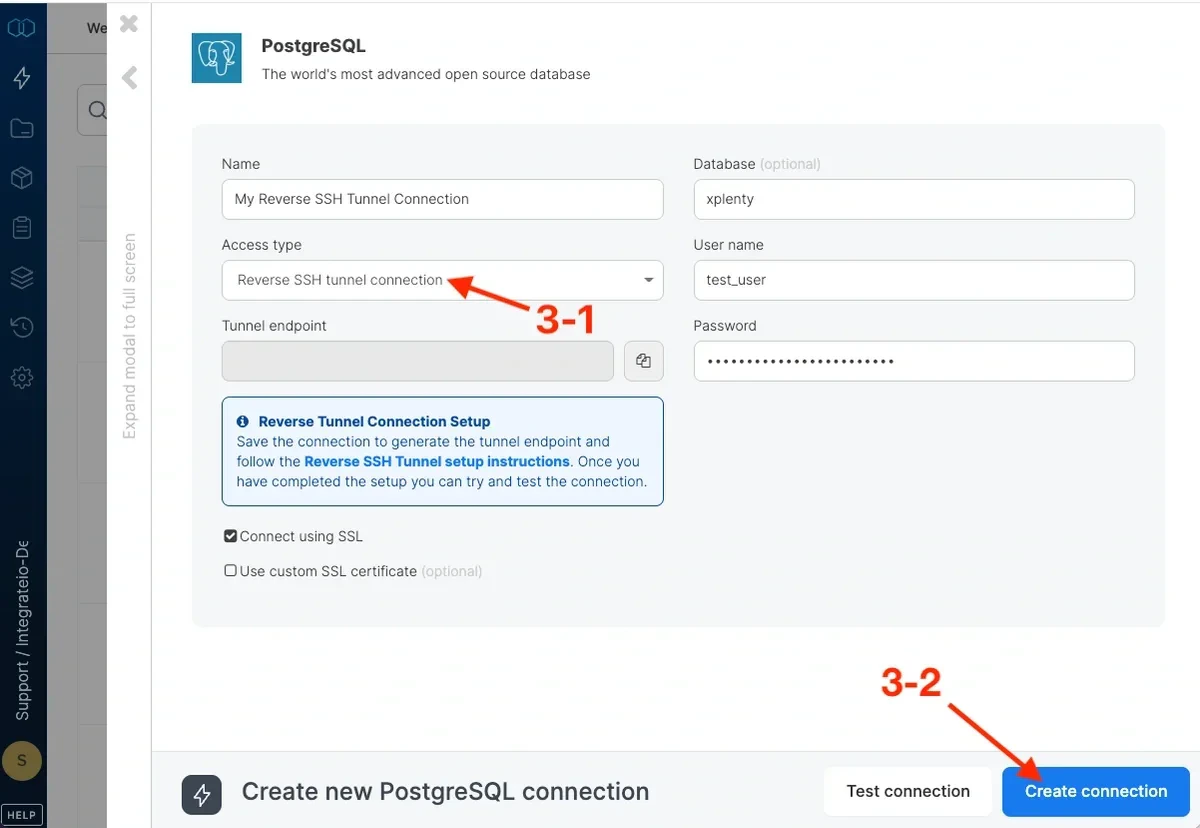 It will fail because we haven't created the tunnel yet, but the light blue box will appear and you will be able to retrieve Integrate.io ETL's tunnel server (**Integrate.io ETL server** endpoint that includes everything before the colon) and **connection port** (the number after the colon).
 #### Establishing Reverse SSH Connection
If you're running Windows, see [here](/docs/etl/set-up-a-reverse-ssh-tunnel-from-windows/) about opening an SSH tunnel. If you're on Linux, Install **autossh** on either the target server or a server that has access to it. On Ubuntu/Debian for example, you can install using apt-get:
```bash theme={null}
sudo apt-get install autossh
```
For other Linux distributions, follow the instructions [here](https://www.xmodulo.com/install-autossh-linux.html).
Create directories to keep logs and pid files for the connection. For example:
```bash theme={null}
mkdir -p ~/MyDB/logs ~/MyDB/run
```
Add Integrate.io ETL's server public key to a **known\_hosts** file. For example:
```bash theme={null}
ssh-keyscan -p 50683 >> ~/MyDB/known_hosts
```
You can test the tunnel using SSH. Use the following syntax and insert your information at the placeholders:
```bash theme={null}
ssh -NR :: sshtunnel@ -g -i -p 50683 -o "ExitOnForwardFailure yes" -o ServerAliveInterval=10 -o ServerAliveCountMax=1 -N -v
```
Run **autossh**. Use the following syntax and insert your information at the placeholders:
```bash theme={null}
AUTOSSH_LOGFILE=~/MyDB/logs/tunnel.log AUTOSSH_PIDFILE=~/MyDB/run/autossh.pid autossh -M 0 -f -N -R :: sshtunnel@ -g -i -p 50683 -o "ExitOnForwardFailure yes" -o ServerAliveInterval=10 -o ServerAliveCountMax=1 -o UserKnownHostsFile=
```
For example, if you open the tunnel to a database that listens to port **5432** on host **mydbserver**, and the connection's assigned host and port at Integrate.io ETL are tunnel.integrate.io and **12345**. Note that the SSH port in Integrate.io ETL's servers is **50683**:
```bash theme={null}
AUTOSSH_LOGFILE=~/MyDB/logs/tunnel.log AUTOSSH_PIDFILE=~/MyDB/run/autossh.pid autossh -M 0 -f -N -R 12345:mydbserver:5432 sshtunnel@tunnel.integrate.io -g -i ~/.ssh/id_rsa -p 50683 -o "ExitOnForwardFailure yes" -o ServerAliveInterval=10 -o ServerAliveCountMax=1 -o UserKnownHostsFile=~/MyDB/known_hosts
```
Add crontab record to run **autossh** automatically to reconnect after reboots. For example:
```bash theme={null}
@reboot AUTOSSH_LOGFILE=~/MyDB/logs/tunnel.log AUTOSSH_PIDFILE=~/MyDB/run/autossh.pid autossh -M 0 -f -N -R 12345:mydbserver:5432 sshtunnel@tunnel.integrate.io -g -i ~/.ssh/id_rsa -p 50683 -o "ExitOnForwardFailure yes" -o ServerAliveInterval=10 -o ServerAliveCountMax=1 -o UserKnownHostsFile=~/MyDB/known_hosts
```
#### Establishing Reverse SSH Connection
If you're running Windows, see [here](/docs/etl/set-up-a-reverse-ssh-tunnel-from-windows/) about opening an SSH tunnel. If you're on Linux, Install **autossh** on either the target server or a server that has access to it. On Ubuntu/Debian for example, you can install using apt-get:
```bash theme={null}
sudo apt-get install autossh
```
For other Linux distributions, follow the instructions [here](https://www.xmodulo.com/install-autossh-linux.html).
Create directories to keep logs and pid files for the connection. For example:
```bash theme={null}
mkdir -p ~/MyDB/logs ~/MyDB/run
```
Add Integrate.io ETL's server public key to a **known\_hosts** file. For example:
```bash theme={null}
ssh-keyscan -p 50683 >> ~/MyDB/known_hosts
```
You can test the tunnel using SSH. Use the following syntax and insert your information at the placeholders:
```bash theme={null}
ssh -NR :: sshtunnel@ -g -i -p 50683 -o "ExitOnForwardFailure yes" -o ServerAliveInterval=10 -o ServerAliveCountMax=1 -N -v
```
Run **autossh**. Use the following syntax and insert your information at the placeholders:
```bash theme={null}
AUTOSSH_LOGFILE=~/MyDB/logs/tunnel.log AUTOSSH_PIDFILE=~/MyDB/run/autossh.pid autossh -M 0 -f -N -R :: sshtunnel@ -g -i -p 50683 -o "ExitOnForwardFailure yes" -o ServerAliveInterval=10 -o ServerAliveCountMax=1 -o UserKnownHostsFile=
```
For example, if you open the tunnel to a database that listens to port **5432** on host **mydbserver**, and the connection's assigned host and port at Integrate.io ETL are tunnel.integrate.io and **12345**. Note that the SSH port in Integrate.io ETL's servers is **50683**:
```bash theme={null}
AUTOSSH_LOGFILE=~/MyDB/logs/tunnel.log AUTOSSH_PIDFILE=~/MyDB/run/autossh.pid autossh -M 0 -f -N -R 12345:mydbserver:5432 sshtunnel@tunnel.integrate.io -g -i ~/.ssh/id_rsa -p 50683 -o "ExitOnForwardFailure yes" -o ServerAliveInterval=10 -o ServerAliveCountMax=1 -o UserKnownHostsFile=~/MyDB/known_hosts
```
Add crontab record to run **autossh** automatically to reconnect after reboots. For example:
```bash theme={null}
@reboot AUTOSSH_LOGFILE=~/MyDB/logs/tunnel.log AUTOSSH_PIDFILE=~/MyDB/run/autossh.pid autossh -M 0 -f -N -R 12345:mydbserver:5432 sshtunnel@tunnel.integrate.io -g -i ~/.ssh/id_rsa -p 50683 -o "ExitOnForwardFailure yes" -o ServerAliveInterval=10 -o ServerAliveCountMax=1 -o UserKnownHostsFile=~/MyDB/known_hosts
```