> ## Documentation Index
> Fetch the complete documentation index at: https://www.integrate.io/docs/llms.txt
> Use this file to discover all available pages before exploring further.
# ETL: Ingesting a Postman API Call
> Convert a working Postman API request into a REST source in Integrate.io ETL: map headers, auth, query parameters, and pagination into the API connector.
Have you ever built a perfectly functional API call in Postman, only to scratch your head when trying to recreating it somewhere else? You're not alone. While integration tools are built to handle data ingestion, their approaches can differ. This guide will bridge that gap, showing you how to seamlessly translate your working Postman calls into robust Integrate.io ETL flows.
This article dives into the nitty-gritty of copying over essential elements like URLs, methods, headers, and data. We'll uncover how to handle certain features in Postman that require slightly different configuration in Integrate.io ETL, ensuring a smooth migration of your API calls. From URL encoding to OAuth 2.0 authorization, we'll equip you with the knowledge to conquer any integration challenge and get your API calls running successfully in Integrate.io.
## Moving Your Postman Calls to Integrate.io ETL
Ready to use your working Postman calls in Integrate.io (IIO)? Let's get started!
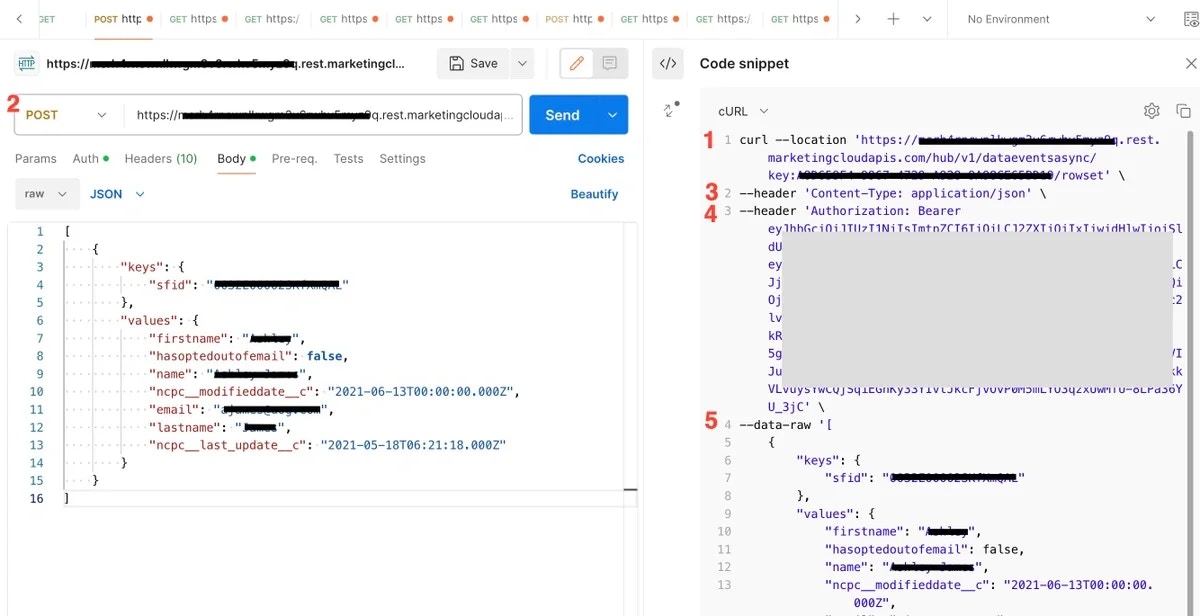
* In Postman, click the code button (`<>`) to see how it sends data. Select "cURL" from the dropdown menu:
 * **Find the URL (#1 in the screenshots)**
* The first line shows the URL, including any automatic encoding. Copy and paste this directly into the URL field of the IIO REST API Source component (don't include the single quotes around this value.)
* **Find the Method - GET, POST, etc. (#2 in the screenshots)**
* Select this from the Method dropdown menu in IIO.
* **Set up Headers (#3 and 4 in the screenshots)**
* Headers provide additional information about your request. Postman will add some automatically. In IIO, you'll need to add them manually.
* The first one is a 'Content-Type' header with a value of 'application/json.' This is telling the API that our call is sending data and the format of the data. Click "Add" under Headers in IIO. Enter "Content-Type" as the key and "application/json" as the value. Don't include the single quotes around this value.
* The second one is an 'Authorization' header with a 'Bearer ``' as the value. Click the + icon on the right side of the 'Content-Type : application/json' header in IIO. Type the key 'Authorization' on the left side and the value 'Bearer ``' on the right side. Don't include the single quotes around this value.
* **Copy the Data (#2 in the screenshots)**
* The cURL code shows the data sent to the API (the `-data` part). Copy and paste this directly into the Body field of the IIO component.
* **Important:** Don't include the single quotes around the data, but keep the double quotes within the JSON data itself.
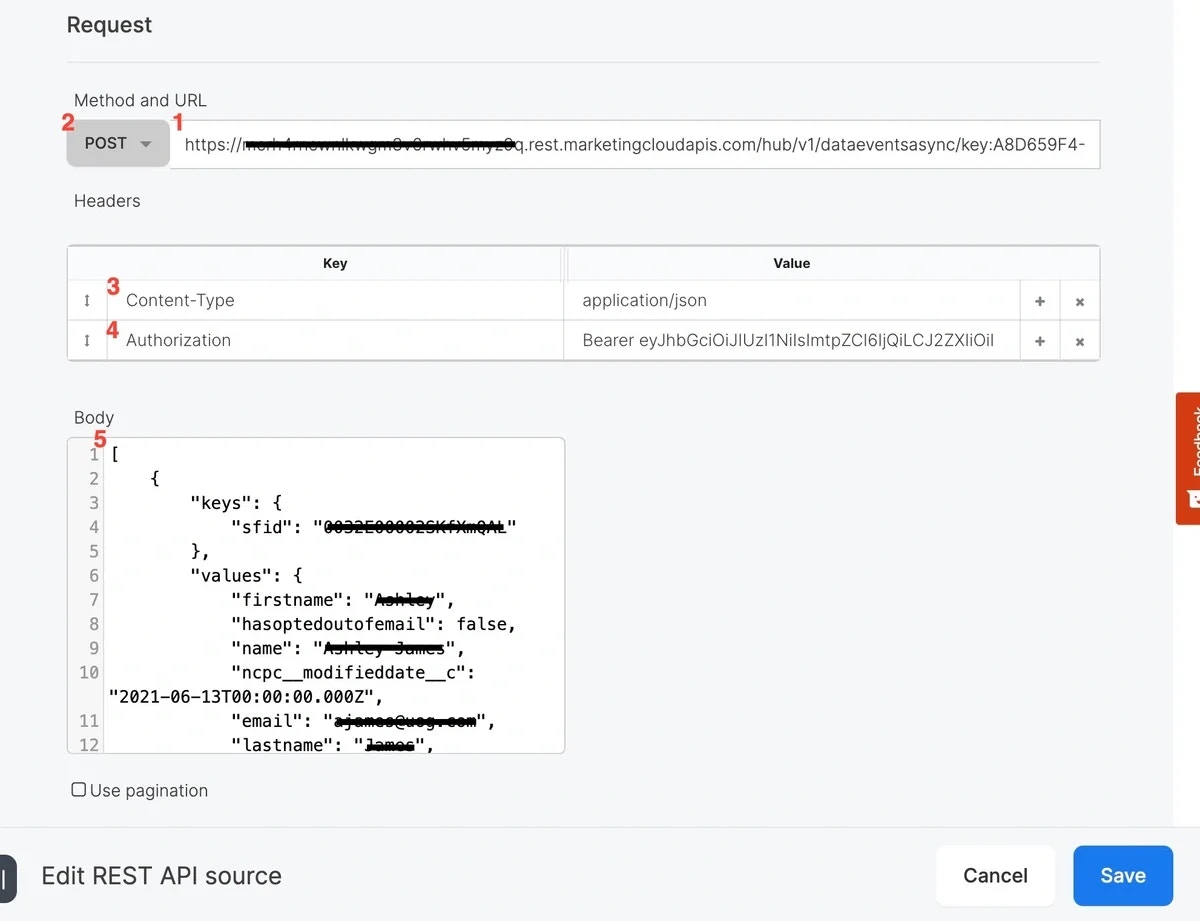
* **In IIO REST API Source Component:**
* **Find the URL (#1 in the screenshots)**
* The first line shows the URL, including any automatic encoding. Copy and paste this directly into the URL field of the IIO REST API Source component (don't include the single quotes around this value.)
* **Find the Method - GET, POST, etc. (#2 in the screenshots)**
* Select this from the Method dropdown menu in IIO.
* **Set up Headers (#3 and 4 in the screenshots)**
* Headers provide additional information about your request. Postman will add some automatically. In IIO, you'll need to add them manually.
* The first one is a 'Content-Type' header with a value of 'application/json.' This is telling the API that our call is sending data and the format of the data. Click "Add" under Headers in IIO. Enter "Content-Type" as the key and "application/json" as the value. Don't include the single quotes around this value.
* The second one is an 'Authorization' header with a 'Bearer ``' as the value. Click the + icon on the right side of the 'Content-Type : application/json' header in IIO. Type the key 'Authorization' on the left side and the value 'Bearer ``' on the right side. Don't include the single quotes around this value.
* **Copy the Data (#2 in the screenshots)**
* The cURL code shows the data sent to the API (the `-data` part). Copy and paste this directly into the Body field of the IIO component.
* **Important:** Don't include the single quotes around the data, but keep the double quotes within the JSON data itself.
* **In IIO REST API Source Component:**
 ## Things to Watch Out For
### Missing Headers
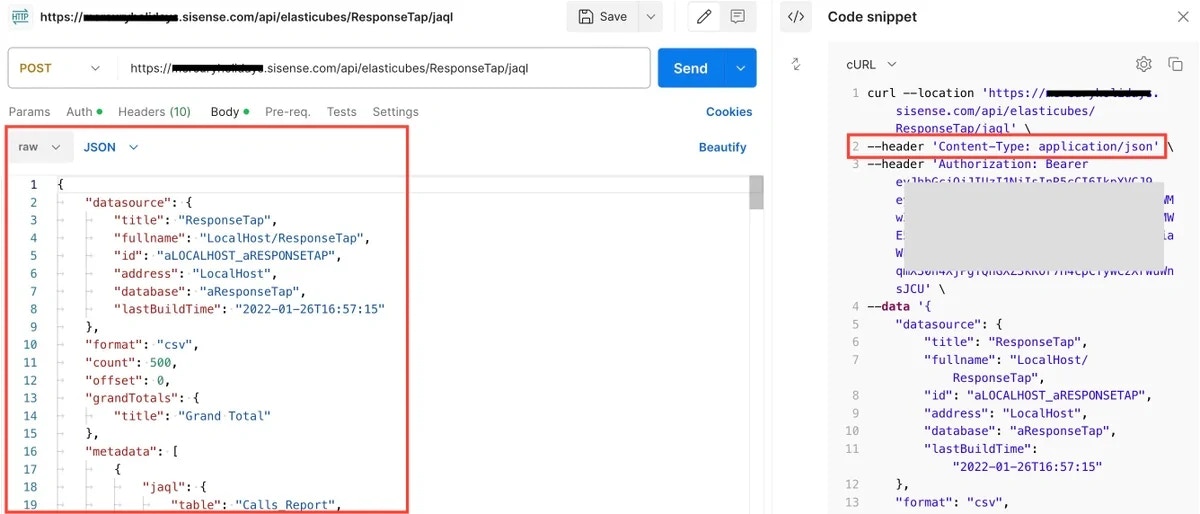
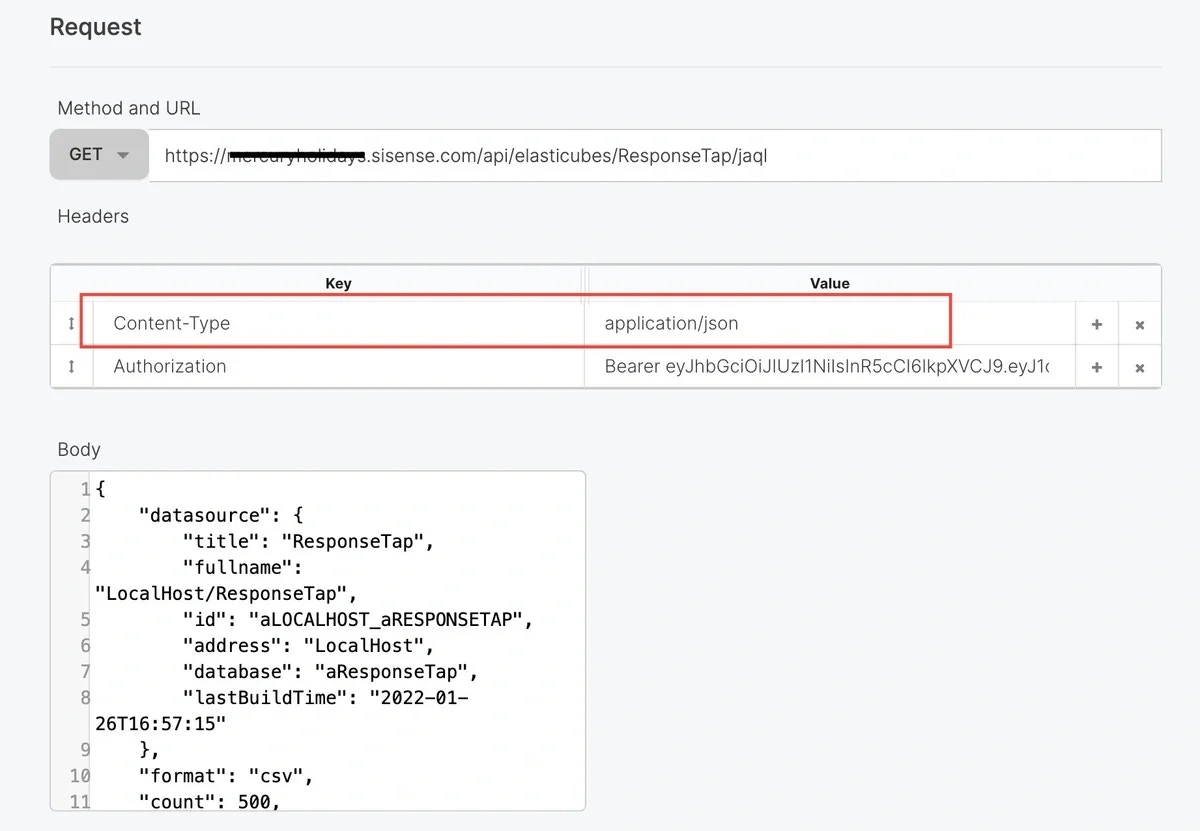
Postman adds headers automatically, but you'll need to add them manually in IIO. For example, when you add JSON data to the Body field in Postman and select JSON from the dropdown menu, Postman automatically adds a "Content-Type: application/json" header. In IIO, you need to explicitly add this header.
In Postman:
## Things to Watch Out For
### Missing Headers
Postman adds headers automatically, but you'll need to add them manually in IIO. For example, when you add JSON data to the Body field in Postman and select JSON from the dropdown menu, Postman automatically adds a "Content-Type: application/json" header. In IIO, you need to explicitly add this header.
In Postman:
 In IIO:
 ### URL Encoding
Postman handles URL encoding automatically, but IIO requires manual encoding for special characters like spaces. You can either replace spaces with "%20" or use the `URLEncode` function in IIO. In Postman you can input a URL with spaces as seen below with "2023-09-25 00:00:00" and Postman will URL encode it before sending it to the API:
### URL Encoding
Postman handles URL encoding automatically, but IIO requires manual encoding for special characters like spaces. You can either replace spaces with "%20" or use the `URLEncode` function in IIO. In Postman you can input a URL with spaces as seen below with "2023-09-25 00:00:00" and Postman will URL encode it before sending it to the API:
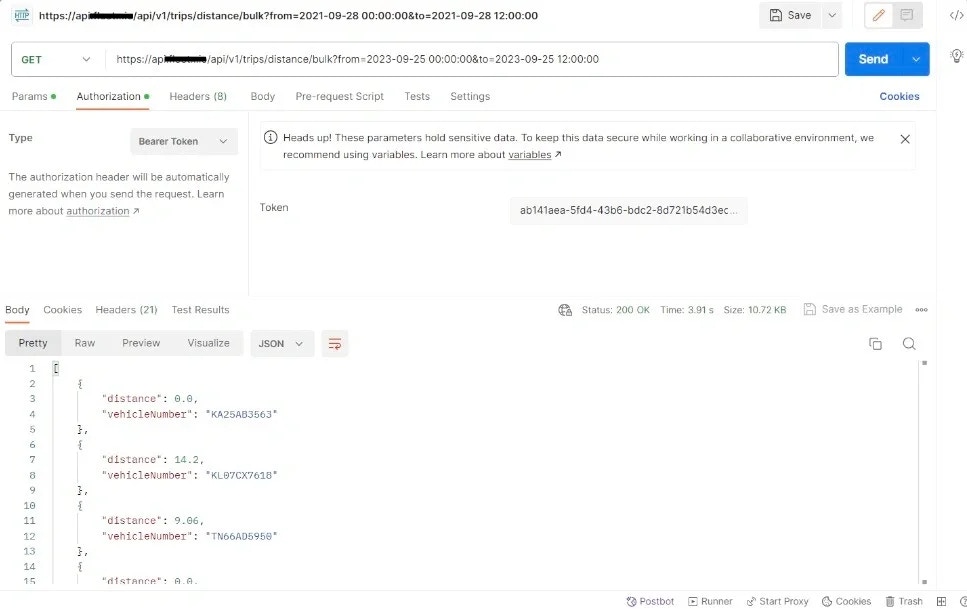 However, in IIO the URL must be URL encoded. You can either do this manually by replacing the spaces with `%20`:
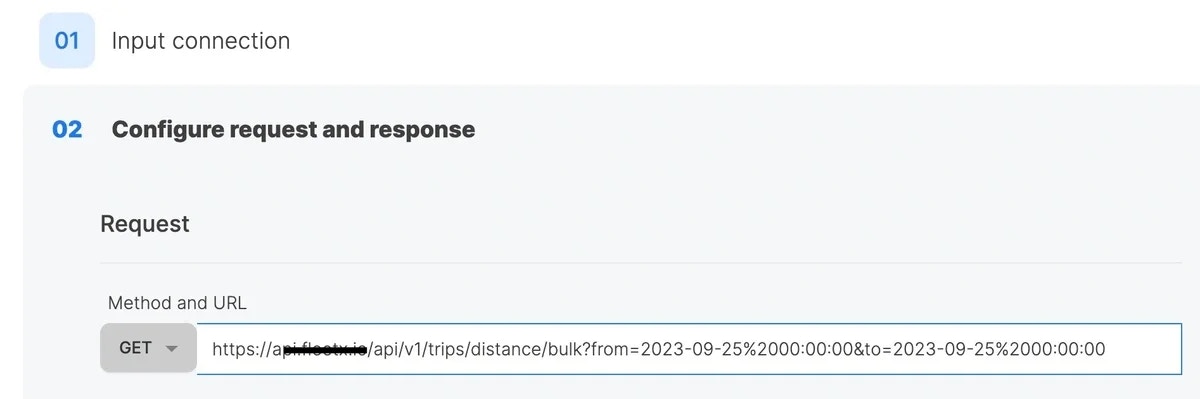 Or you can do it automatically by using our URLEncode function in a variable like this:
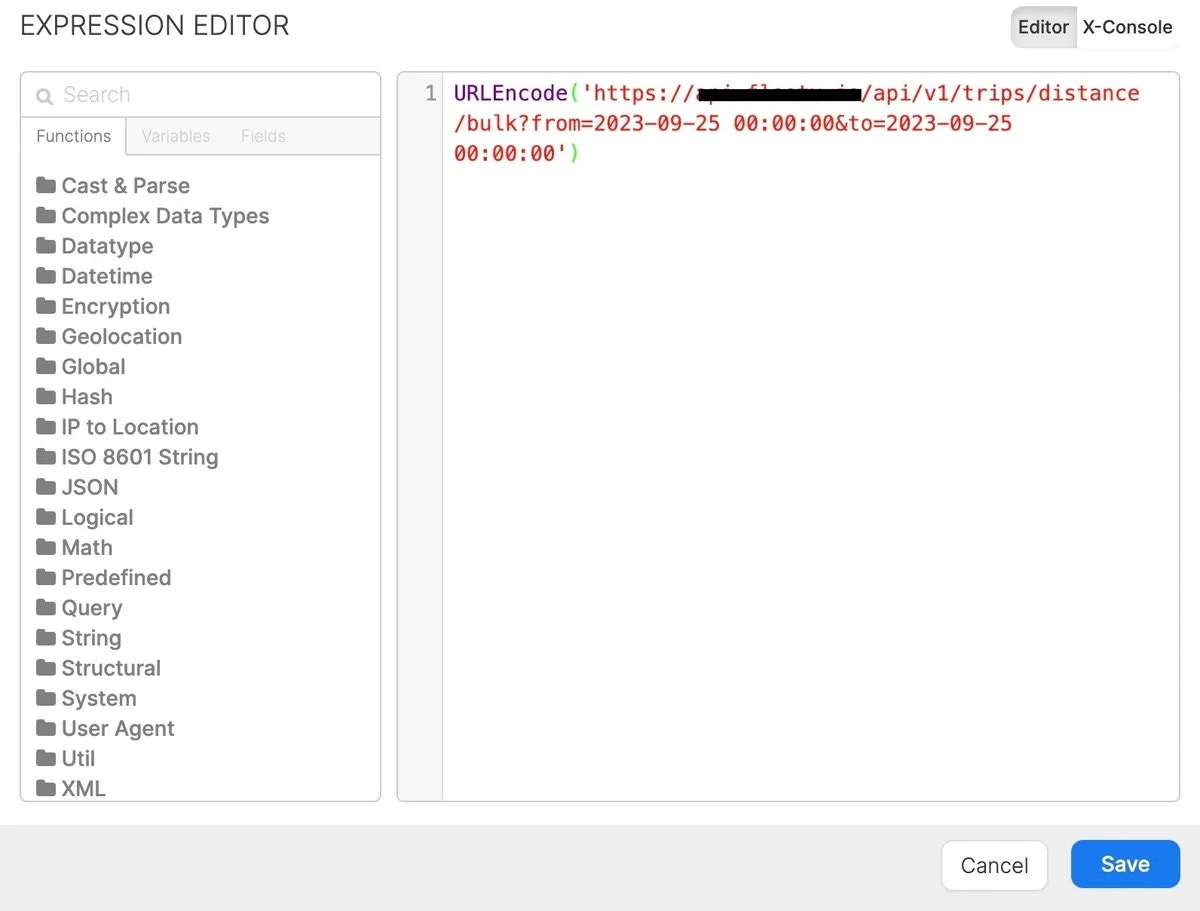
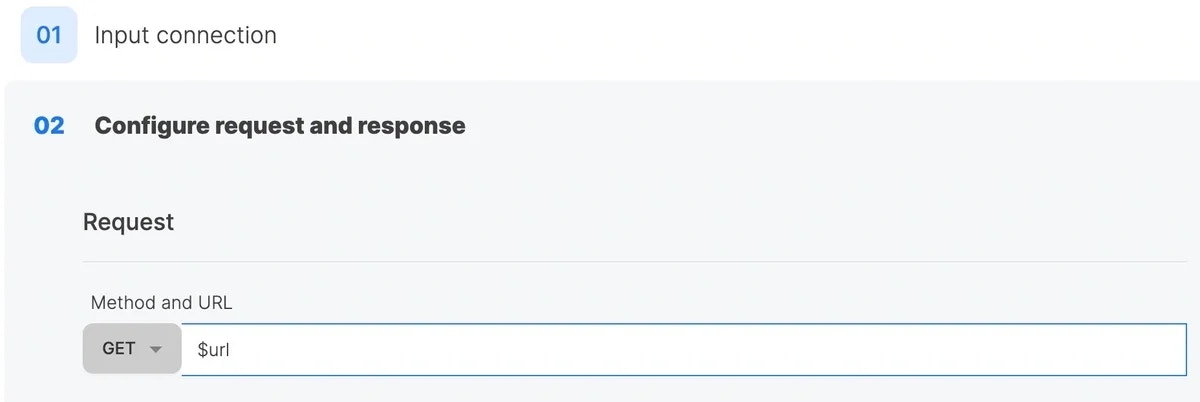
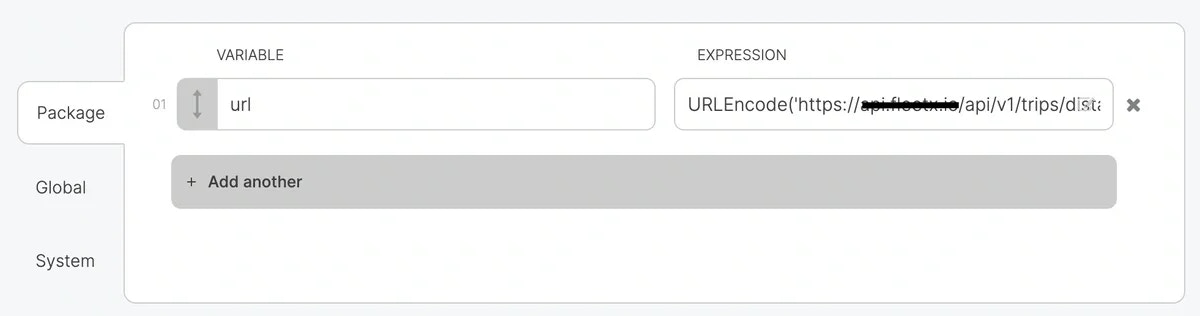 Then call the "url" variable in the REST API source component like this:
 ### OAuth 2.0 Authorization
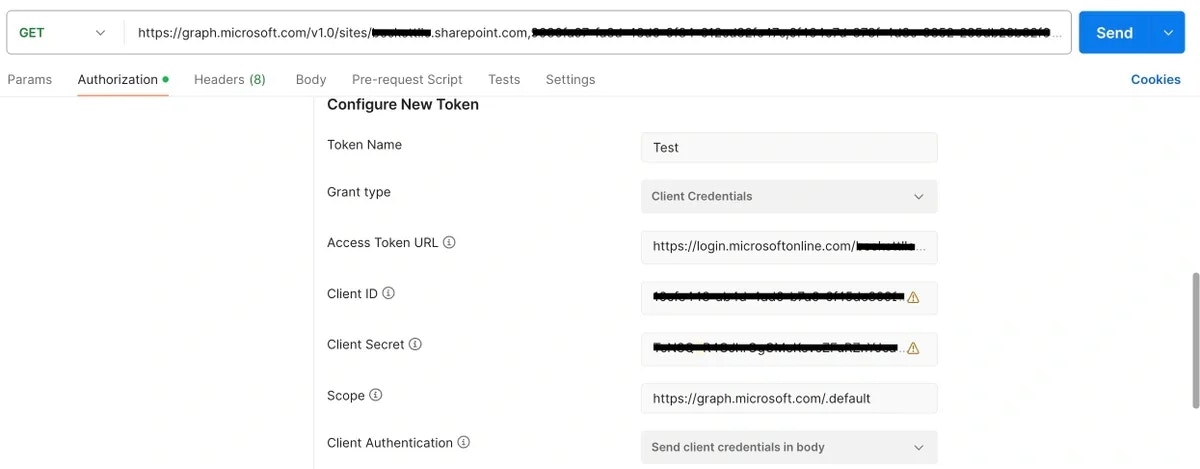
Postman simplifies OAuth. You enter credentials, and it formats them for the API call:
### OAuth 2.0 Authorization
Postman simplifies OAuth. You enter credentials, and it formats them for the API call:
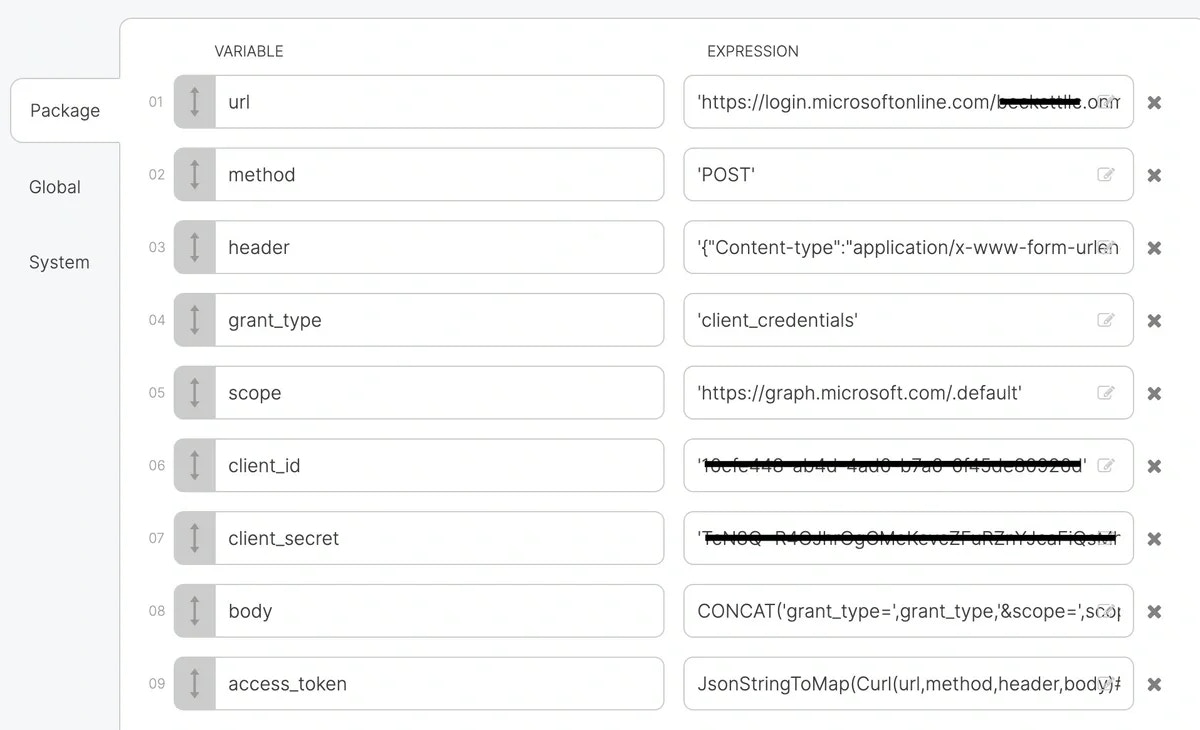
 IIO requires manual setup. You might need to create variables for your credentials and use functions to format them according to the API's requirements (refer to the API documentation for details):
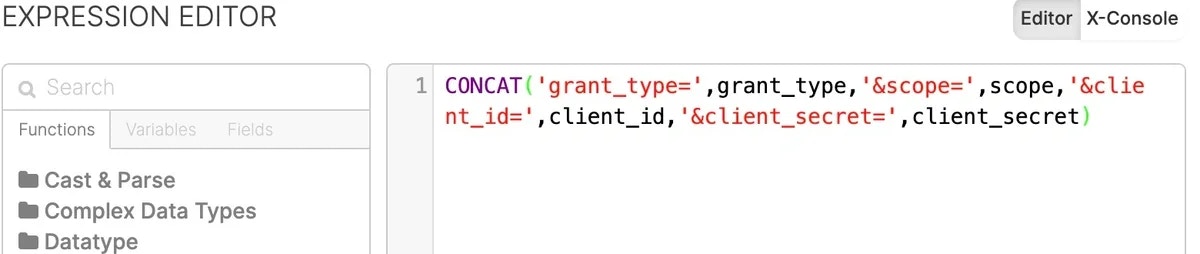
 Then use the CONCAT function to format the body variable value:
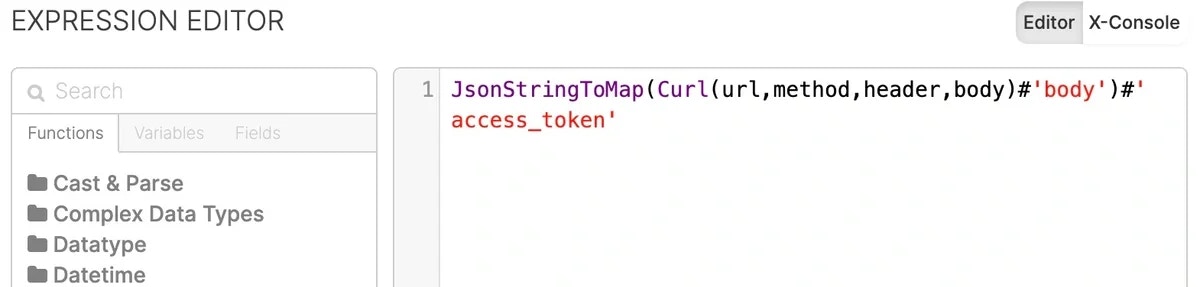
 Then use the Curl function to call the API and pass in the url, method, header, and body variables. The #'body' will extract the body of the API response, and then the JsonStringToMap function will turn that body json string into a Map data type and you can use the #'access\_token' to extract just the access token from the body:
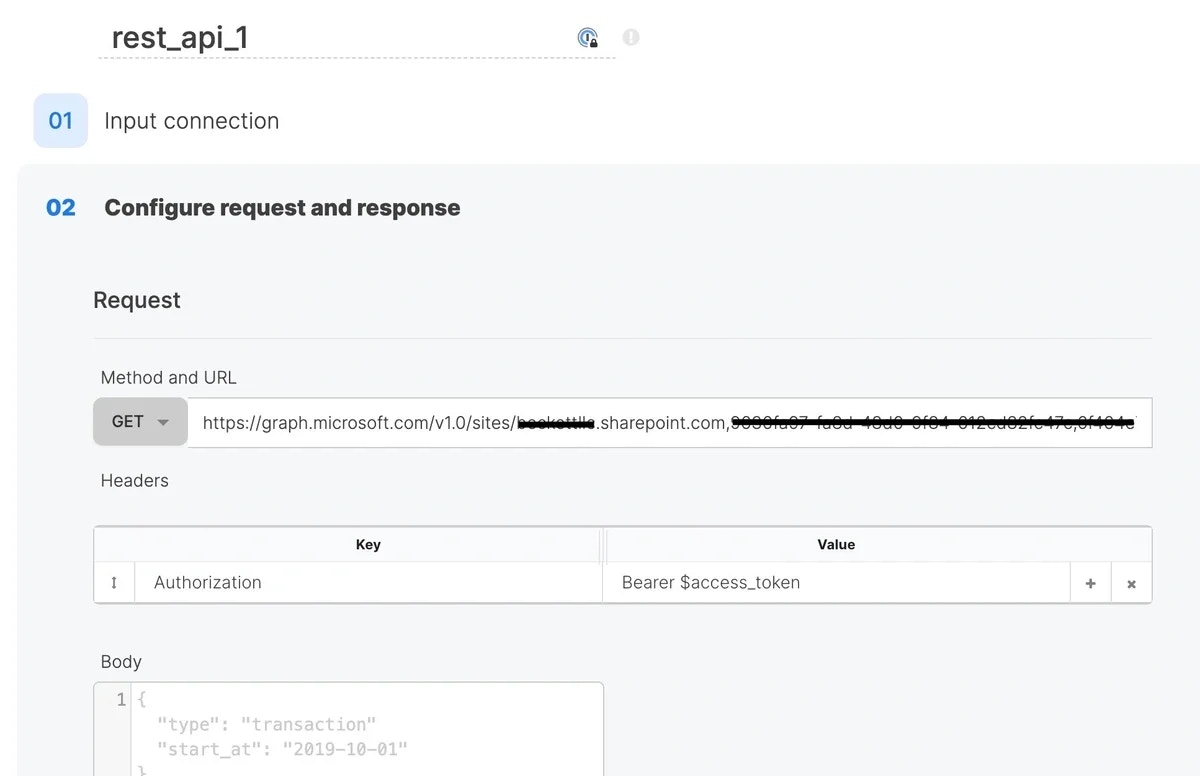
 Then call that access\_token variable in the REST API Source component in IIO:
 For more examples of this process, see [this](/docs/etl/api-ingestion-guide-with-integrateio/) doc.
## Conclusion
By following this guide, you've unlocked the power to seamlessly translate your well-crafted Postman calls into robust Integrate.io ETL flows using our API connector. You've learned how to extract essential elements like URLs, methods, headers, and data, and how to handle the automatic features in Postman that require manual configuration in IIO. Remember, a keen eye for missing headers, proper URL encoding, and manual OAuth 2.0 authorization setup will ensure a smooth migration process. With this knowledge in your arsenal, you're equipped to conquer any API integration challenge and streamline your data workflows! And of course if you do have any questions, just reach out to our team!
For more examples of this process, see [this](/docs/etl/api-ingestion-guide-with-integrateio/) doc.
## Conclusion
By following this guide, you've unlocked the power to seamlessly translate your well-crafted Postman calls into robust Integrate.io ETL flows using our API connector. You've learned how to extract essential elements like URLs, methods, headers, and data, and how to handle the automatic features in Postman that require manual configuration in IIO. Remember, a keen eye for missing headers, proper URL encoding, and manual OAuth 2.0 authorization setup will ensure a smooth migration process. With this knowledge in your arsenal, you're equipped to conquer any API integration challenge and streamline your data workflows! And of course if you do have any questions, just reach out to our team!