> ## Documentation Index
> Fetch the complete documentation index at: https://www.integrate.io/docs/llms.txt
> Use this file to discover all available pages before exploring further.
# ETL: Amazon Redshift Source
> Configure the Amazon Redshift source component to read data from Redshift tables and views in your Integrate.io ETL data pipeline.
## Connection Setup
Connect Integrate.io ETL to your [Redshift](https://www.integrate.io/blog/guide-to-amazon-redshift/) cluster in order to write data to it, or read data from it. Watch this short [video walkthrough](https://share.getcloudapp.com/p9uGqxDO) or read below for further instructions.
## In Redshift console
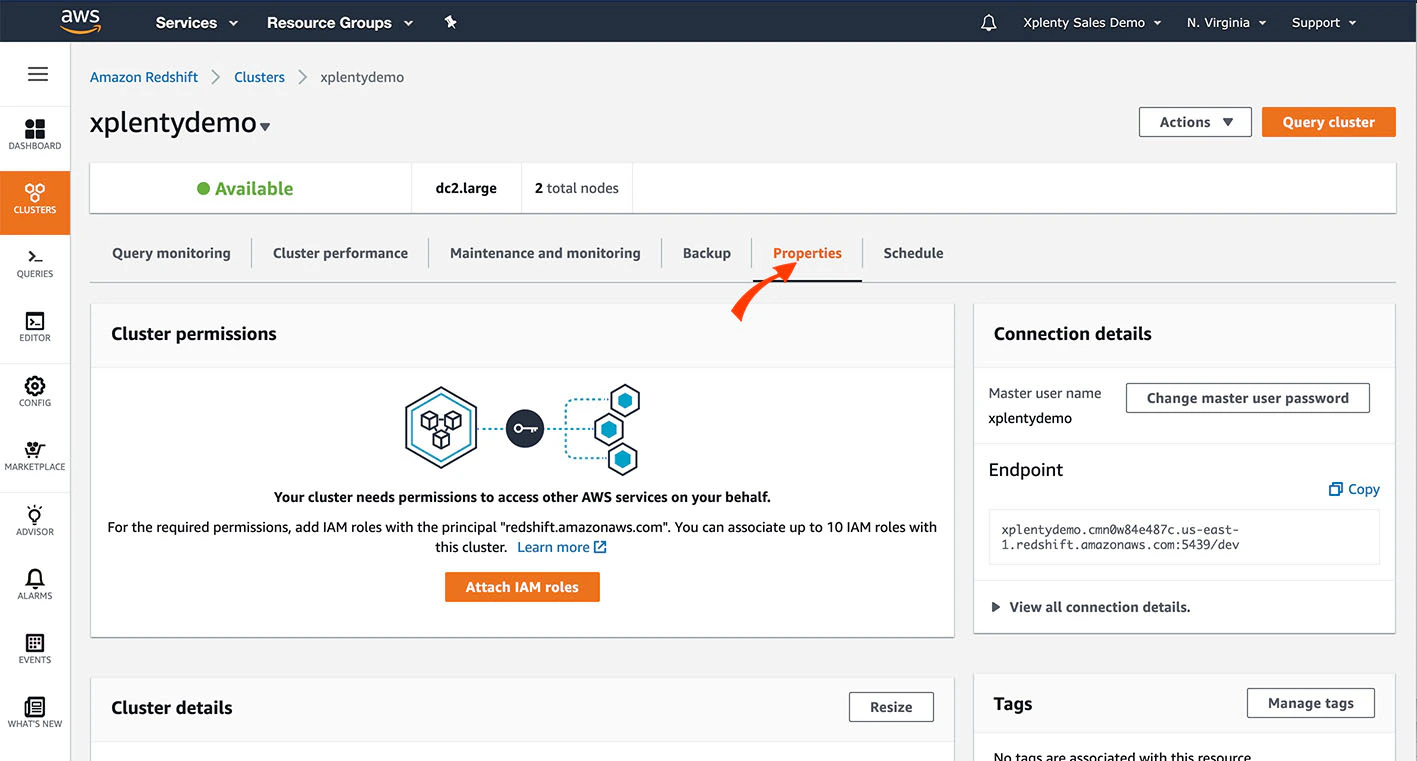
Start by navigating to the Redshift console --> **Clusters** screen and clicking on the **Properties** tab.
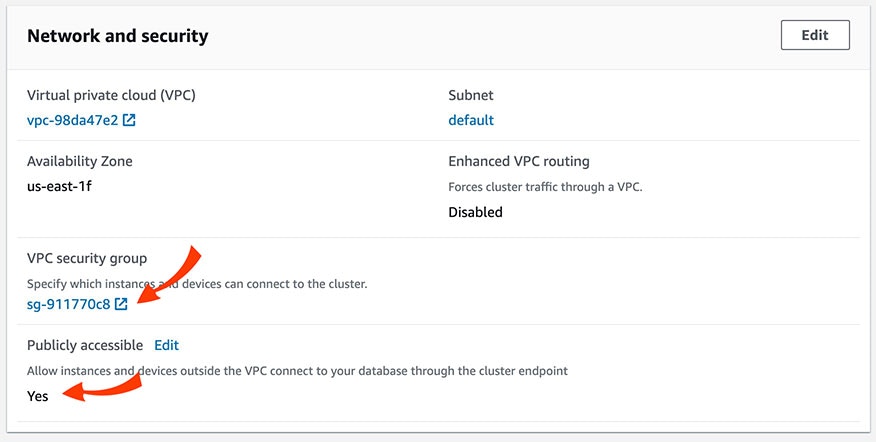
 Scroll down to the Network and Security section. Make sure that the cluster is set with the value for **Publicly Accessible** to Yes. Then, click the **VPC Security Group** to verify and/or modify the security rules.
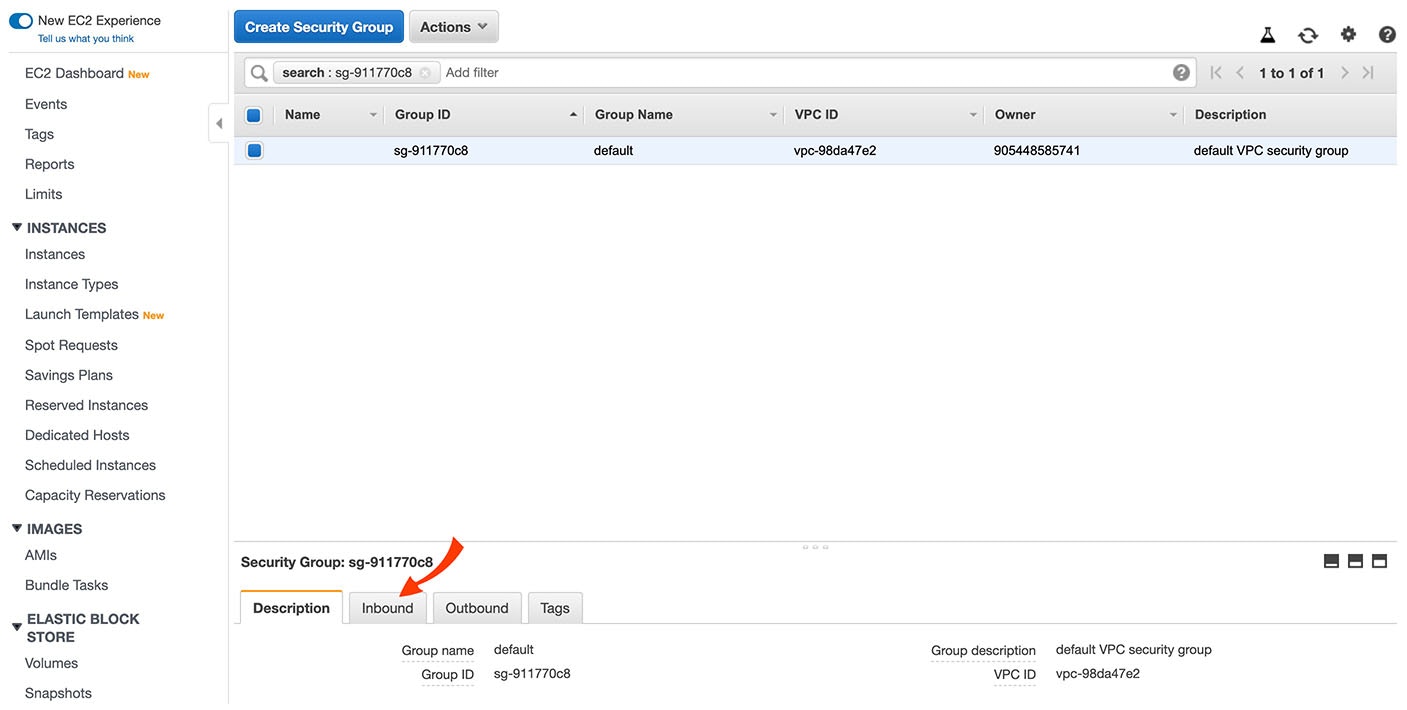
 In the Security Group screen, select the **Inbound** tab.
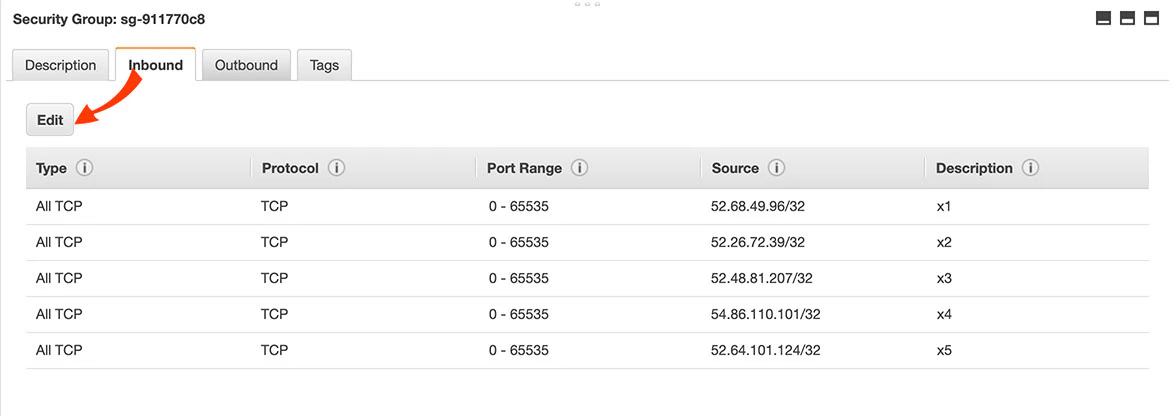
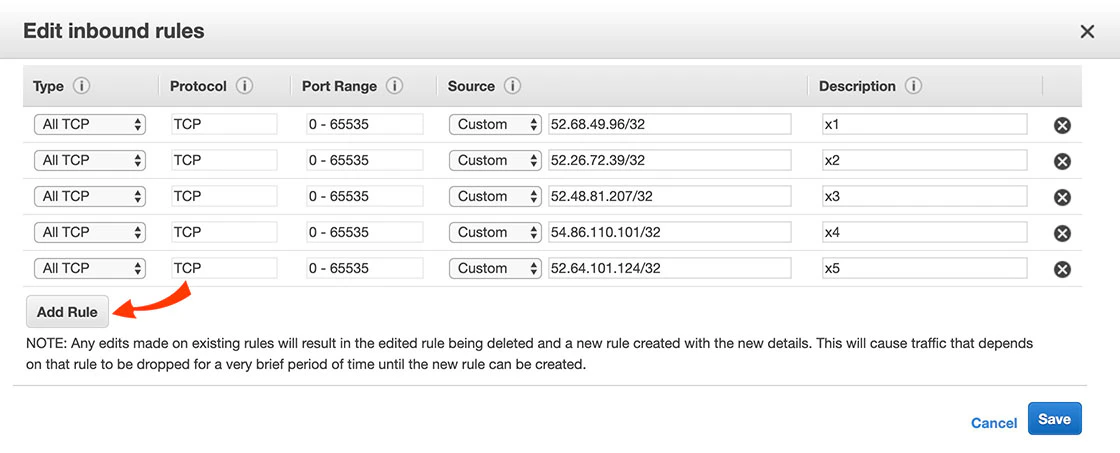
 There should be rules for the IP addresses listed [here](/docs/etl/integrateio-etls-ip-list/). If those rules need to be altered or don't exist, click Edit.
 Edit any existing rules or click **Add Rule** to add a new rule. For each rule, select the type of database and enter the Redshift port. Then click **Save**.
 **To configure your cluster to only accept SSL encrypted connections:**
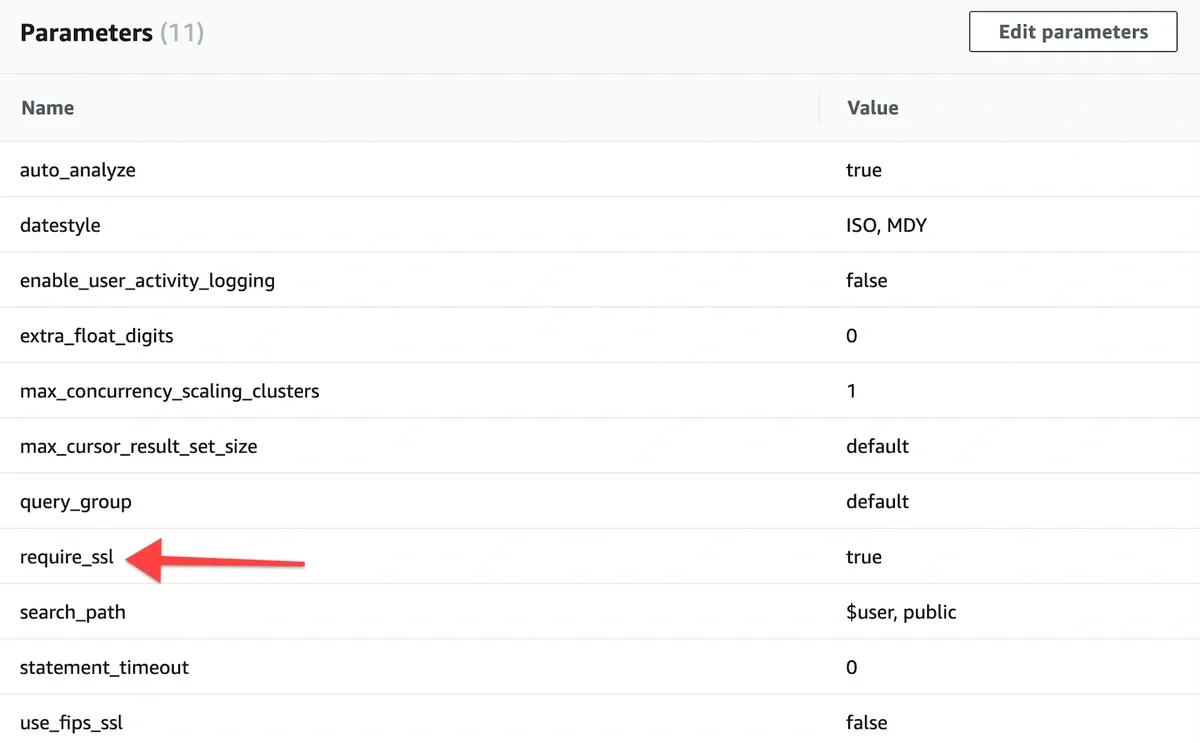
First, access the parameter group and edit it to set require\_ssl to true.
**To configure your cluster to only accept SSL encrypted connections:**
First, access the parameter group and edit it to set require\_ssl to true.
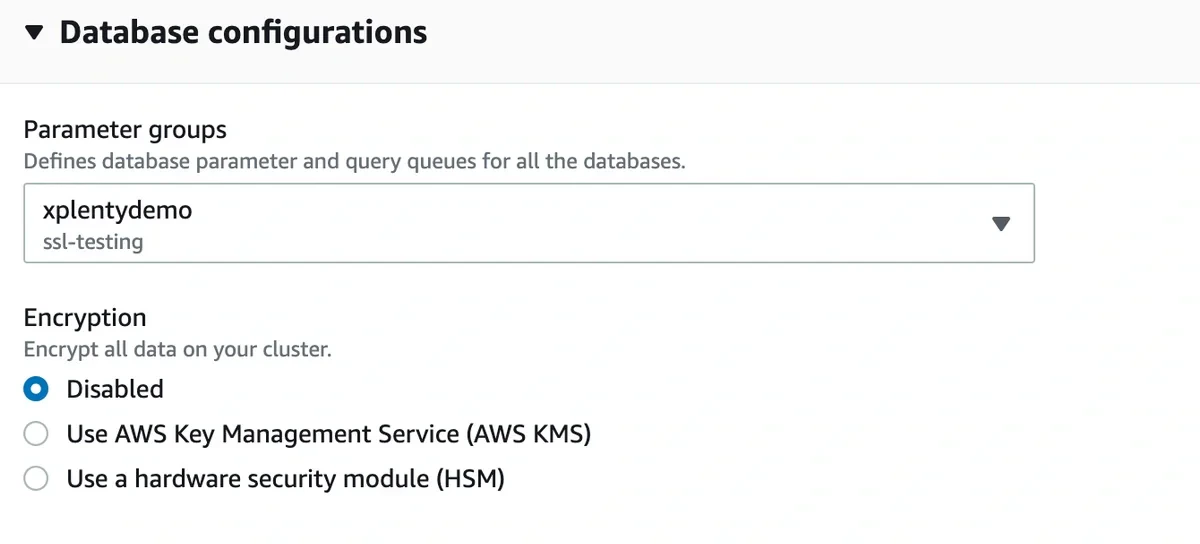
 Then, Navigate to Config --> Workload management. If you created the cluster with a default parameter group, create a new parameter group and modify the cluster to associate to that parameter group. Click **Edit** on the cluster homepage, then go to **Database Configurations** to associate the parameter group with the current cluster.
 ### To verify or modify the security rules of an instance on EC2-Classic (without VPC)
In your [Redshift Cluster](https://www.integrate.io/blog/data-warehousing-for-dummies-a-beginners-guide-to-setting-up-an-amazon-redshift-data-warehouse/) Security Group, modify a rule or add a new rule for each IP address listed [here](/docs/etl/integrateio-etls-ip-list/):
### To verify or modify the security rules of an instance on EC2-Classic (without VPC)
In your [Redshift Cluster](https://www.integrate.io/blog/data-warehousing-for-dummies-a-beginners-guide-to-setting-up-an-amazon-redshift-data-warehouse/) Security Group, modify a rule or add a new rule for each IP address listed [here](/docs/etl/integrateio-etls-ip-list/):
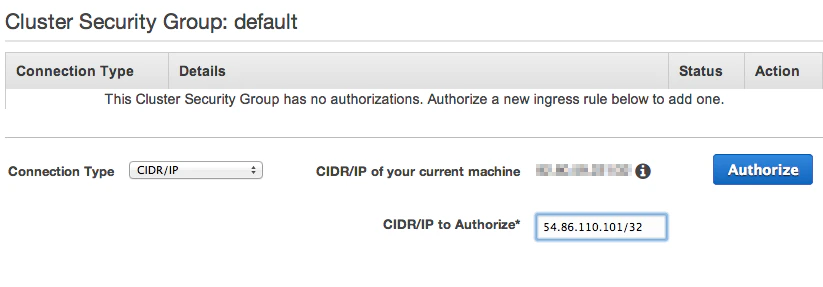 * In the Connection Type dropbox, choose CIDR/IP.
* In the CIDR/IP to Authorize field, enter the IP addresses from [this list](/docs/etl/integrateio-etls-ip-list/).
## Create a Redshift user
* [Create a Redshift user](https://docs.aws.amazon.com/redshift/latest/dg/r_CREATE_USER.html).
* Grant it the following permissions:
* If you intend to only append data into a table, give the user minimal permissions required to execute the COPY command.
* If you intend to merge data into a table, give the user minimal permissions required to execute the COPY command, create a table, and insert and update to your target tables.
* Note that truncate requires Integrate.io ETL to either be the owner of the target table or have superuser access.
## To define a connection in Integrate.io ETL to Amazon Redshift
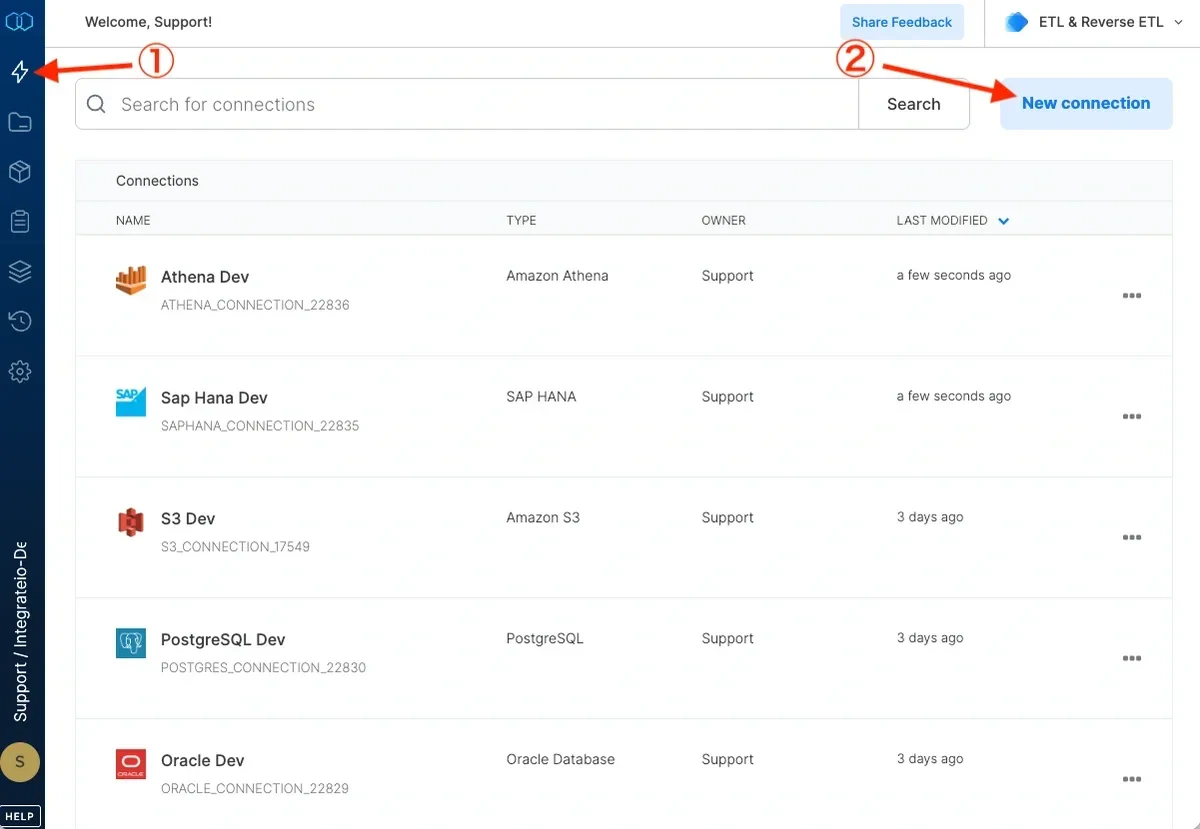
Click **Connections** (the lightning bolt) on the left side of the dashboard.
Click **New connection**.
* In the Connection Type dropbox, choose CIDR/IP.
* In the CIDR/IP to Authorize field, enter the IP addresses from [this list](/docs/etl/integrateio-etls-ip-list/).
## Create a Redshift user
* [Create a Redshift user](https://docs.aws.amazon.com/redshift/latest/dg/r_CREATE_USER.html).
* Grant it the following permissions:
* If you intend to only append data into a table, give the user minimal permissions required to execute the COPY command.
* If you intend to merge data into a table, give the user minimal permissions required to execute the COPY command, create a table, and insert and update to your target tables.
* Note that truncate requires Integrate.io ETL to either be the owner of the target table or have superuser access.
## To define a connection in Integrate.io ETL to Amazon Redshift
Click **Connections** (the lightning bolt) on the left side of the dashboard.
Click **New connection**.
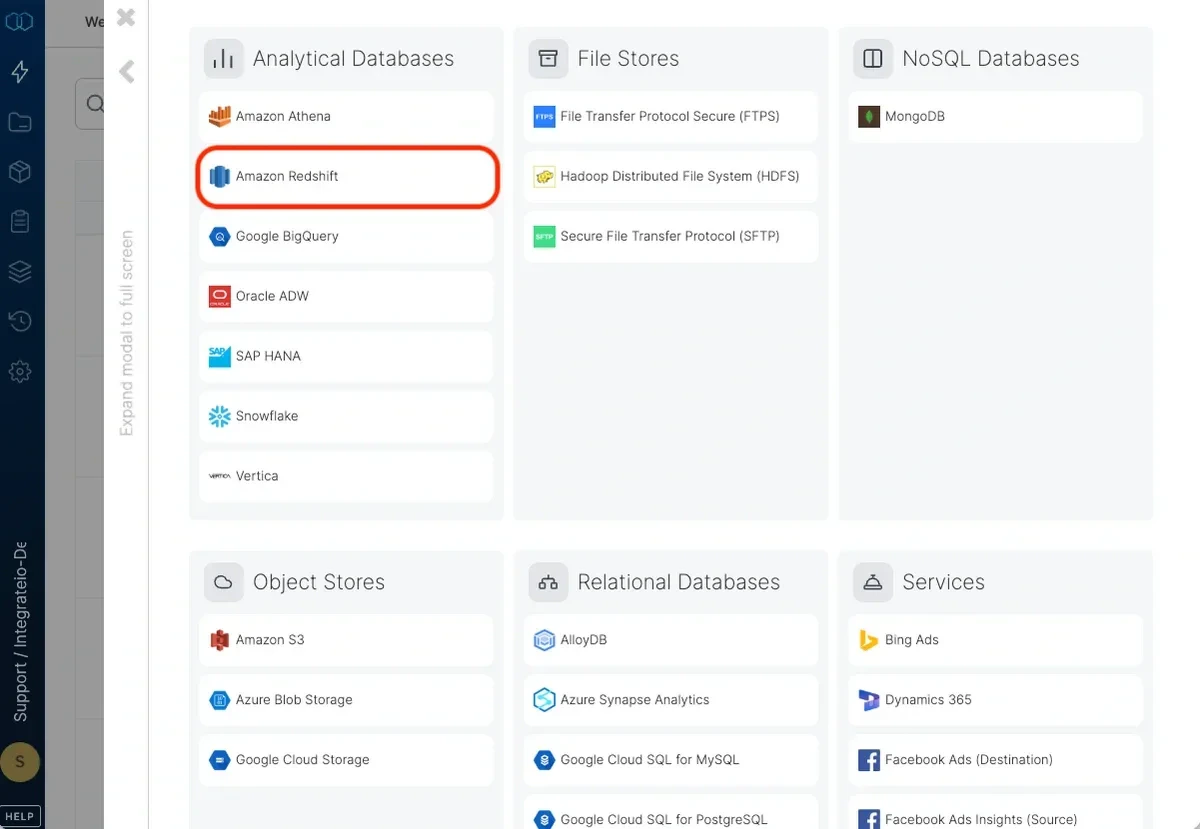
 Select **Amazon Redshift** from the Analytical Database category.
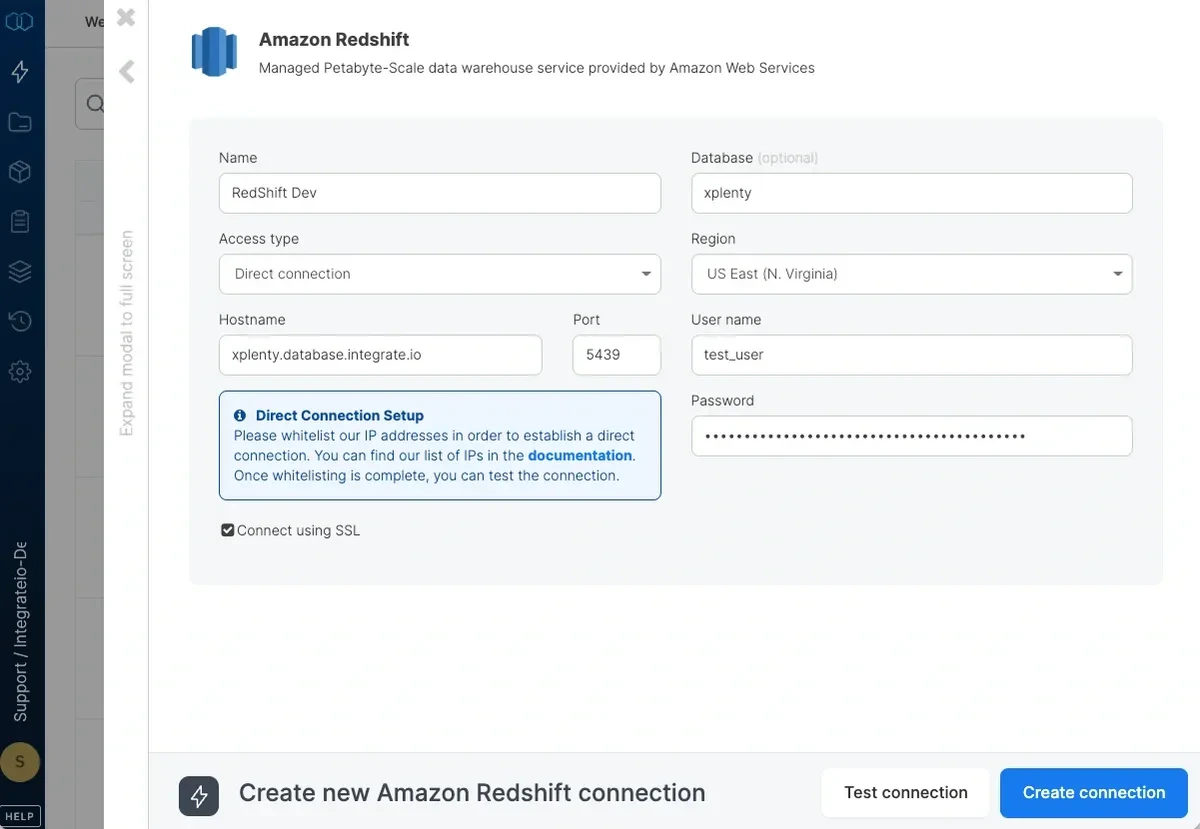
 Type a name for the connection.
If you allow direct access from Integrate.io ETL's IP addresses, enter the hostname and port. If direct access is not allowed, read more about setting a tunnel connection [here](/docs/etl/allowing-integrateio-etl-access-to-my-server-behind-a-firewall/).
Enter the user name and password you created for Integrate.io ETL to use.
Enter the default database to use. If you leave it empty, the user's default database will be used.
Set the region to the AWS region in which the Redshift cluster was created. If the region requires AWS Signature v4 (see list [here](https://docs.aws.amazon.com/general/latest/gr/rande.html#s3_region)) you may need our support team's help with allowing Integrate.io ETL access to read from this Amazon Redshift connection.
Click **Test connection**. If the credentials are correct, a message that the cloud storage connection test was successful appears.
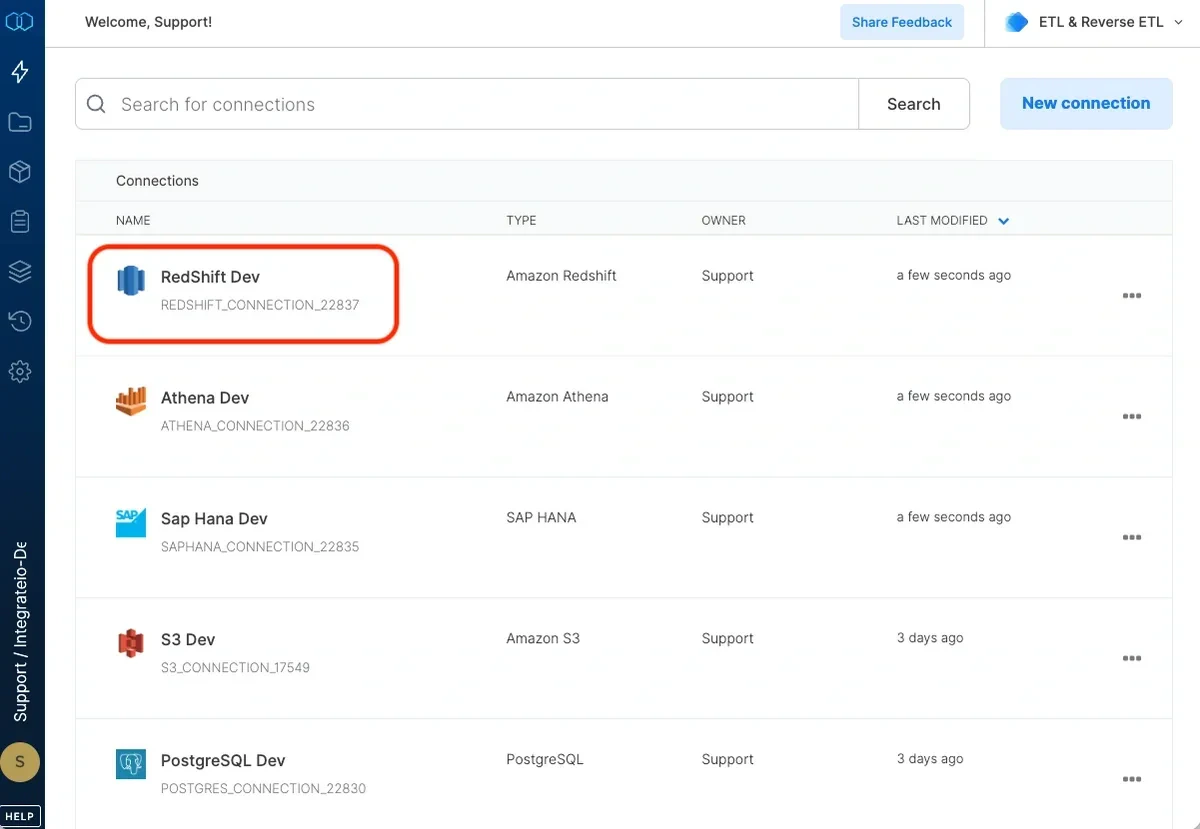
Click **Create connection** and the connection is created and appears in the list of connections.
Type a name for the connection.
If you allow direct access from Integrate.io ETL's IP addresses, enter the hostname and port. If direct access is not allowed, read more about setting a tunnel connection [here](/docs/etl/allowing-integrateio-etl-access-to-my-server-behind-a-firewall/).
Enter the user name and password you created for Integrate.io ETL to use.
Enter the default database to use. If you leave it empty, the user's default database will be used.
Set the region to the AWS region in which the Redshift cluster was created. If the region requires AWS Signature v4 (see list [here](https://docs.aws.amazon.com/general/latest/gr/rande.html#s3_region)) you may need our support team's help with allowing Integrate.io ETL access to read from this Amazon Redshift connection.
Click **Test connection**. If the credentials are correct, a message that the cloud storage connection test was successful appears.
Click **Create connection** and the connection is created and appears in the list of connections.
 ***
Use the Amazon Redshift source component to read data stored in an Amazon Redshift table, view or using a query. The source component uses Amazon Redshift's UNLOAD statement to pull data into files in Amazon S3 and then reads the files.
***
Use the Amazon Redshift source component to read data stored in an Amazon Redshift table, view or using a query. The source component uses Amazon Redshift's UNLOAD statement to pull data into files in Amazon S3 and then reads the files.
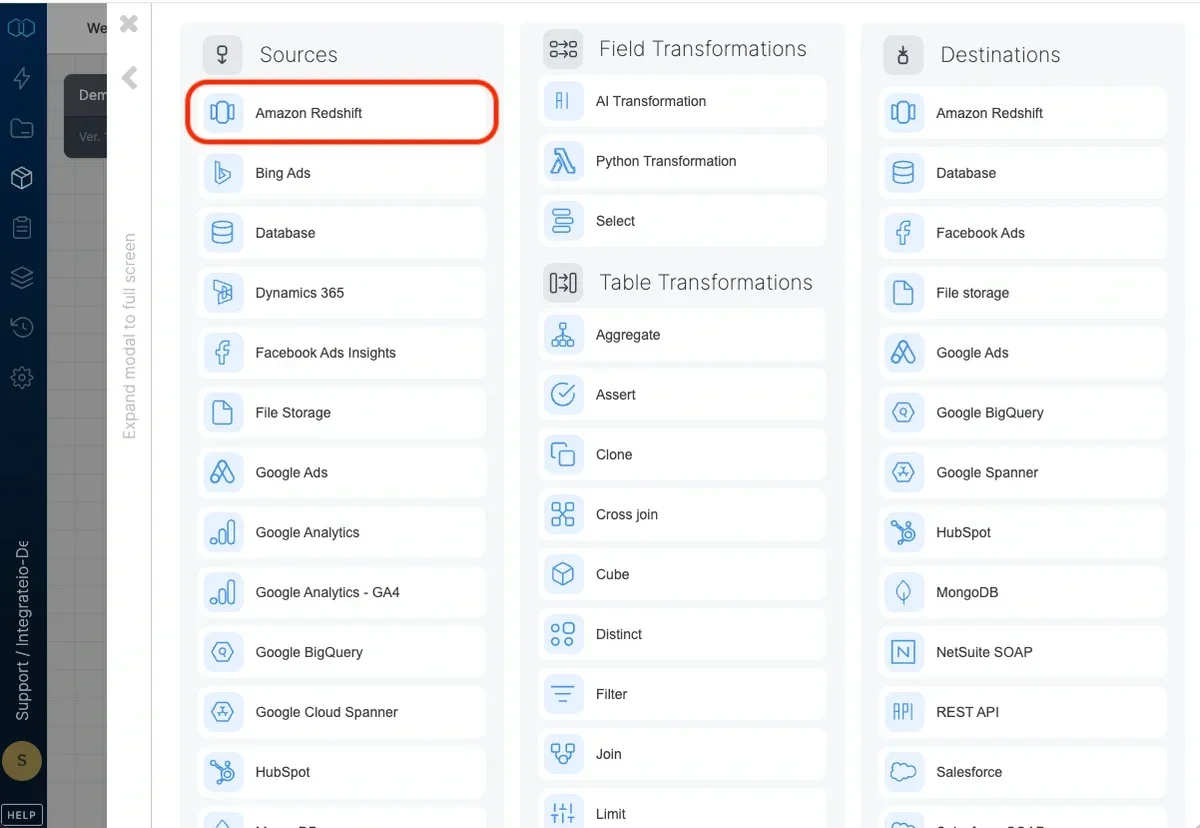 ## Connection
Select an existing Amazon Redshift connection or create a new one (for more information, see [Allowing Integrate.io ETL access to my Redshift cluster](/docs/etl/allowing-integrateio-etl-access-to-my-redshift-cluster/).)
## Source Properties
## Connection
Select an existing Amazon Redshift connection or create a new one (for more information, see [Allowing Integrate.io ETL access to my Redshift cluster](/docs/etl/allowing-integrateio-etl-access-to-my-redshift-cluster/).)
## Source Properties
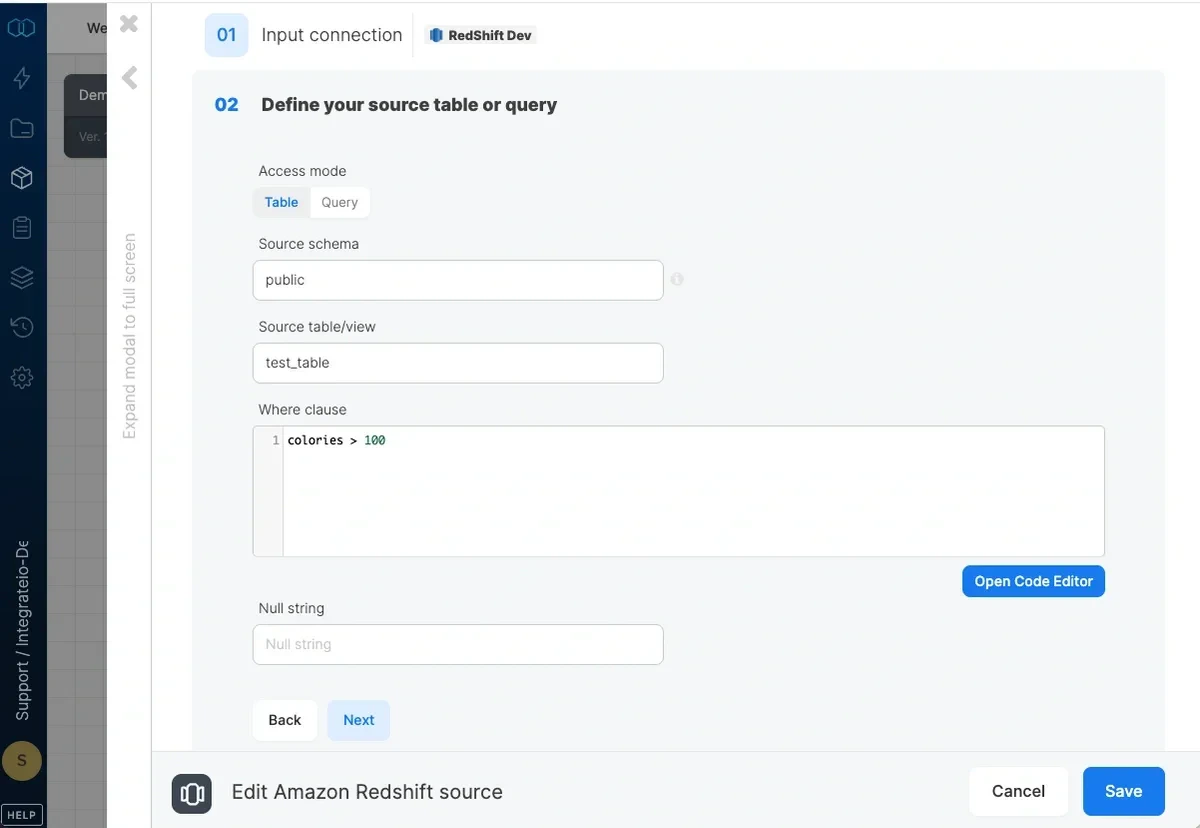 * **Access mode** - select table to extract an entire table/view or query to execute a query.
* **Source schema** - the source table's schema. If empty, the default schema is used.
* **Source table/view** - the table or view name from which the data will be imported.
* **where clause** - optional. You can add predicates clauses to the WHERE clause as part of the SQL query that is built in order to get the data from the database. Make sure to skip the keyword WHERE.
| Good | `prod_category = 1 AND prod_color = 'red'` |
| :--- | :----------------------------------------------- |
| Bad | `WHERE prod_category = 1 AND prod_color = 'red'` |
* **Query** - type in a SQL query. Make sure to name all columns uniquely.
* **Null string** - NULL values in string columns will be replaced with the string specified here. By default NULL values will appear like empty strings.
## Source Schema
* **Access mode** - select table to extract an entire table/view or query to execute a query.
* **Source schema** - the source table's schema. If empty, the default schema is used.
* **Source table/view** - the table or view name from which the data will be imported.
* **where clause** - optional. You can add predicates clauses to the WHERE clause as part of the SQL query that is built in order to get the data from the database. Make sure to skip the keyword WHERE.
| Good | `prod_category = 1 AND prod_color = 'red'` |
| :--- | :----------------------------------------------- |
| Bad | `WHERE prod_category = 1 AND prod_color = 'red'` |
* **Query** - type in a SQL query. Make sure to name all columns uniquely.
* **Null string** - NULL values in string columns will be replaced with the string specified here. By default NULL values will appear like empty strings.
## Source Schema
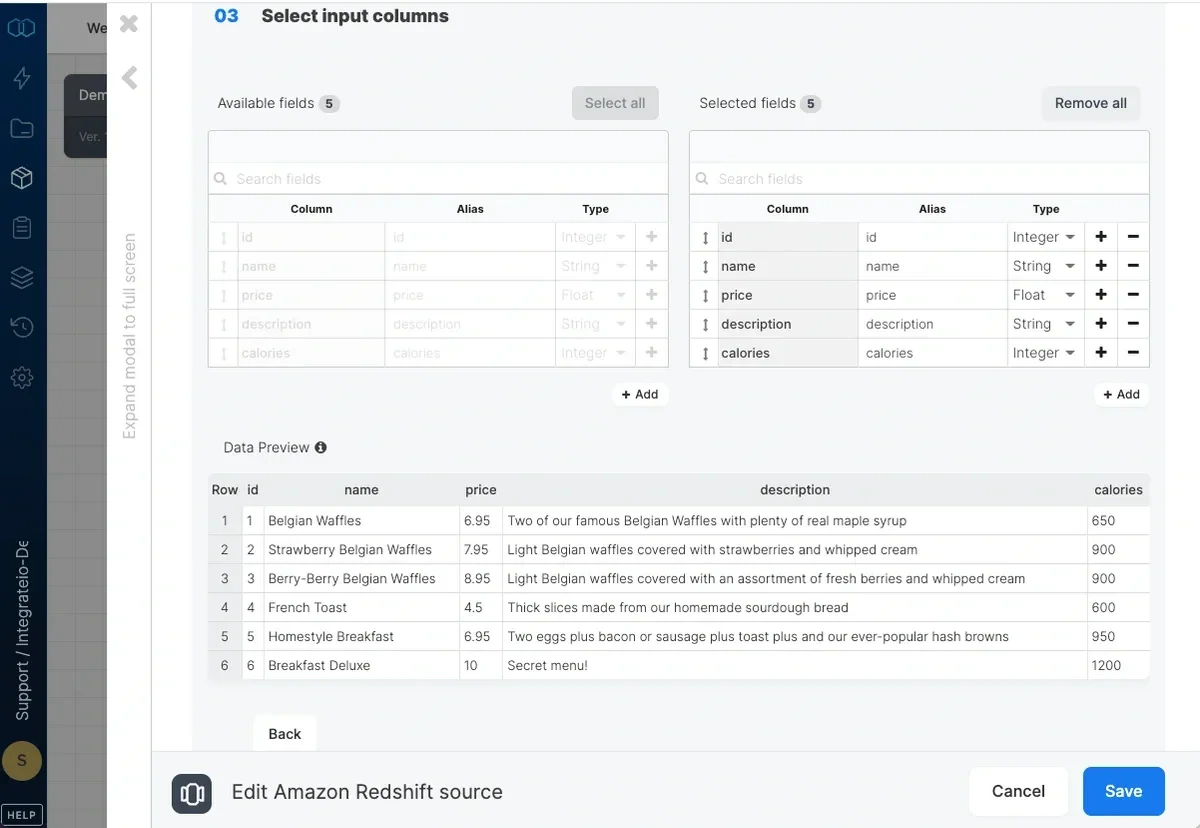 After defining the source table/view/query select the fields to use in the source.
With table access mode, the fields you select are used to build the query that will be executed to read the data.
With query access mode, select all the fields that are defined in the query and make sure to use the same column names
Define the data type for the field. Use the following table when matching Redshift data types to Integrate.io ETL data types.
| **Amazon Redshift** | **Integrate.io ETL** |
| :---------------------- | :------------------- |
| varchar, nvarchar, text | String |
| smallint, int | Integer |
| bigint | Long |
| decimal, real | Float |
| double precision | Double |
| timestamp, date | DateTime |
After defining the source table/view/query select the fields to use in the source.
With table access mode, the fields you select are used to build the query that will be executed to read the data.
With query access mode, select all the fields that are defined in the query and make sure to use the same column names
Define the data type for the field. Use the following table when matching Redshift data types to Integrate.io ETL data types.
| **Amazon Redshift** | **Integrate.io ETL** |
| :---------------------- | :------------------- |
| varchar, nvarchar, text | String |
| smallint, int | Integer |
| bigint | Long |
| decimal, real | Float |
| double precision | Double |
| timestamp, date | DateTime |