> ## Documentation Index
> Fetch the complete documentation index at: https://www.integrate.io/docs/llms.txt
> Use this file to discover all available pages before exploring further.
# ETL: NetSuite Source
> Use the NetSuite source component to read NetSuite standard and custom records (tables) using the NetSuite JDBC drivers (SuiteAnalytics Connect).
## Connection Setup: NetSuite
## To create a NetSuite JDBC(Source) connection in Integrate.io ETL
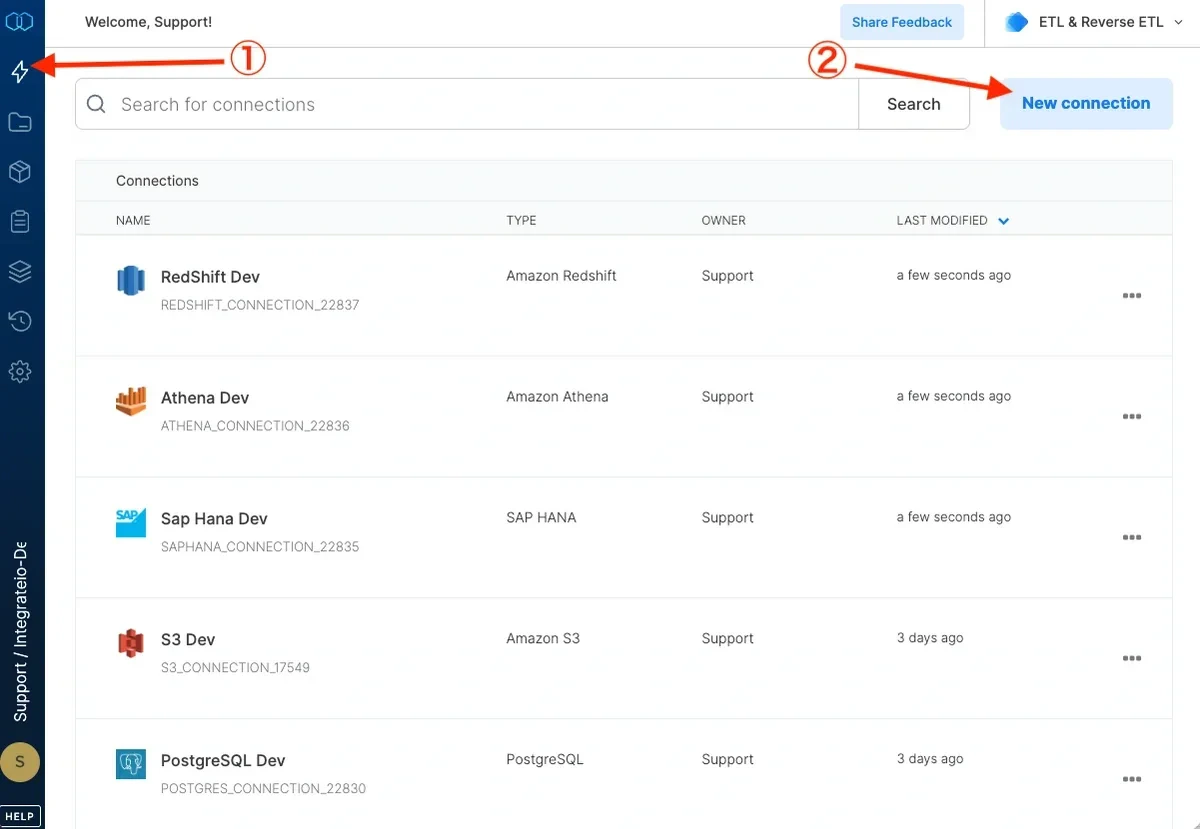
Click the Connections icon (lightning bolt) on the top left menu.
To create a connection, click **New connection**.
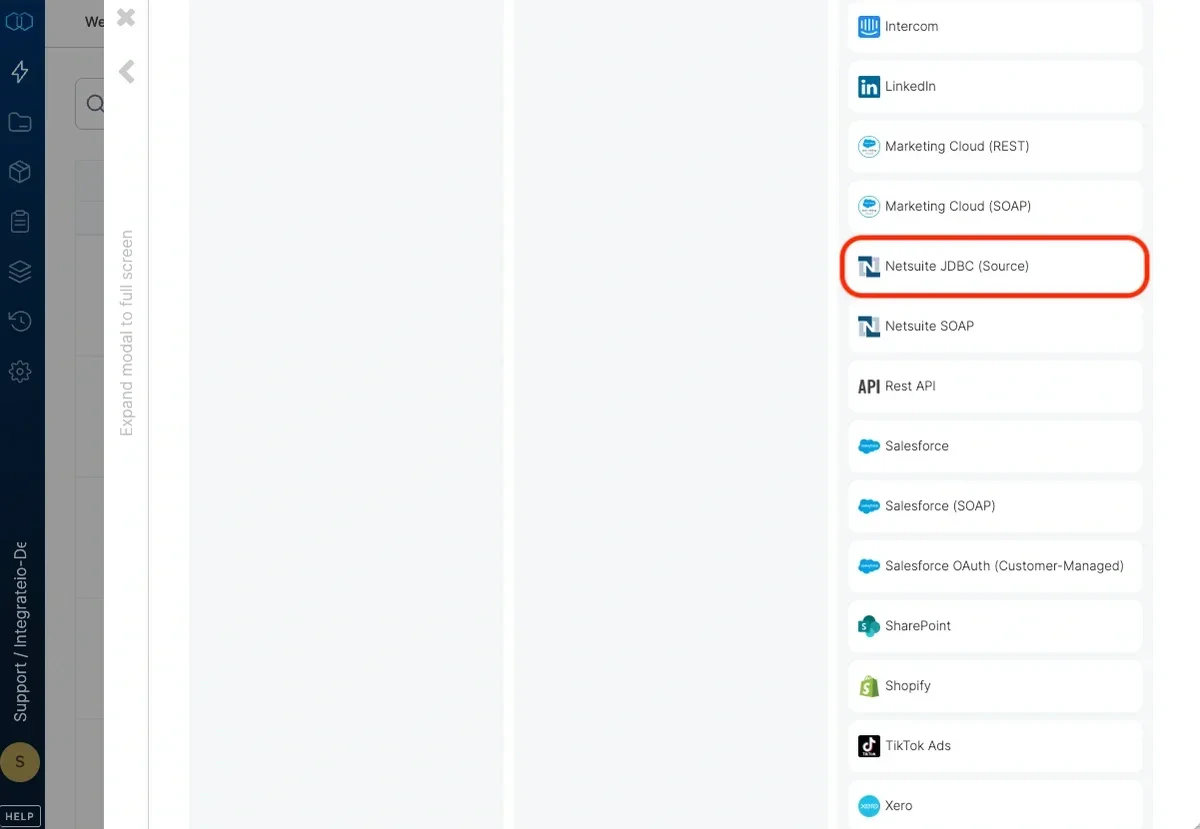
 Select **NetSuite JDBC(Source)**.
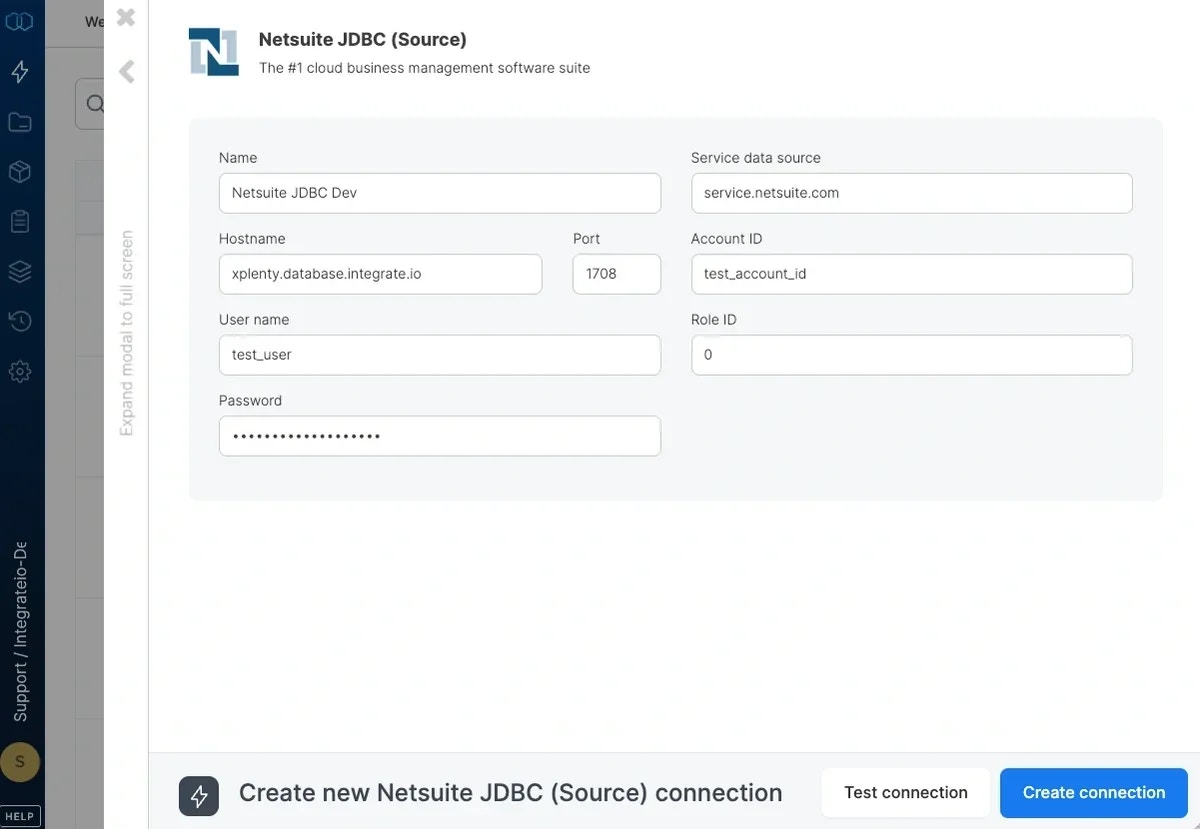
 In the new NetSuite JDBC(Source) connection window, name the connection and enter the connection information.
* **Name** - name for the new connection
* **Hostname** - copy from SuiteAnalytics Connect configuration (see image below)
* **Port** - copy from SuiteAnalytics Connect configuration (see image below)
* **User name** - your NetSuite user name.
* **Password** - your NetSuite password.
* **Service data source** - copy from SuiteAnalytics Connect configuration (see image below).
* **Account ID** - copy from SuiteAnalytics Connect configuration (see image below).
* **Role ID** - copy from SuiteAnalytics Connect configuration (see image below).
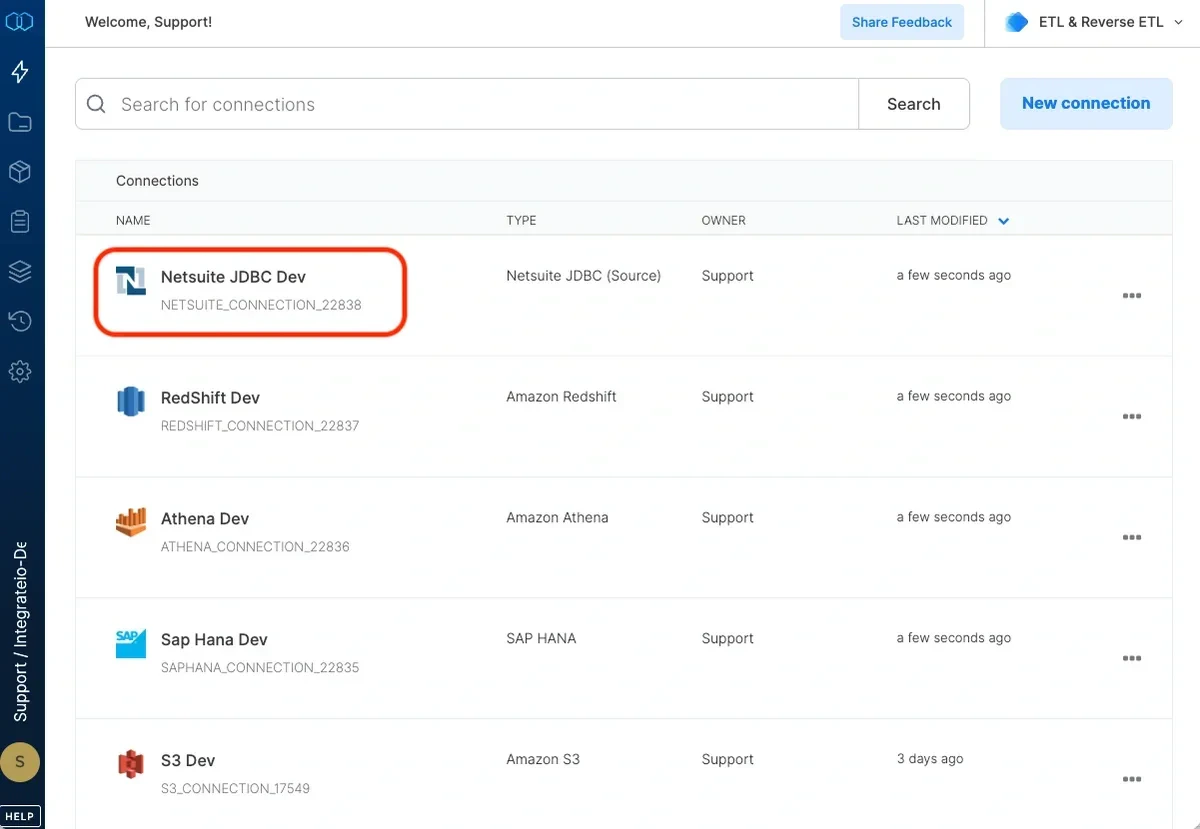
Then, test the NetSuite connection by clicking **Test connection**. Once the connection tests successful, click **Create connection**.
In the new NetSuite JDBC(Source) connection window, name the connection and enter the connection information.
* **Name** - name for the new connection
* **Hostname** - copy from SuiteAnalytics Connect configuration (see image below)
* **Port** - copy from SuiteAnalytics Connect configuration (see image below)
* **User name** - your NetSuite user name.
* **Password** - your NetSuite password.
* **Service data source** - copy from SuiteAnalytics Connect configuration (see image below).
* **Account ID** - copy from SuiteAnalytics Connect configuration (see image below).
* **Role ID** - copy from SuiteAnalytics Connect configuration (see image below).
Then, test the NetSuite connection by clicking **Test connection**. Once the connection tests successful, click **Create connection**.
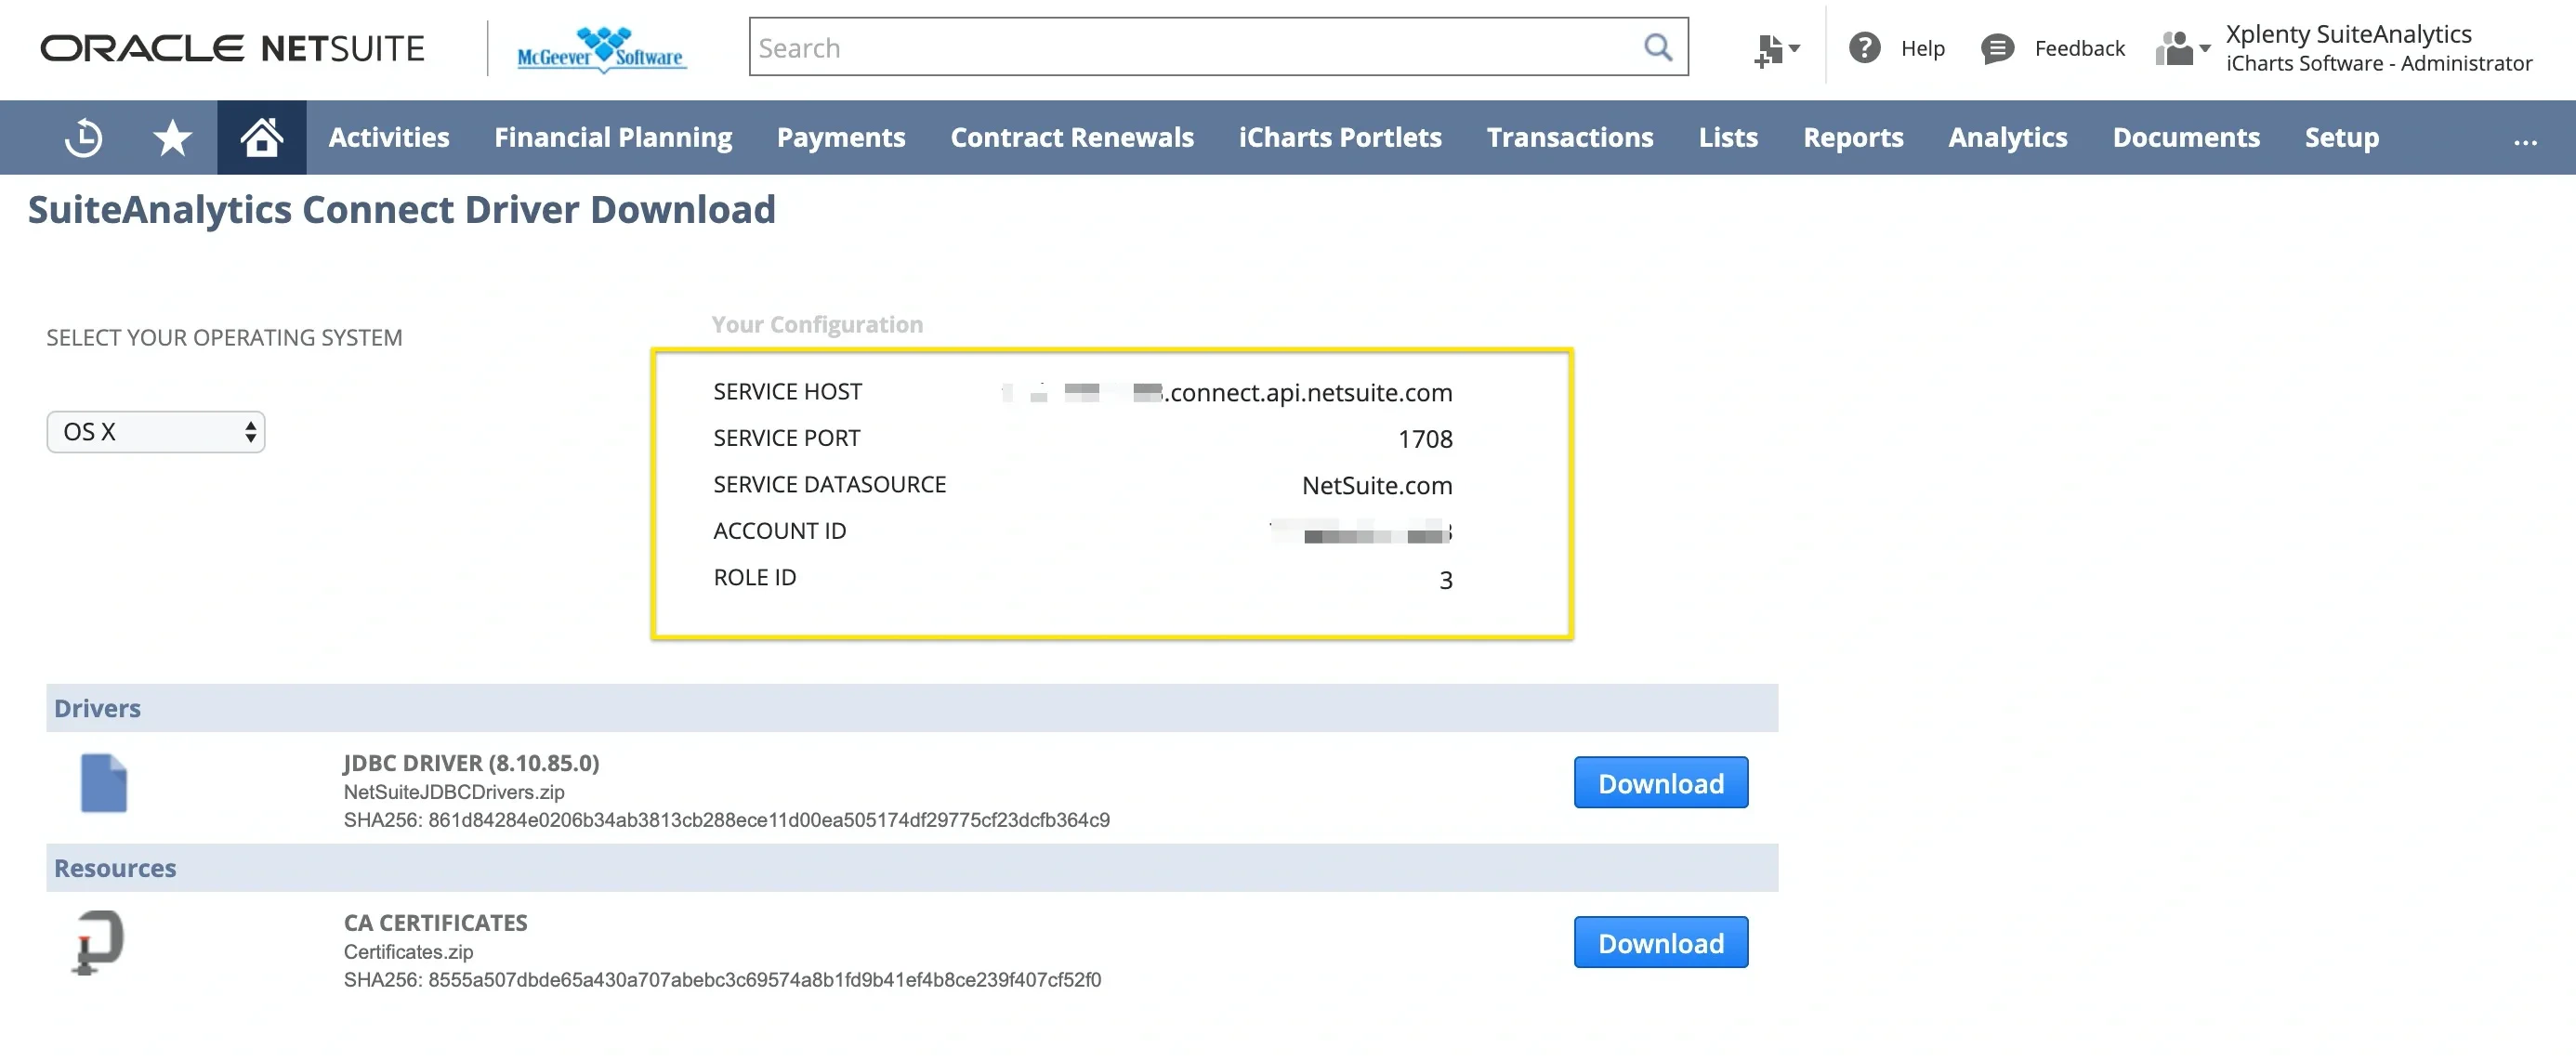
 You can find the connection information needed above in the SuiteAnalytics Connect configuration panel shown here:
 ## To setup Netsuite2.com as data source
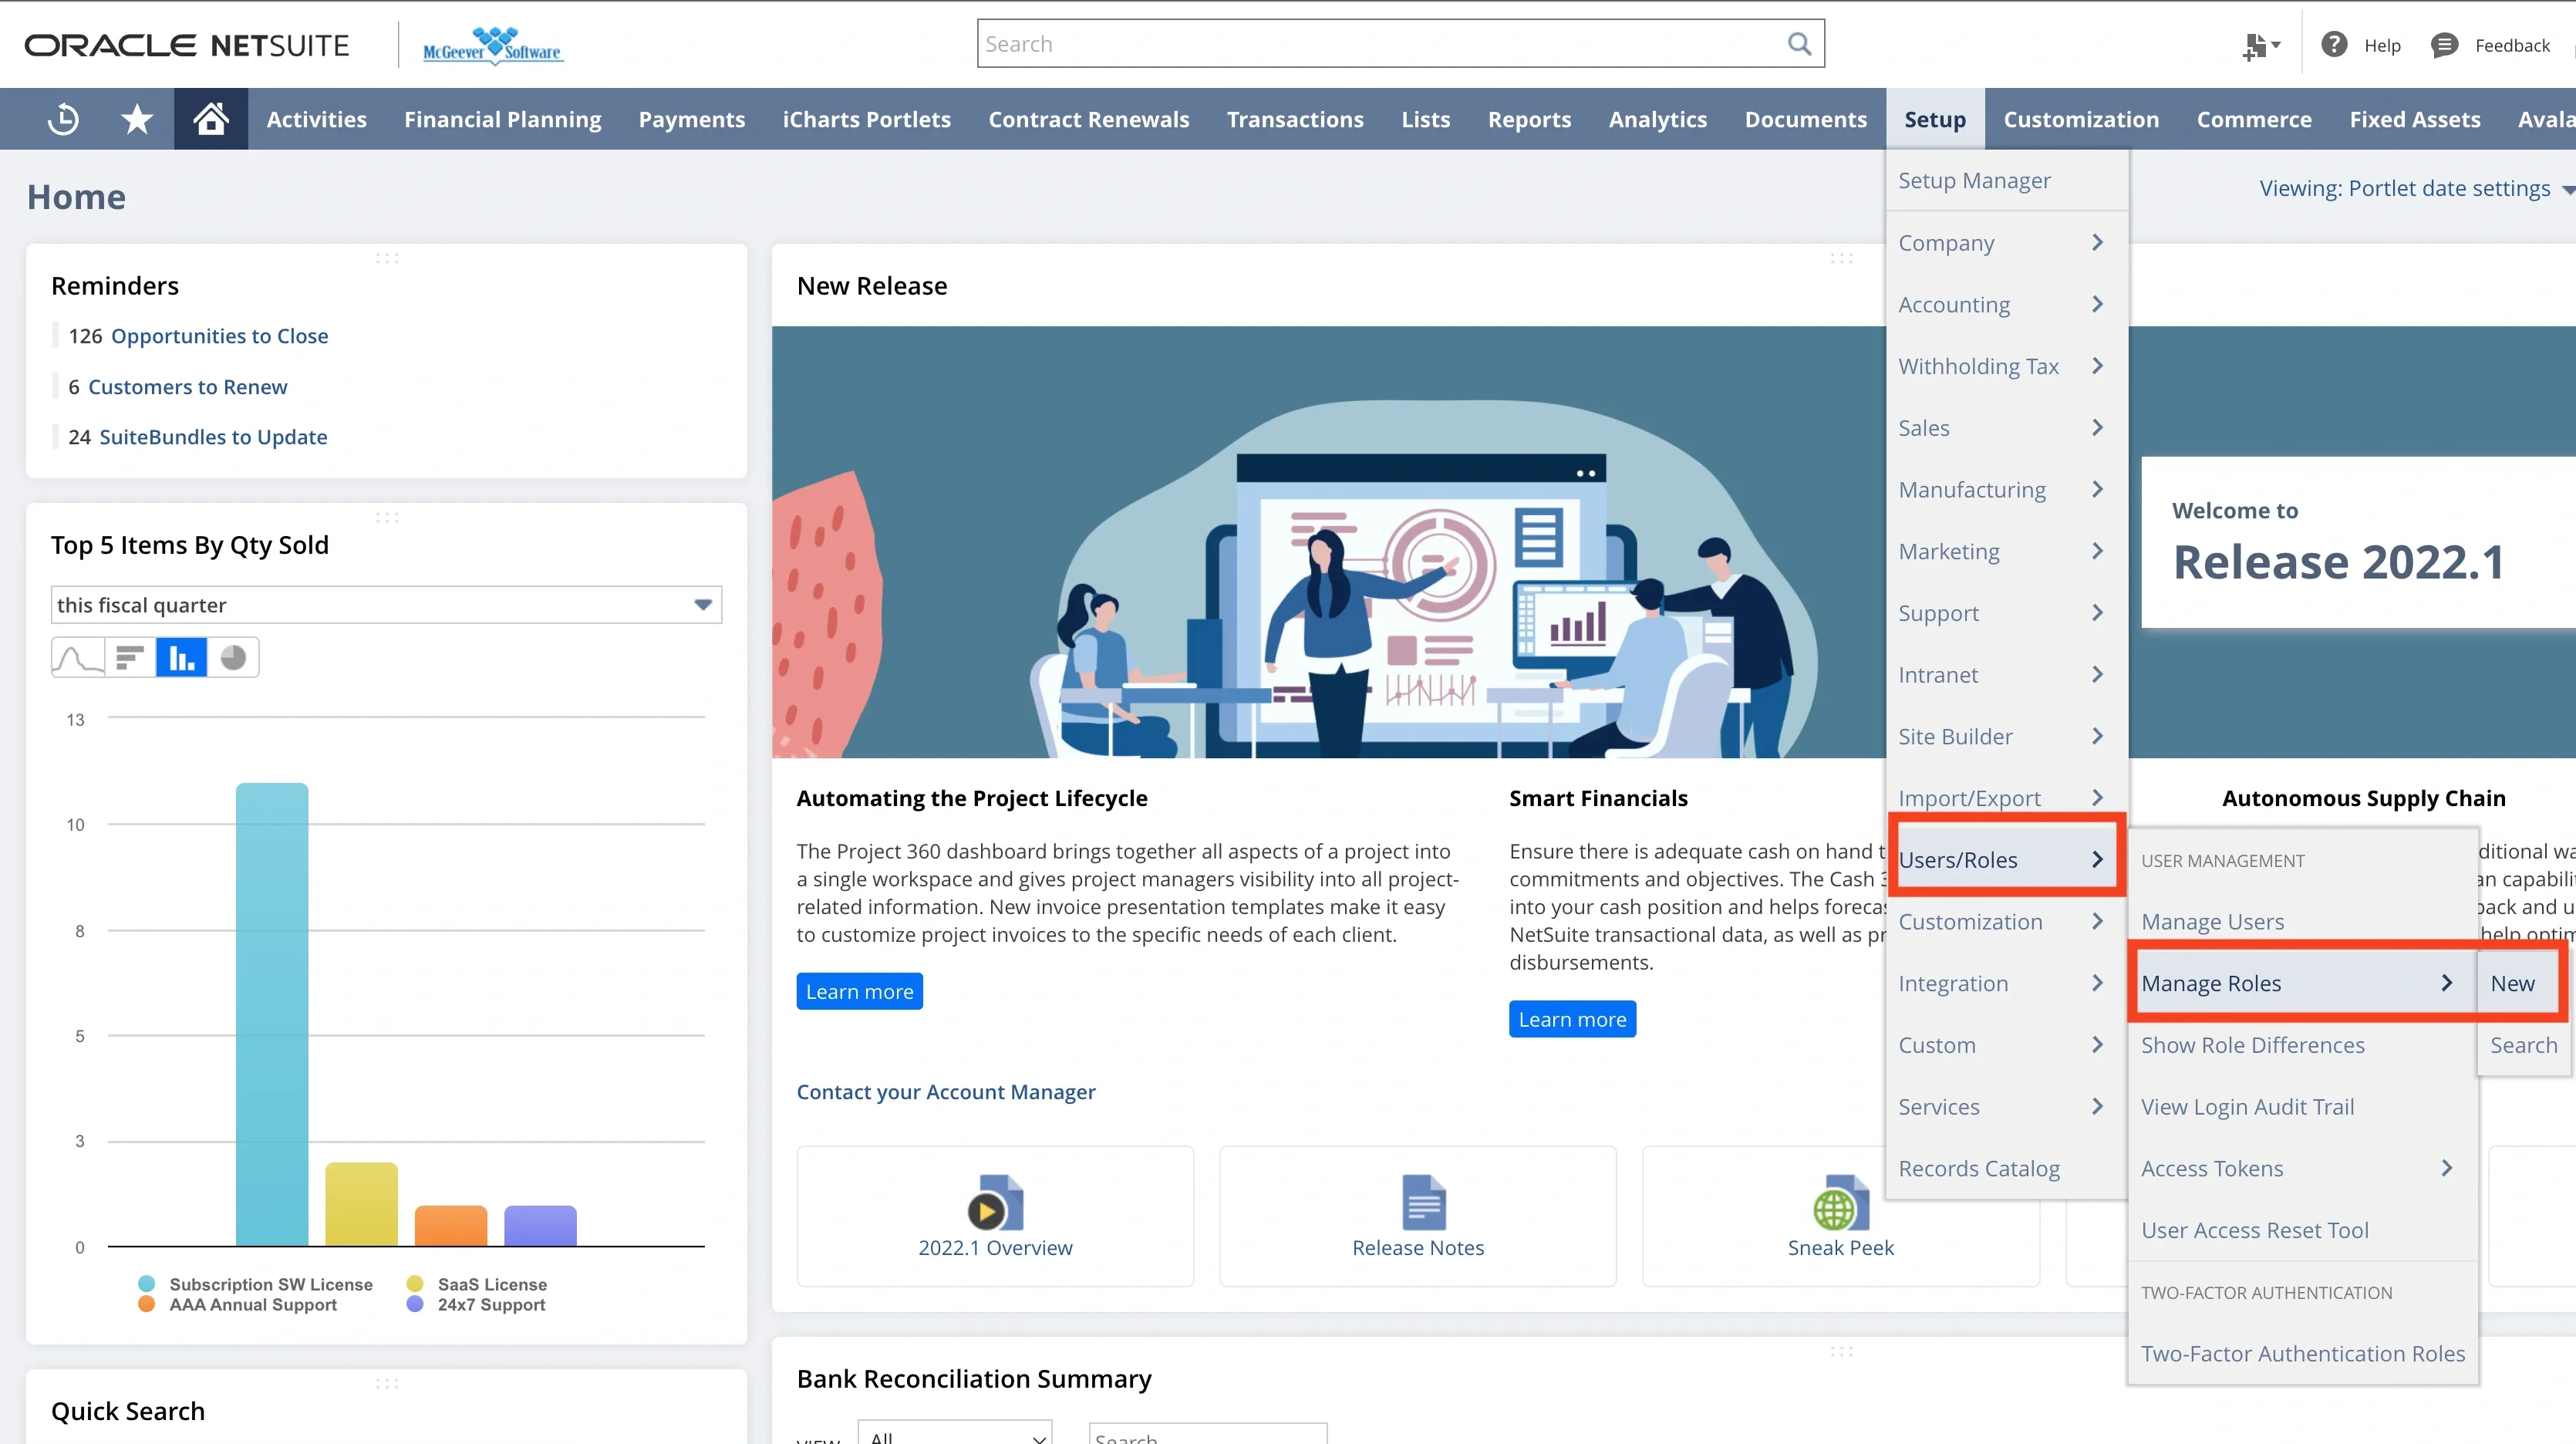
Create a new role. Go to **Setup** > **Users/Roles** > **Manage Roles** > **New**.
## To setup Netsuite2.com as data source
Create a new role. Go to **Setup** > **Users/Roles** > **Manage Roles** > **New**.
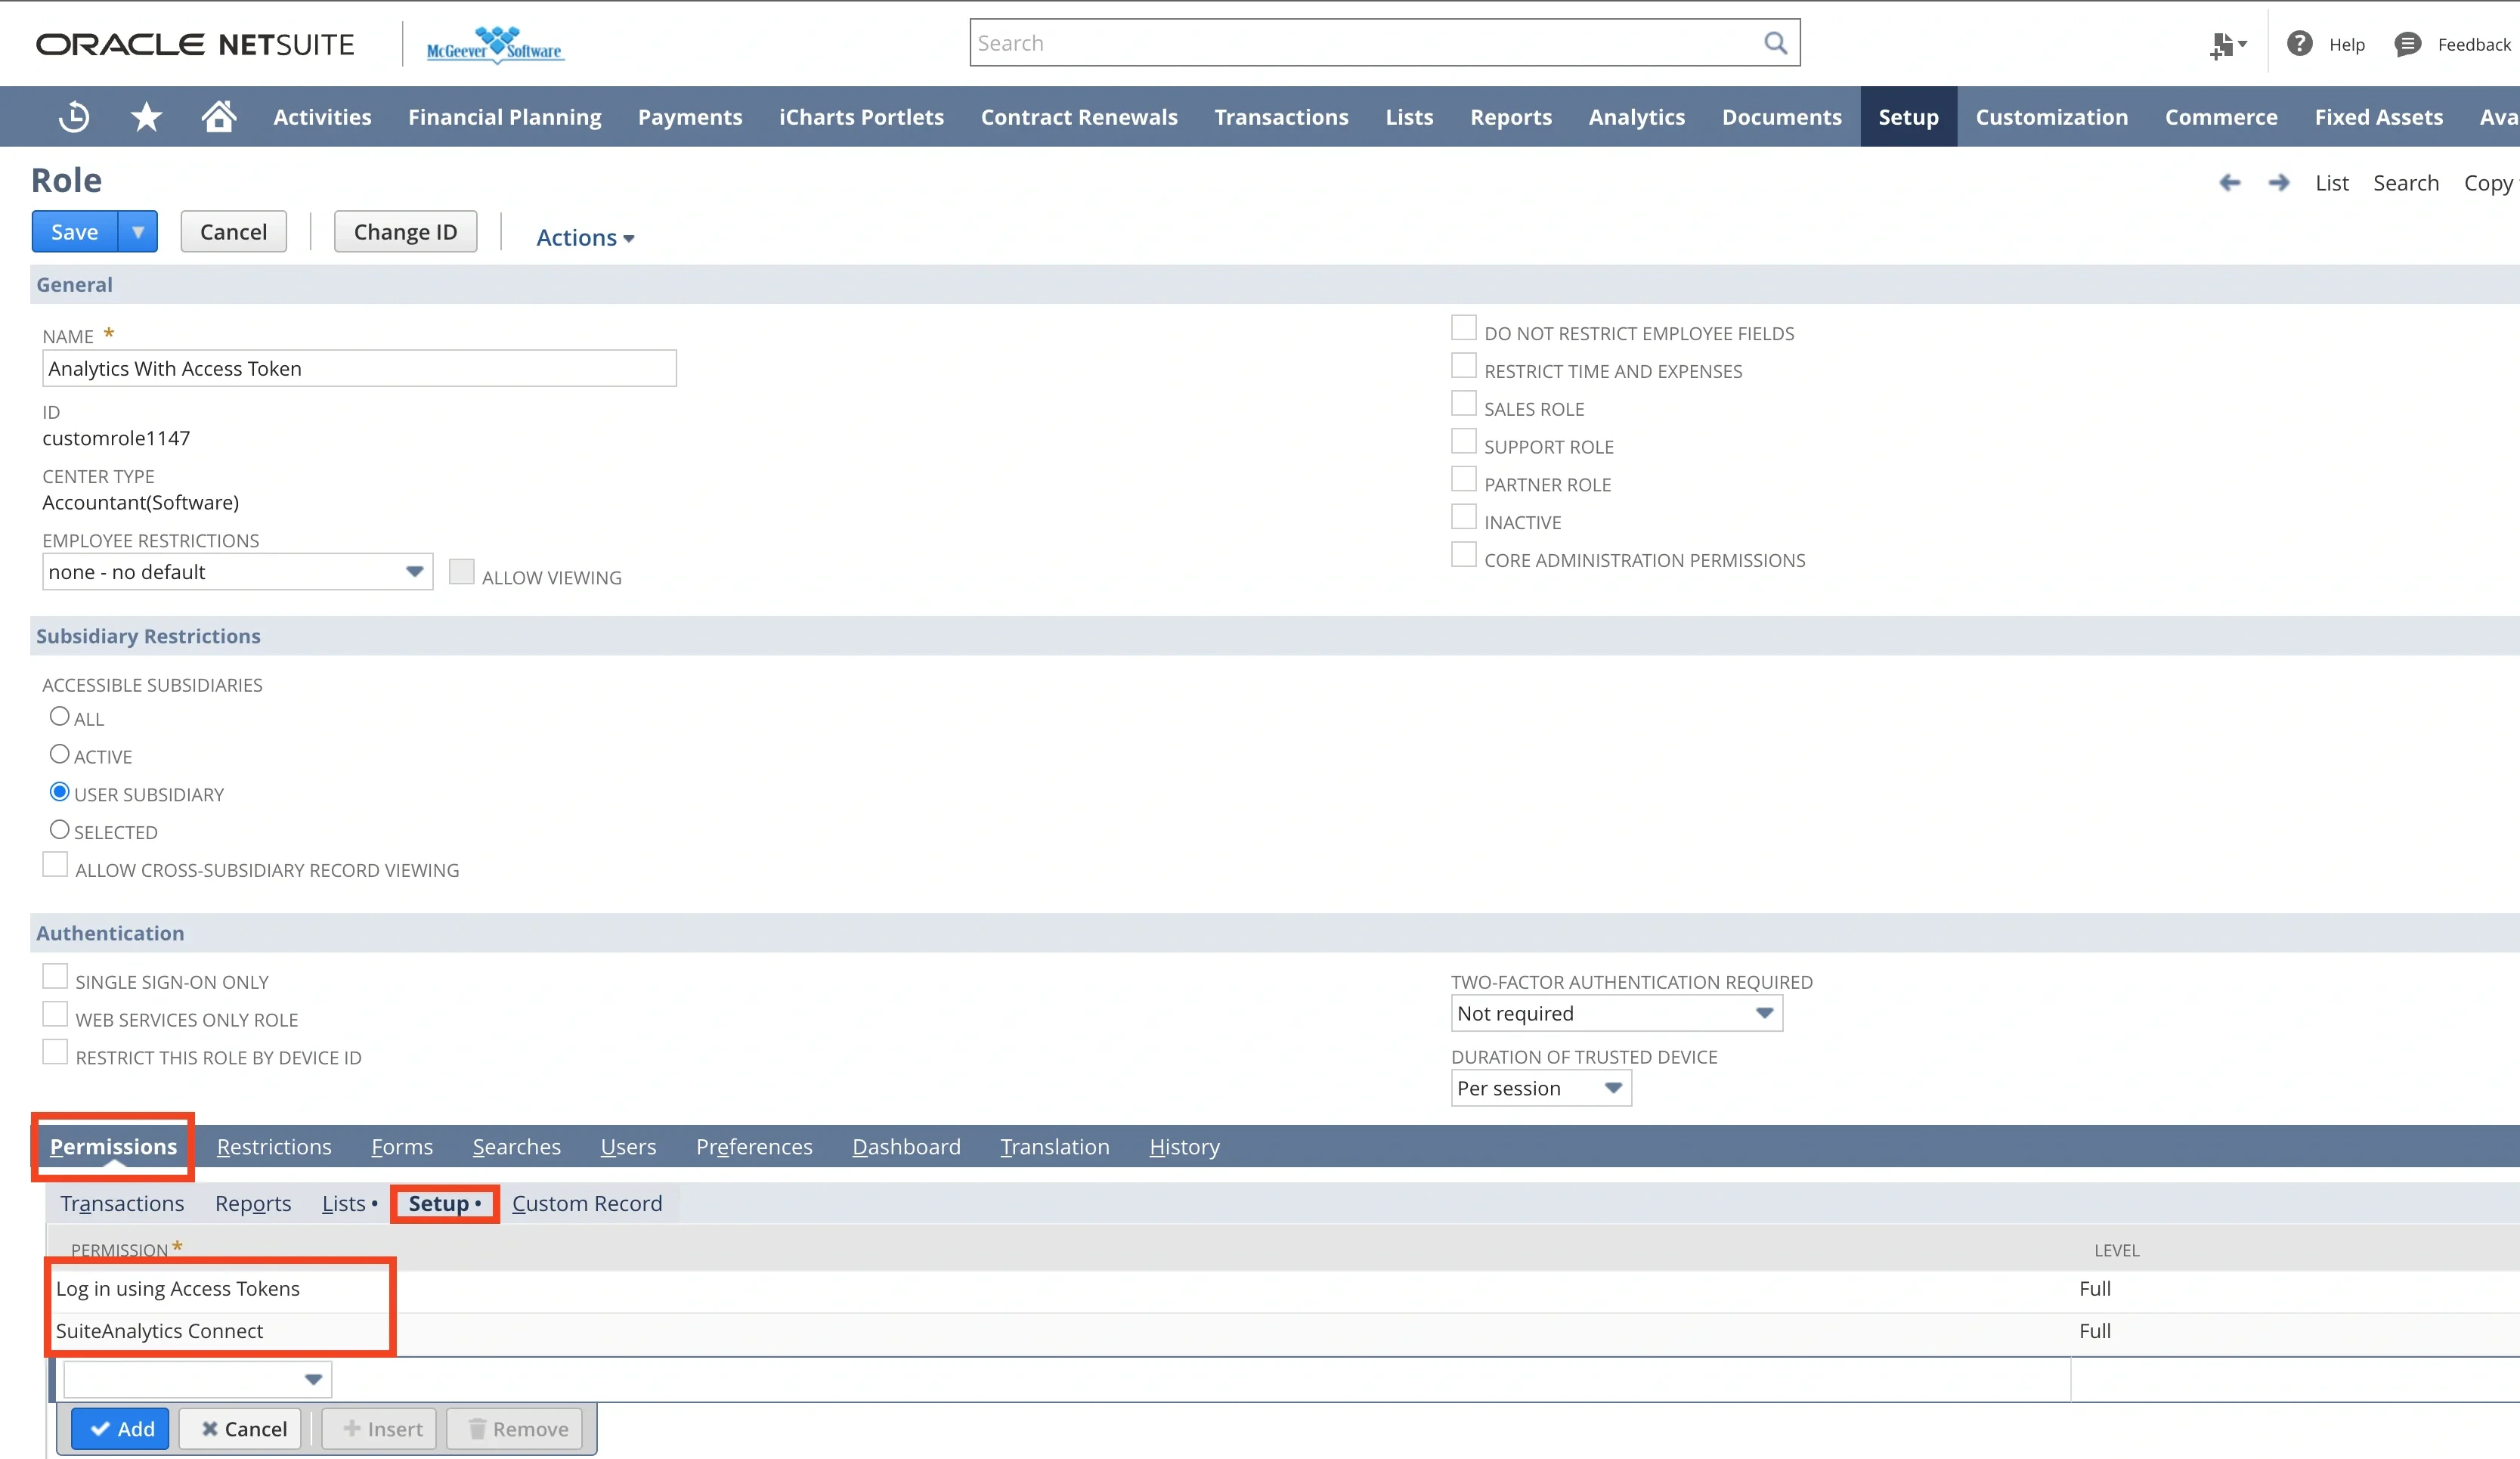
 Enter a name for this role. Select **Permissions** tab and then click **Setup** tab and assign following permissions:
* Log in using Access Tokens
* SuiteAnalytics Connect
Enter a name for this role. Select **Permissions** tab and then click **Setup** tab and assign following permissions:
* Log in using Access Tokens
* SuiteAnalytics Connect
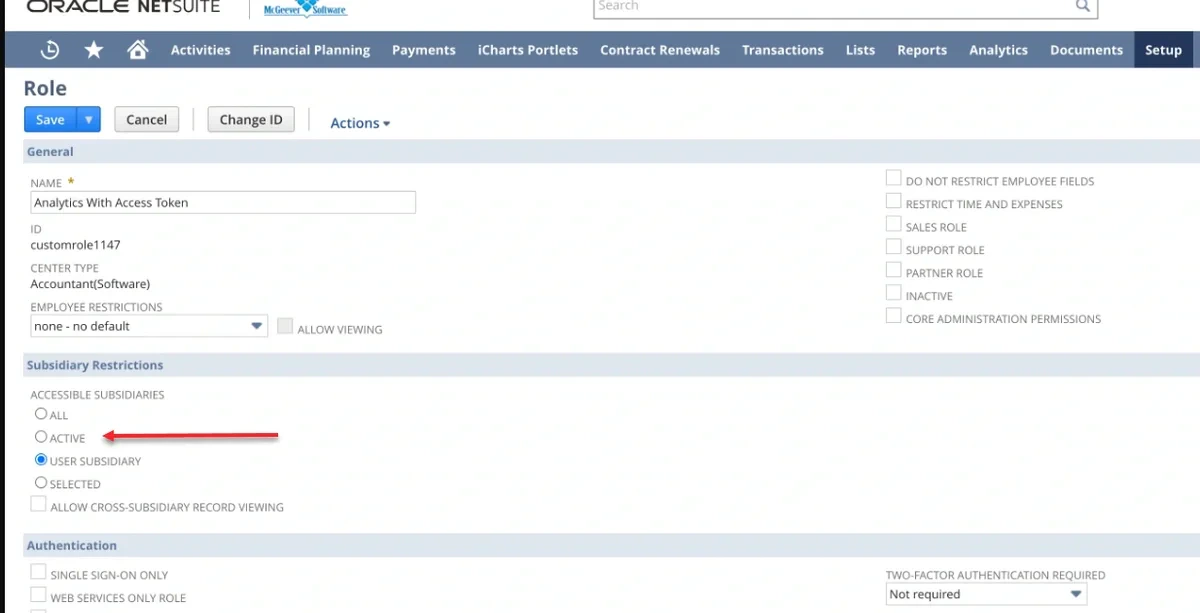
 **Note:**
The 'Subsidiary Restriction' section may limit access to certain records you wish to retrieve. Depending on the type of subsidiary structure your organization operates under, you should carefully select these options to ensure you obtain the desired data.
**Note:**
The 'Subsidiary Restriction' section may limit access to certain records you wish to retrieve. Depending on the type of subsidiary structure your organization operates under, you should carefully select these options to ensure you obtain the desired data.
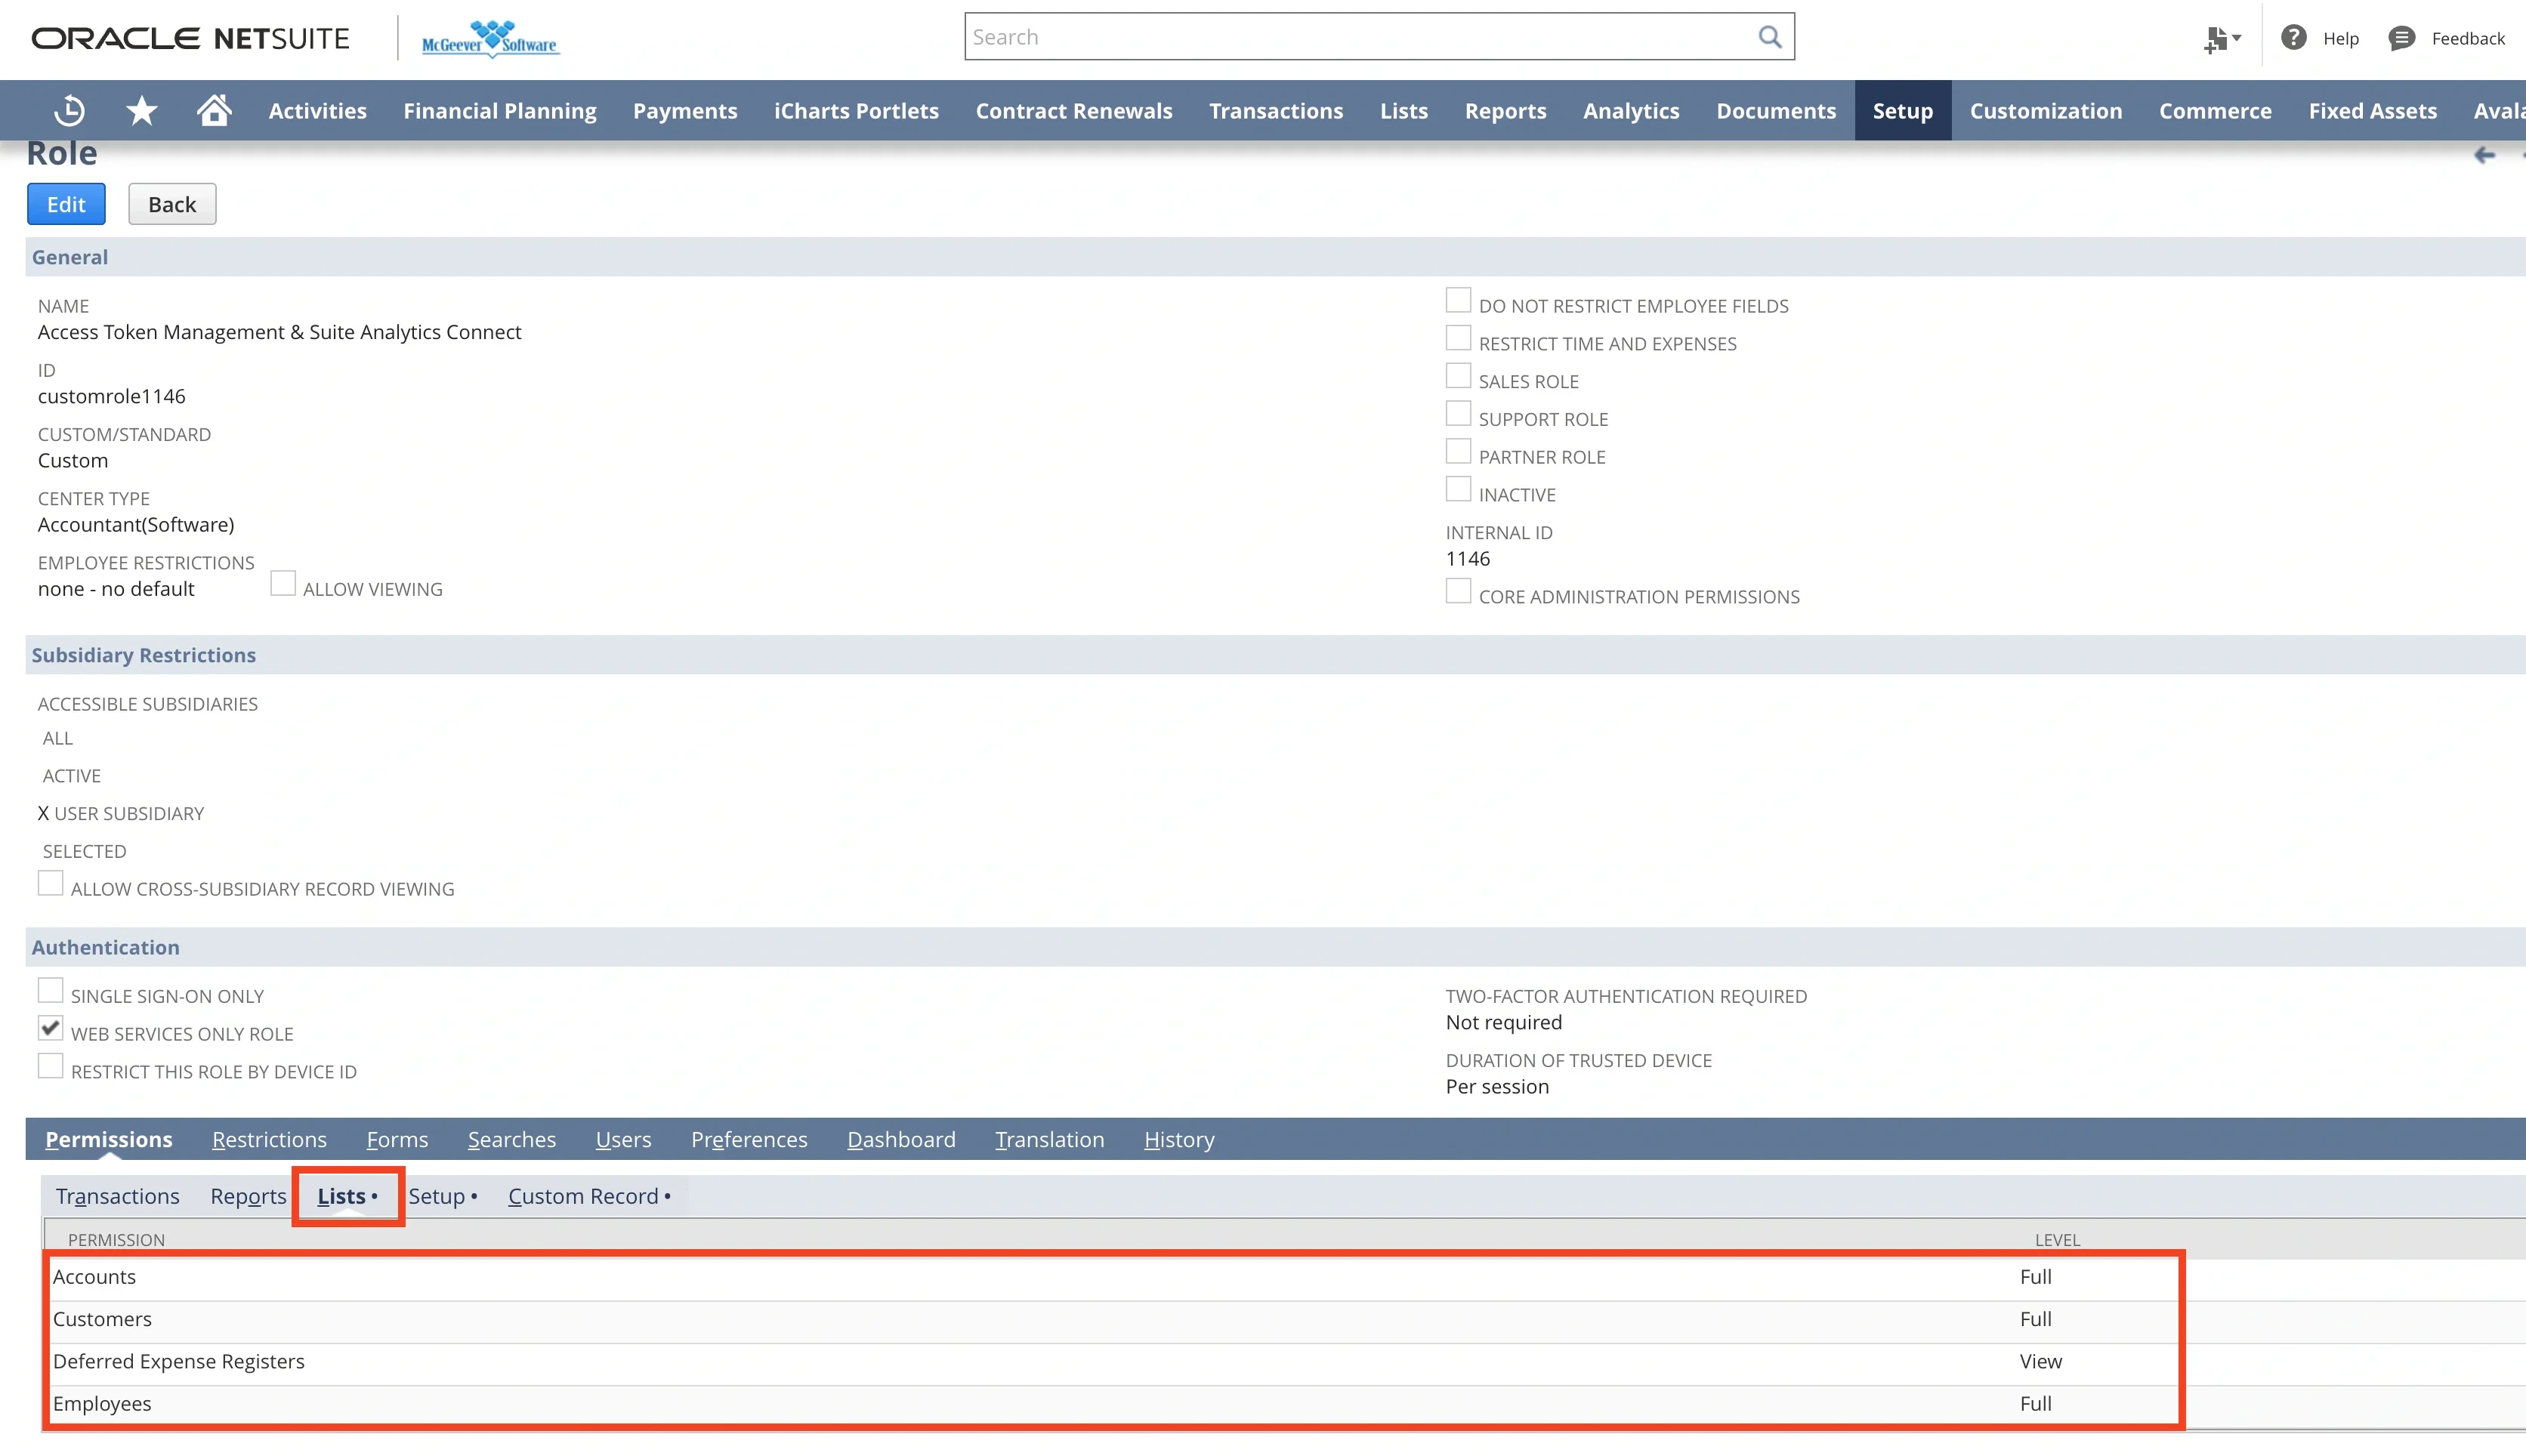
 Grant an access to the selected tables. On the same role creation page, go to **Lists** tab and select tables.
**Note:**
The screenshot below is demonstrating how to enable access to the Account table. Before proceeding, we recommend coordinating with your business team to determine the complete list of NetSuite tables required for your integration. Once the list is finalized, please contact your NetSuite Account Manager for assistance in configuring the appropriate permissions to ensure all relevant tables are both visible and accessible for integration purposes.
Grant an access to the selected tables. On the same role creation page, go to **Lists** tab and select tables.
**Note:**
The screenshot below is demonstrating how to enable access to the Account table. Before proceeding, we recommend coordinating with your business team to determine the complete list of NetSuite tables required for your integration. Once the list is finalized, please contact your NetSuite Account Manager for assistance in configuring the appropriate permissions to ensure all relevant tables are both visible and accessible for integration purposes.
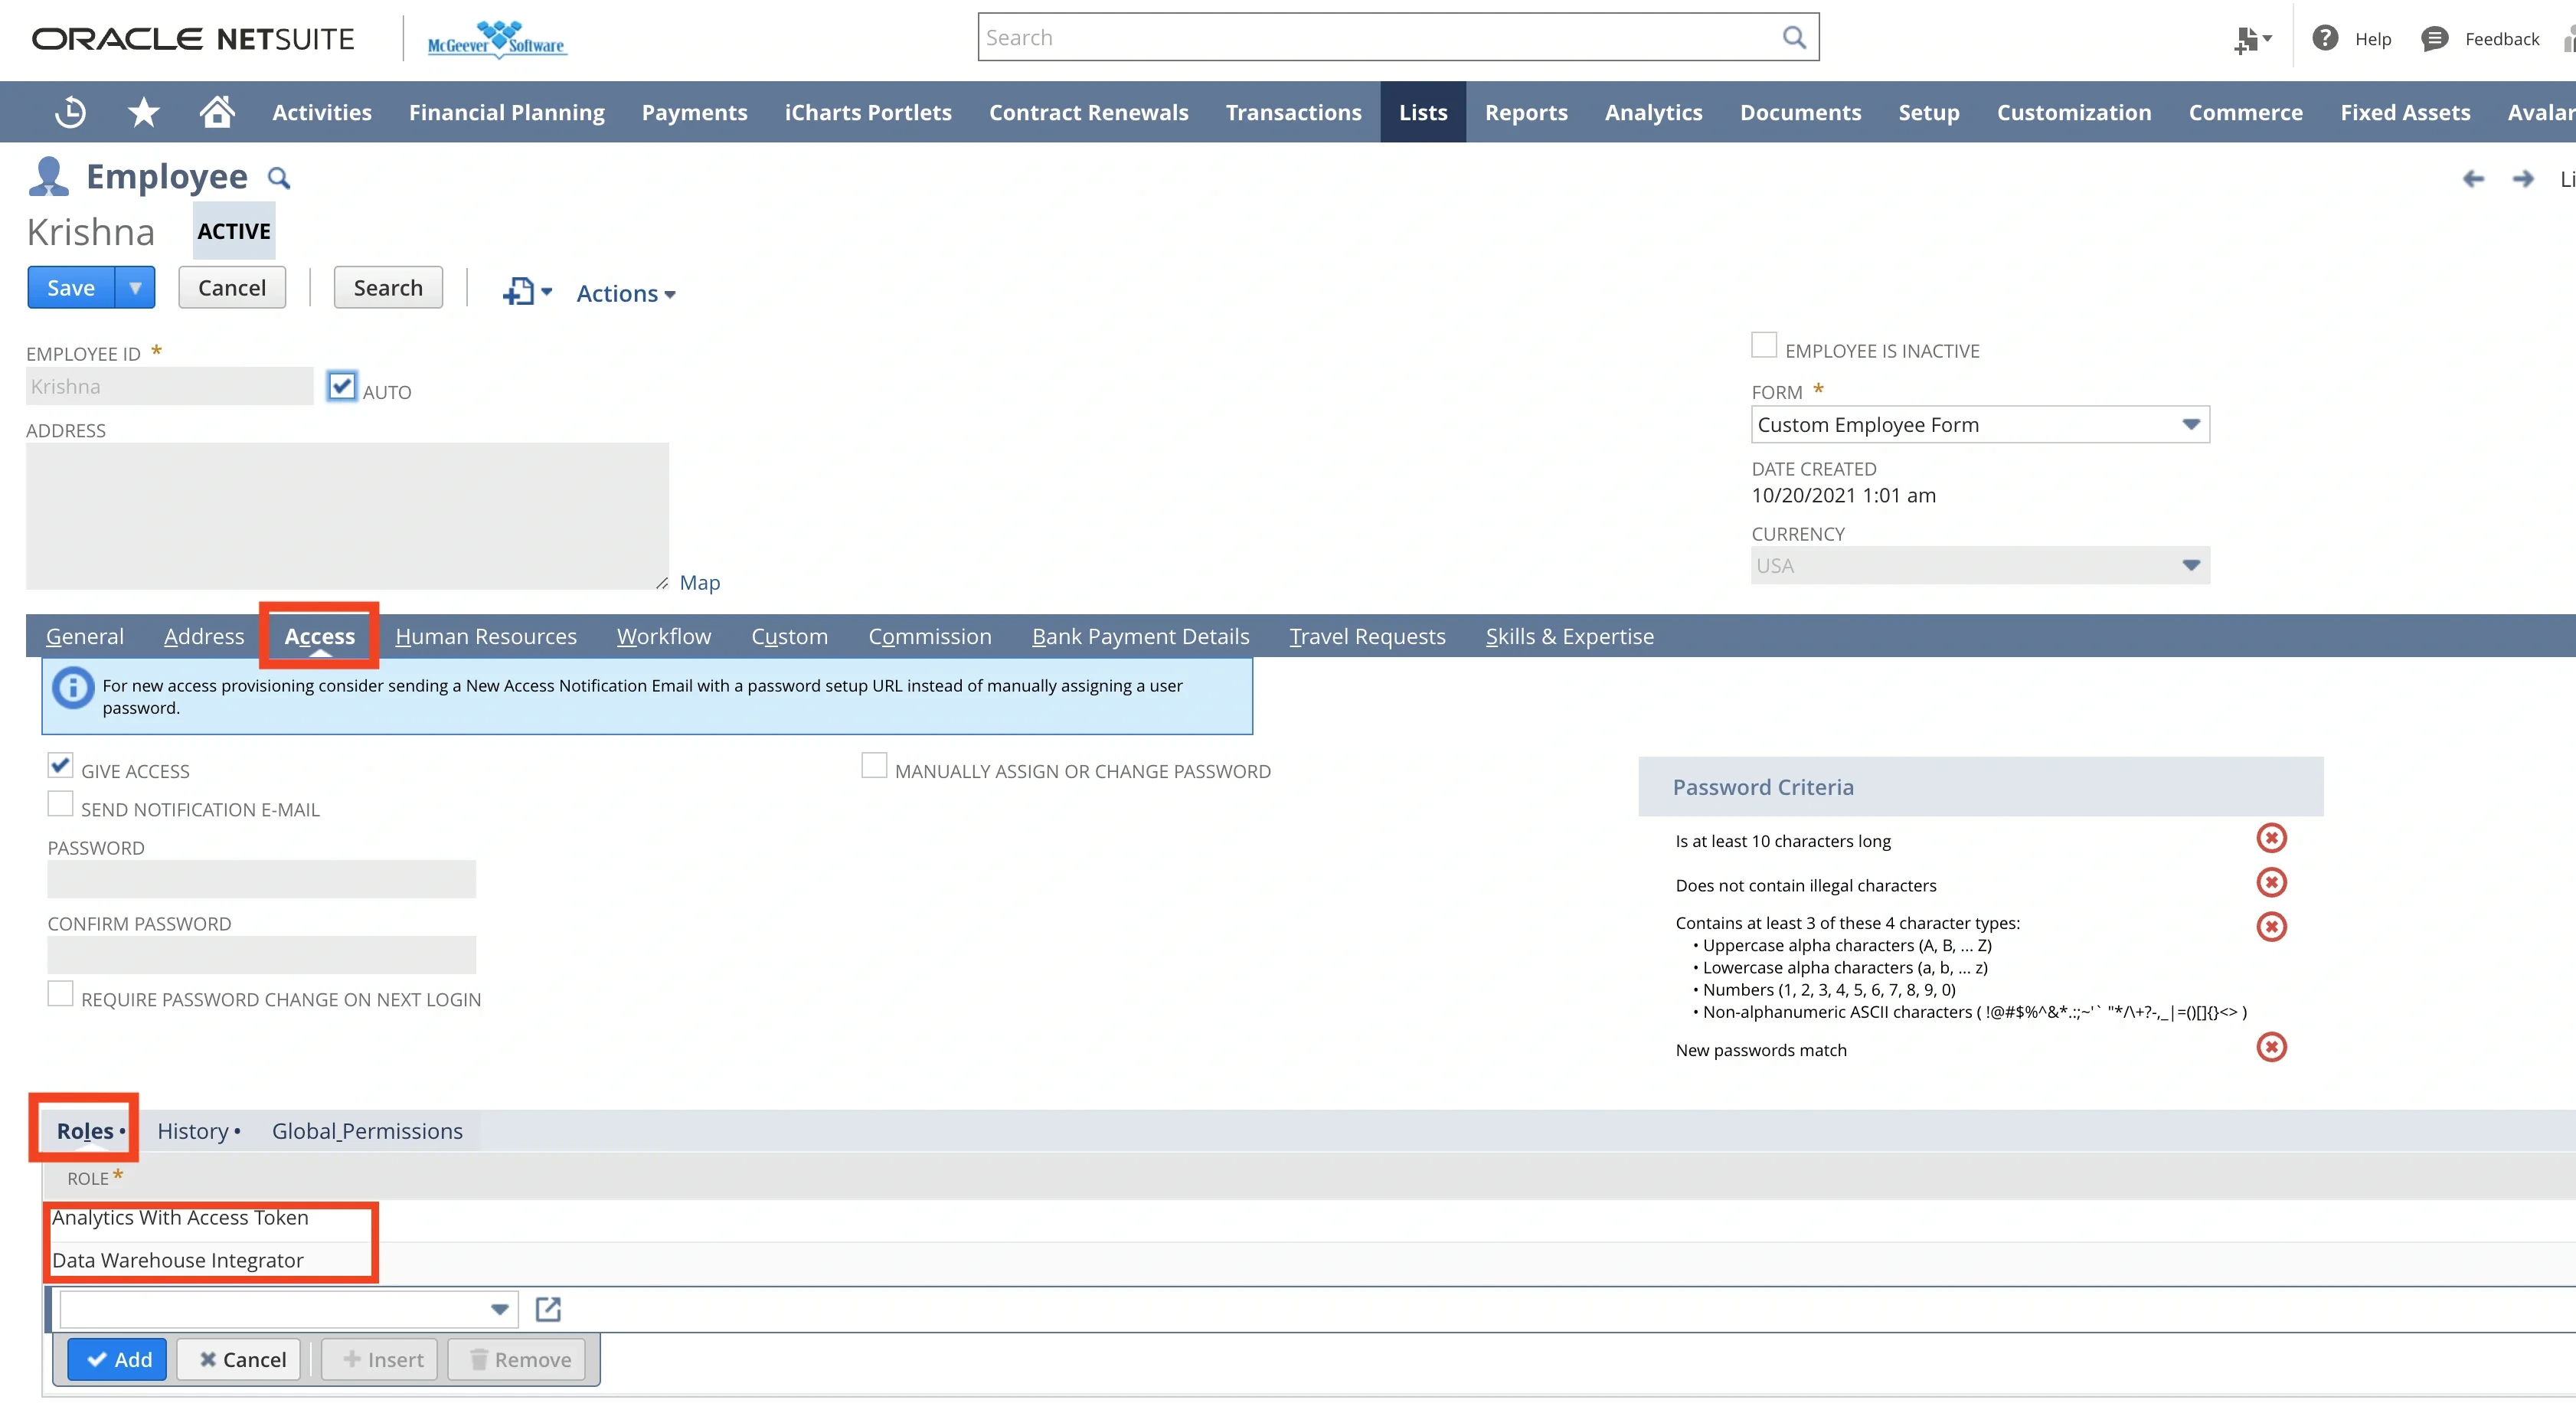
 Assign the Roles to the selected User. Select **Access** tab and then add following roles under **Roles** tab:
* The role that has just been created from previous step
* **Data Warehouse Integrator** role
Assign the Roles to the selected User. Select **Access** tab and then add following roles under **Roles** tab:
* The role that has just been created from previous step
* **Data Warehouse Integrator** role
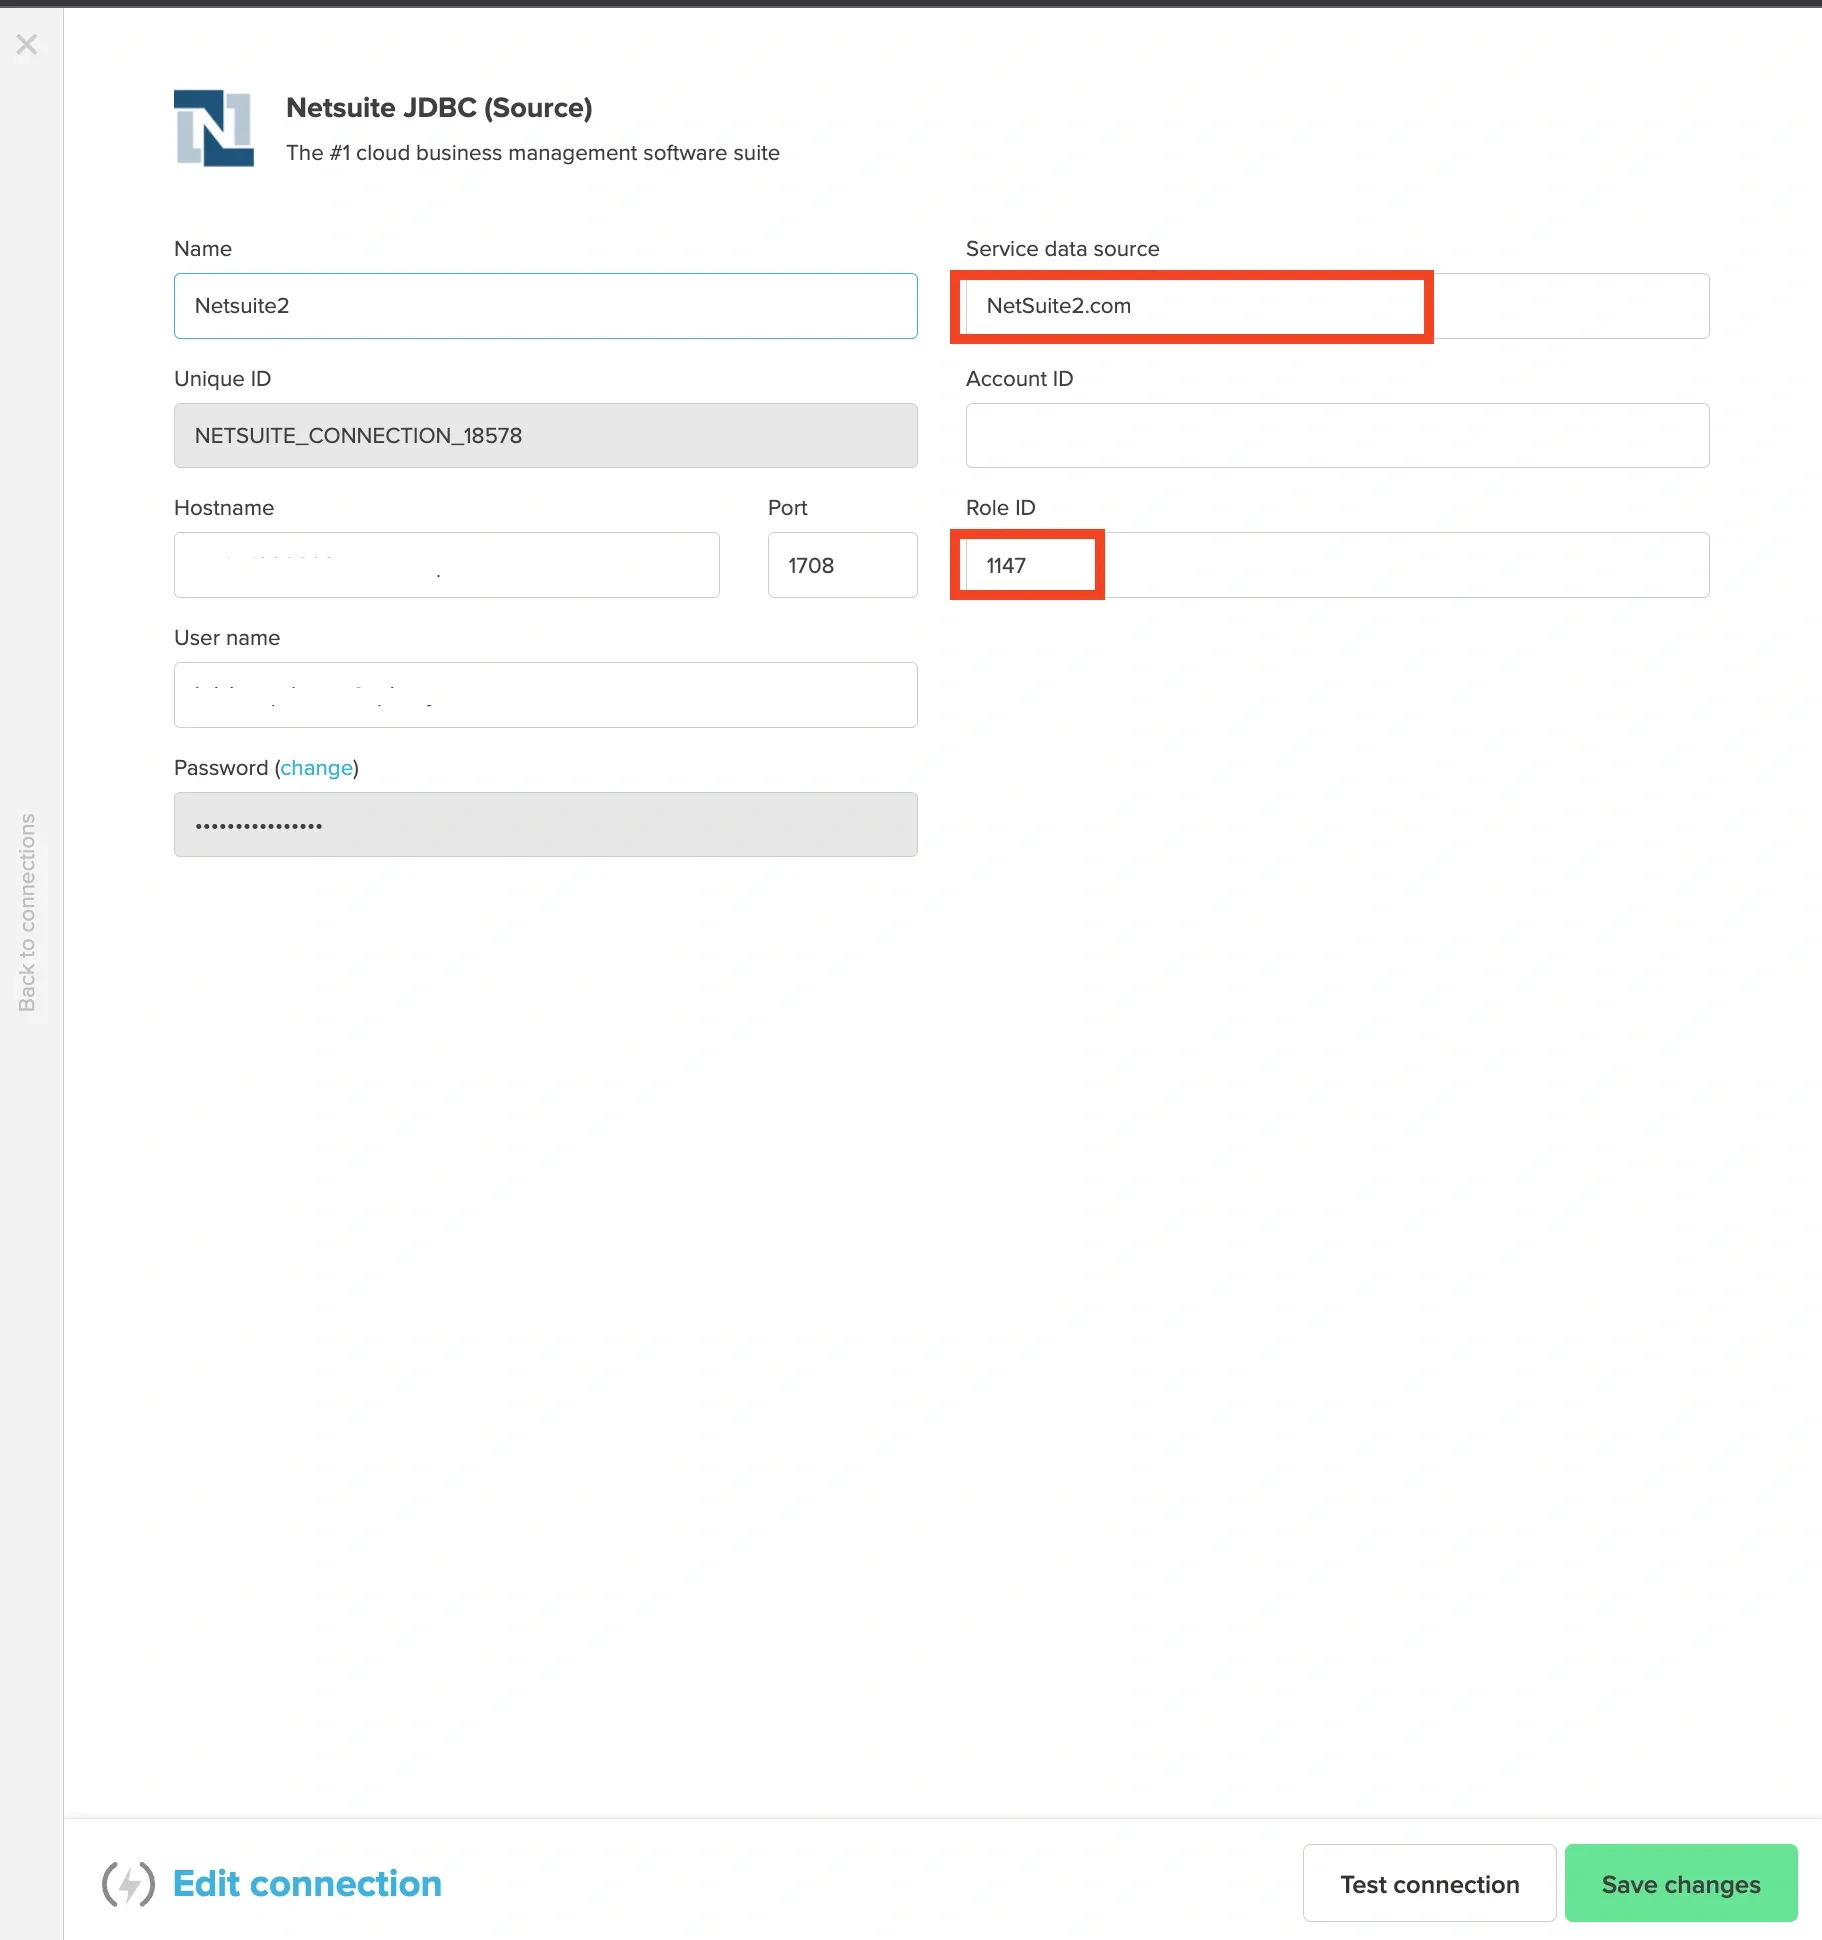
 Configure DB connection in Integrate.io ETL. Enter connection information (see steps "To create a Netsuite connection in Integrate.io ETL" from above) along with **Netsuite2.com** as Service data source and Role ID from the role that we just created from step 2.
 ## Connection Setup: NetSuite (SOAP)
## Setting up on NetSuite dashboard
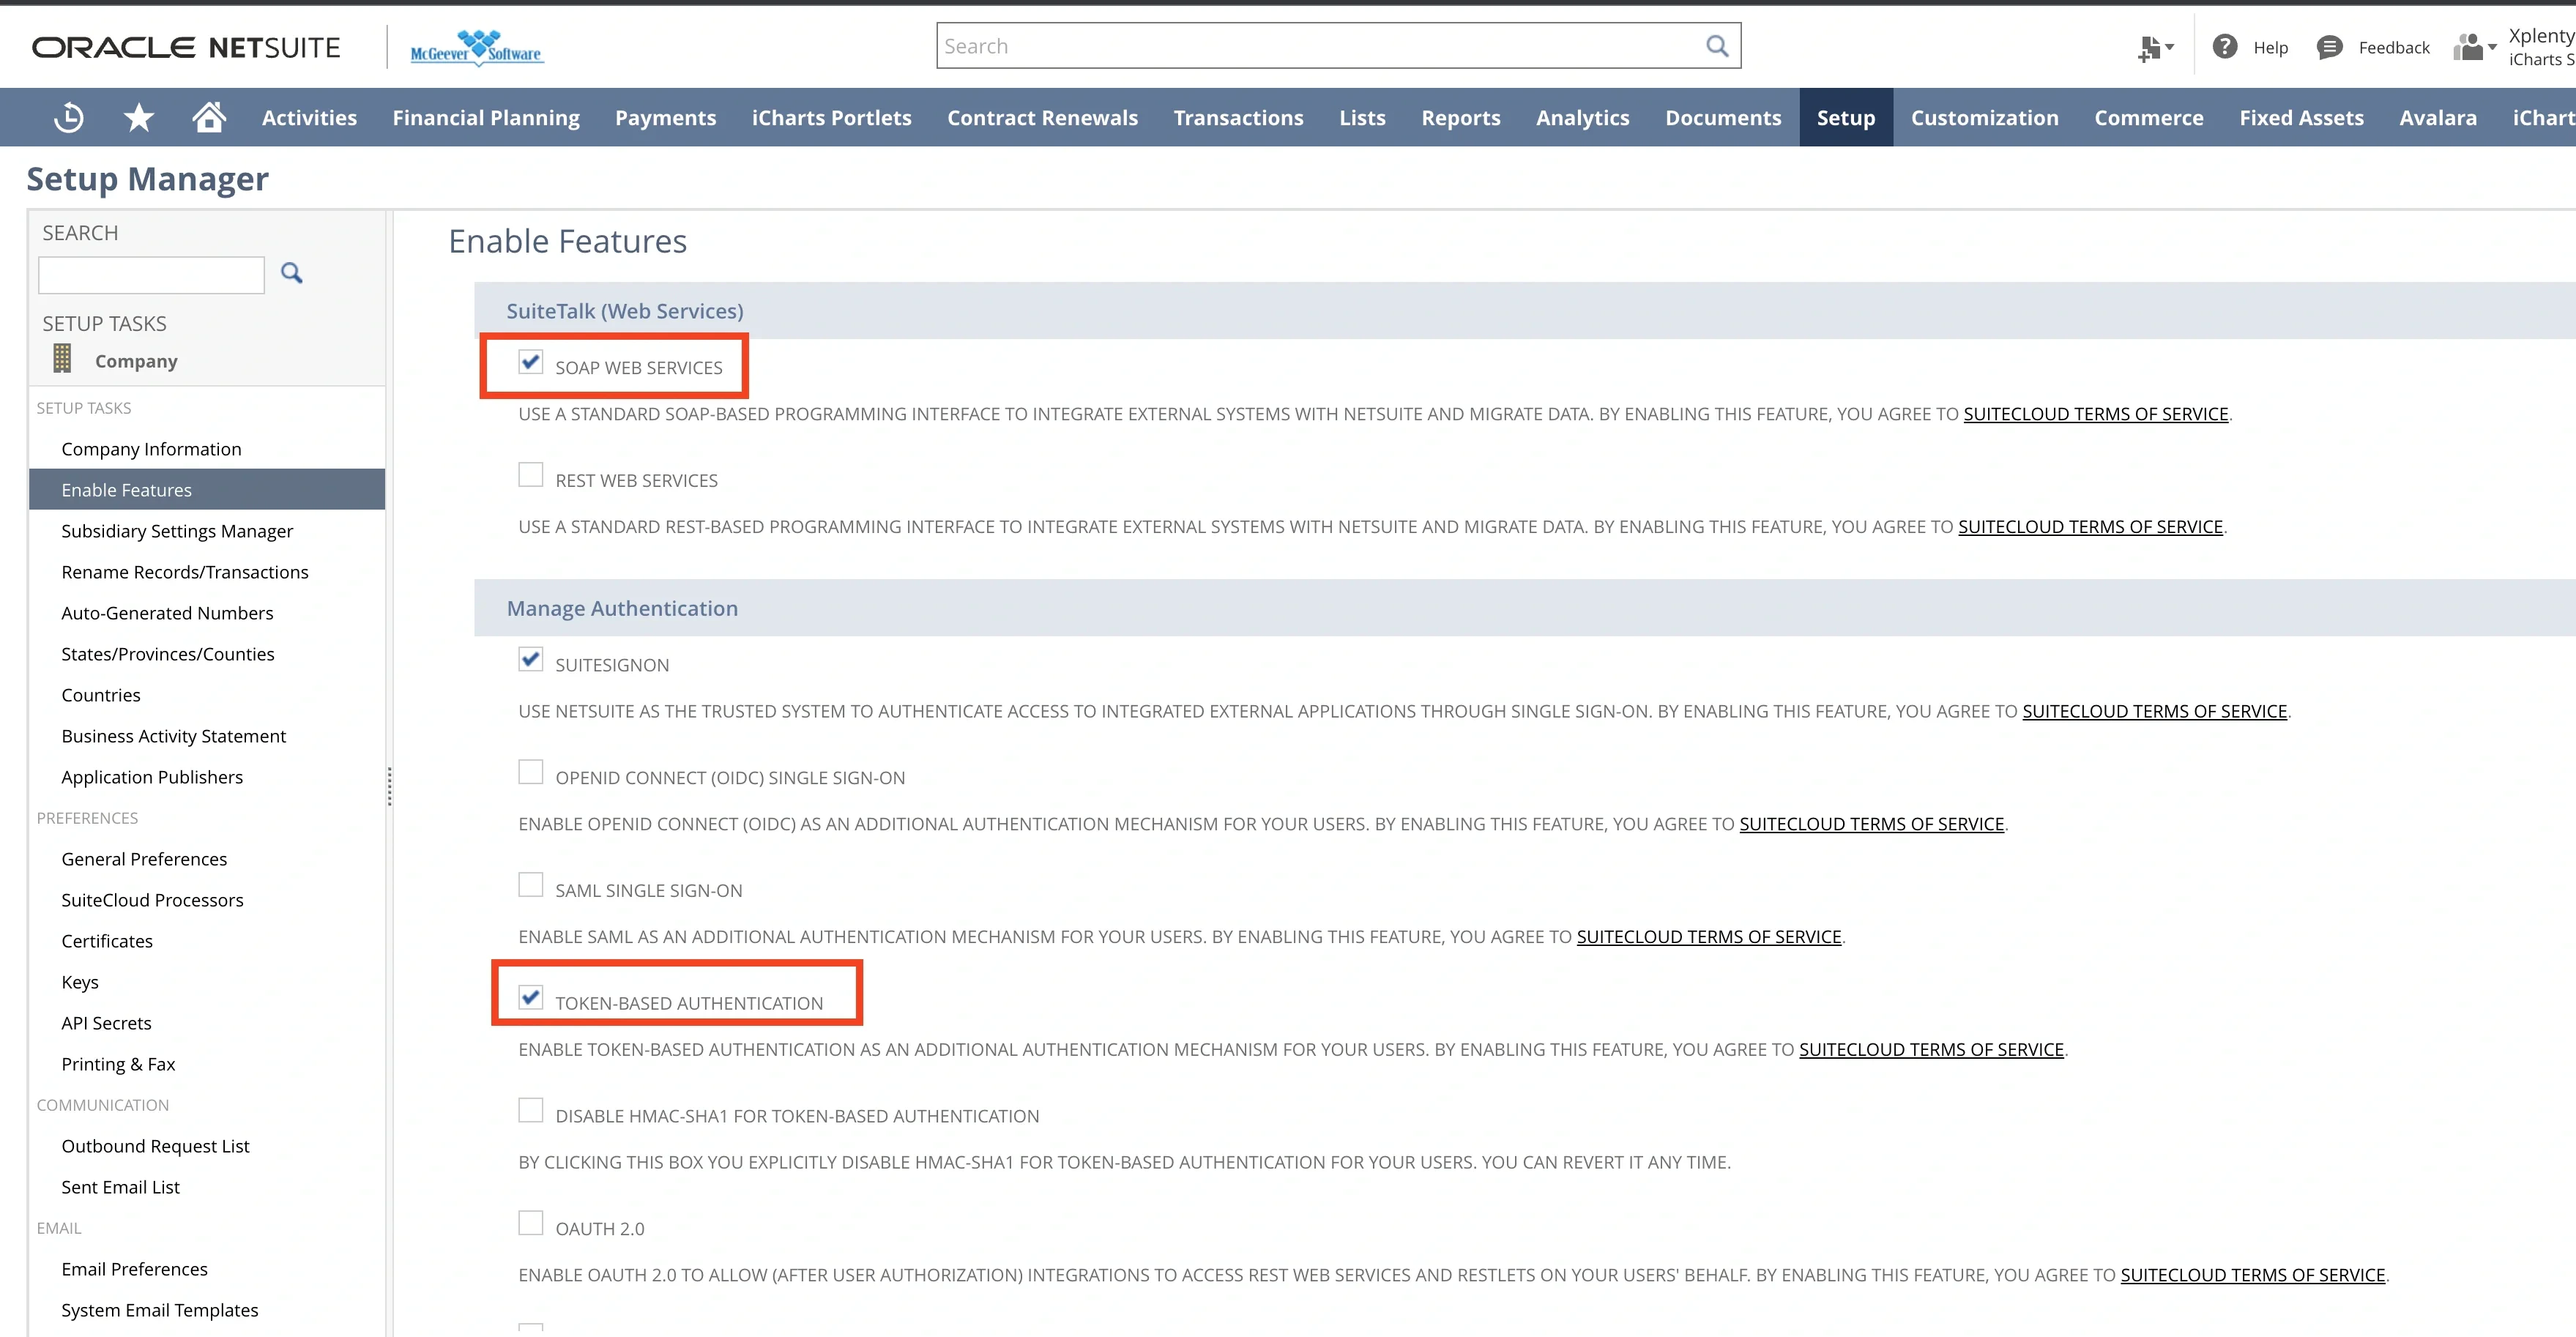
To enable SOAP Web Services and Token Based Authentication, you need to log in to your Netsuite dashboard with admin roles and please follow these steps:
Go to Setup > Company > Enable Features > SuiteTalk (Web Services) and enable both "SOAP Web Services" and "Token-based Authentication".
## Connection Setup: NetSuite (SOAP)
## Setting up on NetSuite dashboard
To enable SOAP Web Services and Token Based Authentication, you need to log in to your Netsuite dashboard with admin roles and please follow these steps:
Go to Setup > Company > Enable Features > SuiteTalk (Web Services) and enable both "SOAP Web Services" and "Token-based Authentication".
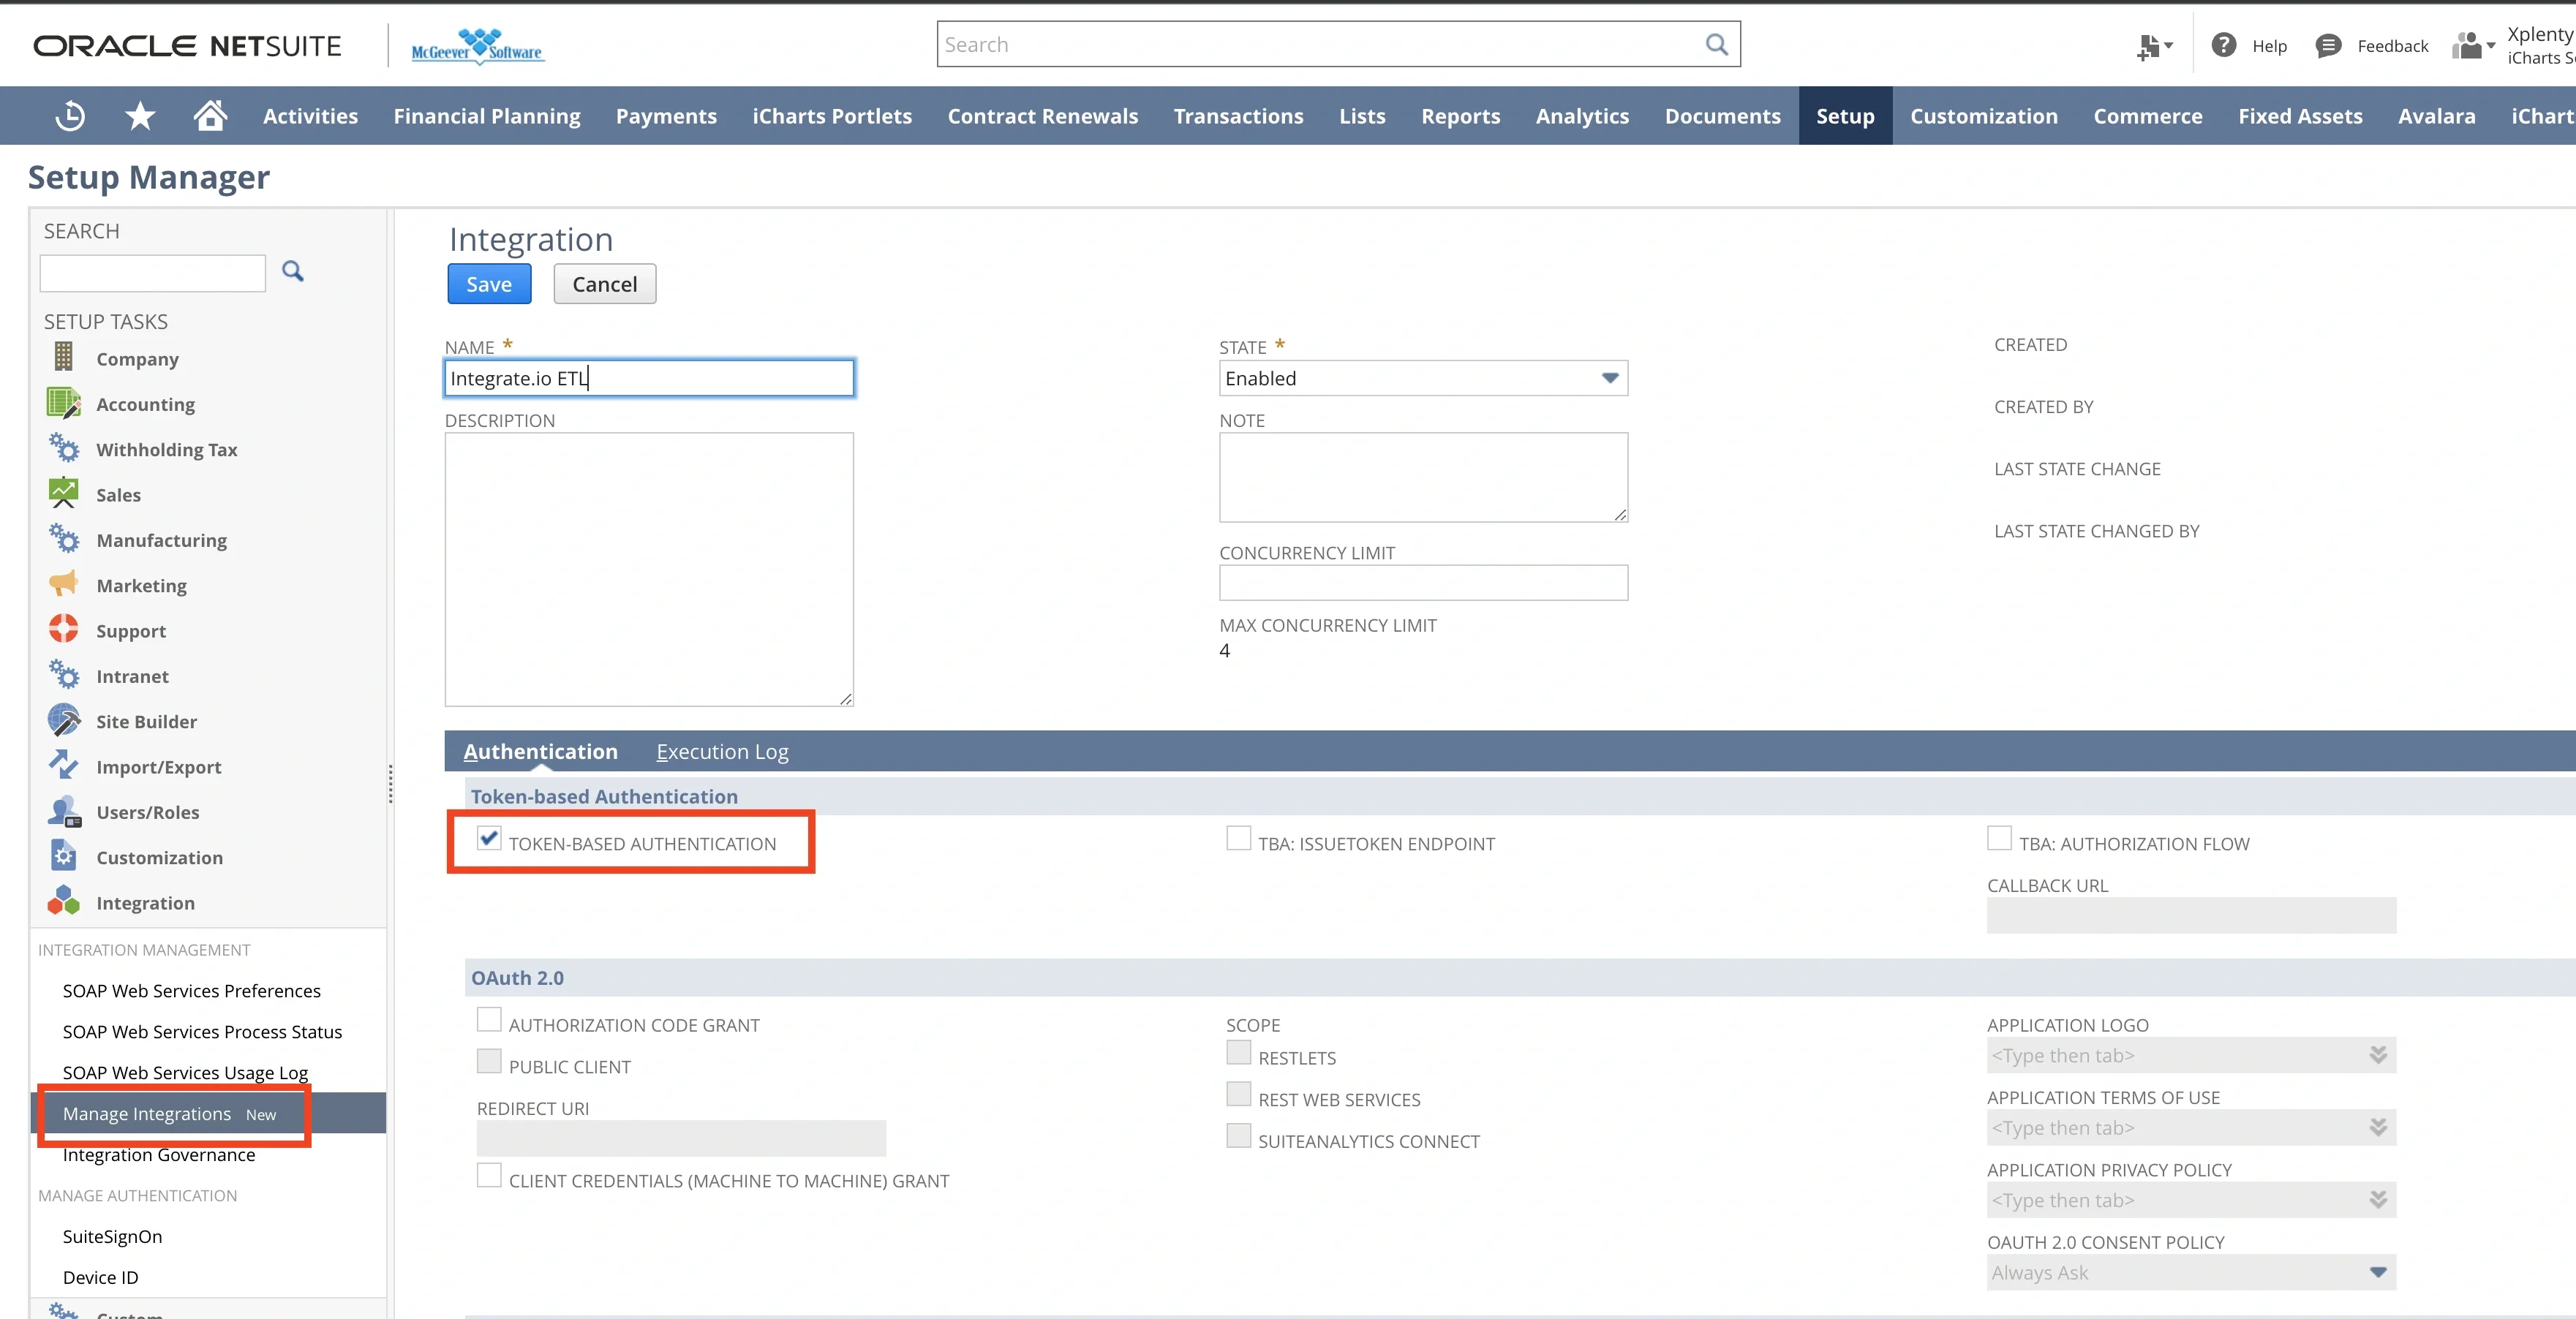
 Create a new Integration. Navigate to Setup > Integrations > Manage Integrations > New. Please note that "Token-based Authentication" must be checked.
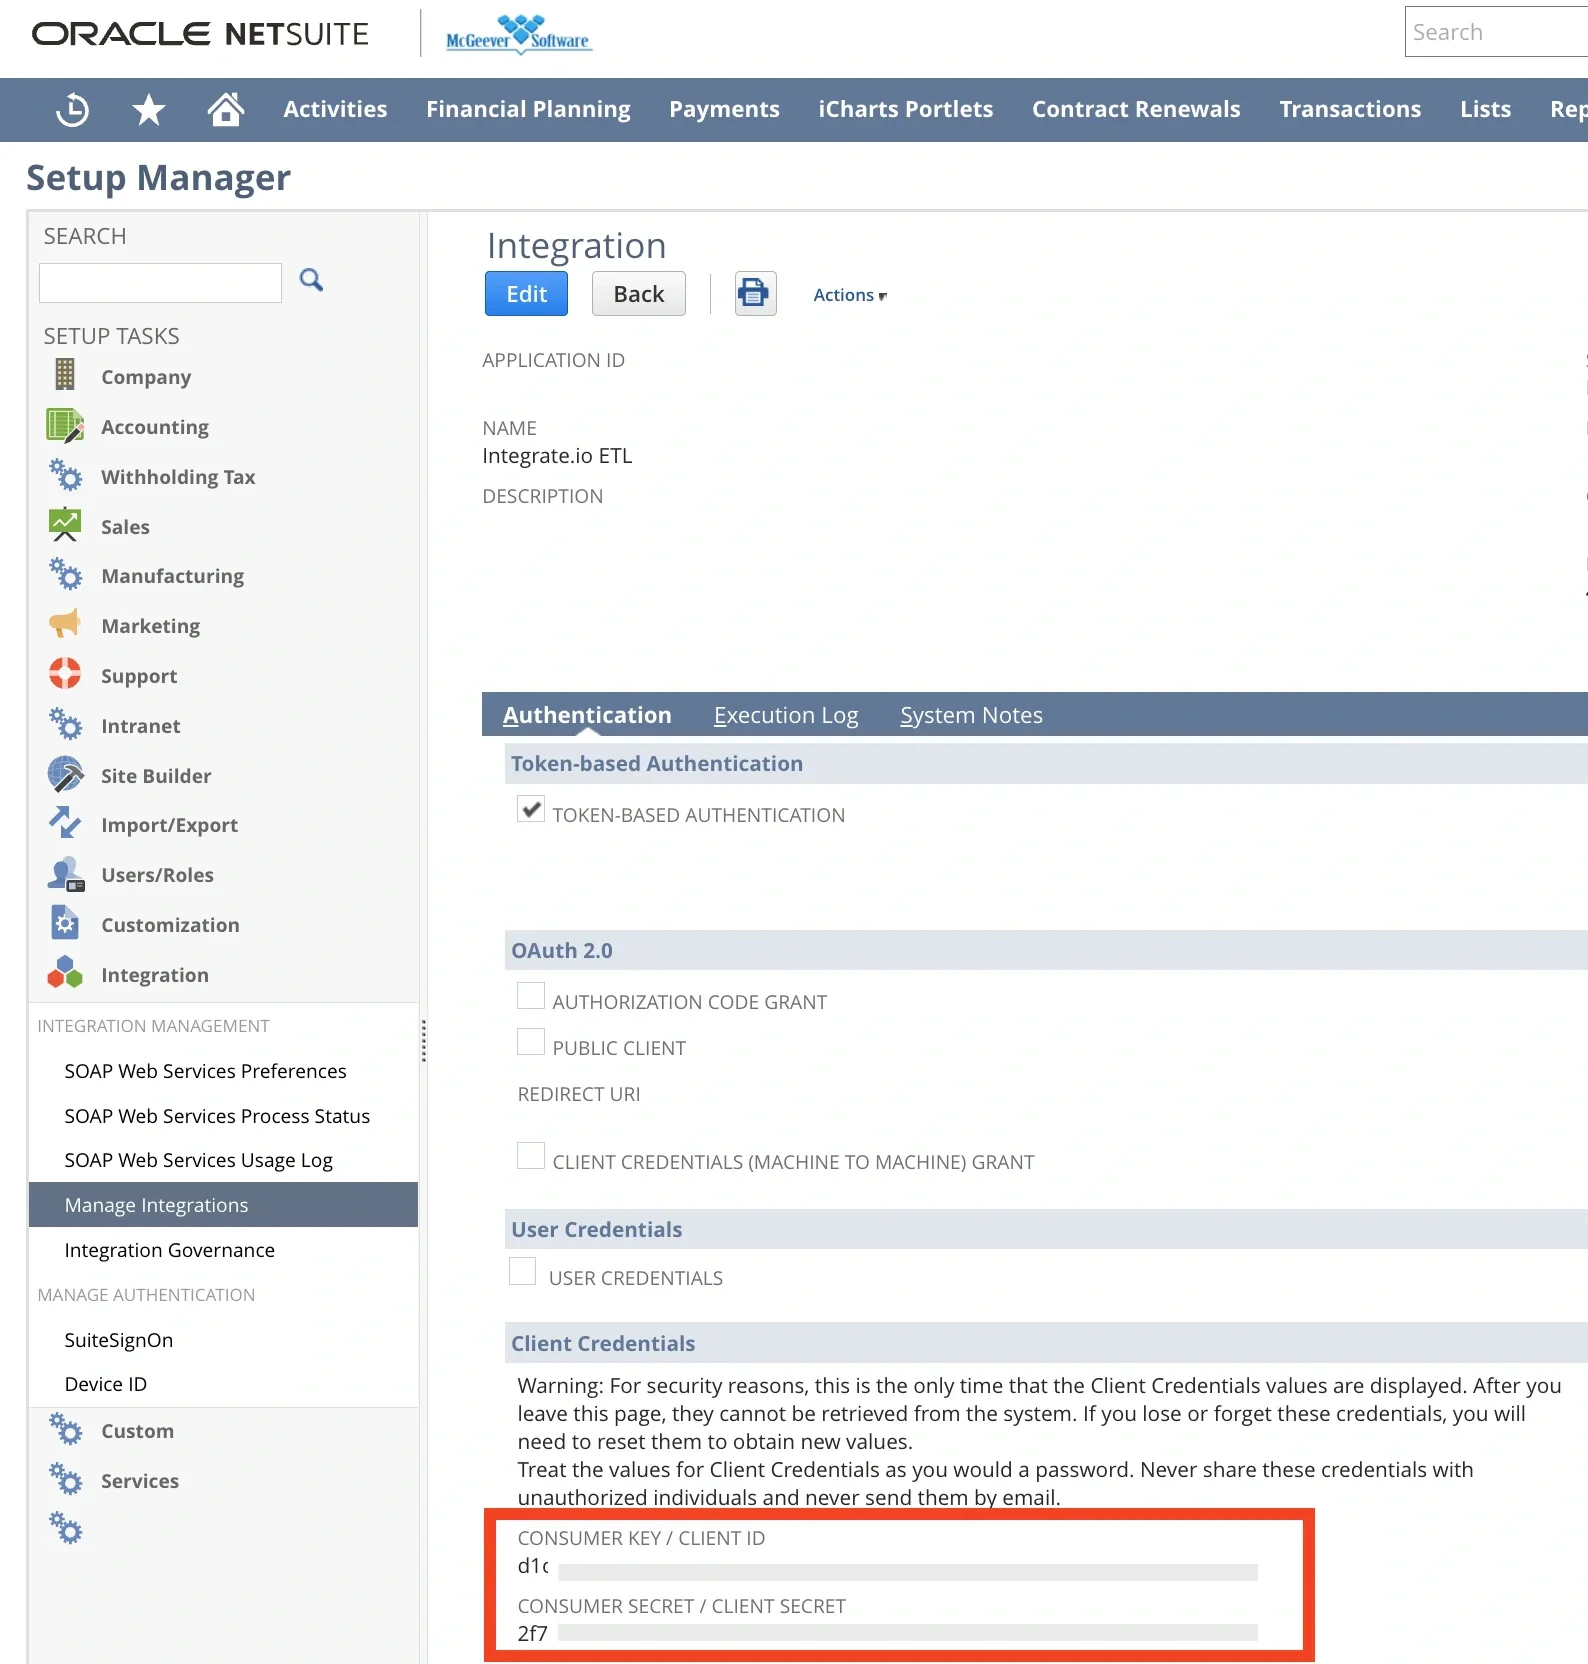
 After finished creation integration, save the Consumer Key and Consumer Secret as it will be only shown once and used for connection configuration on Integrate.io ETL.
 Create a new role. Go to Setup > User Management > Manage Roles > New. Check "Web Services Only Roles" and add following permissions on Permissions > Setup tab:
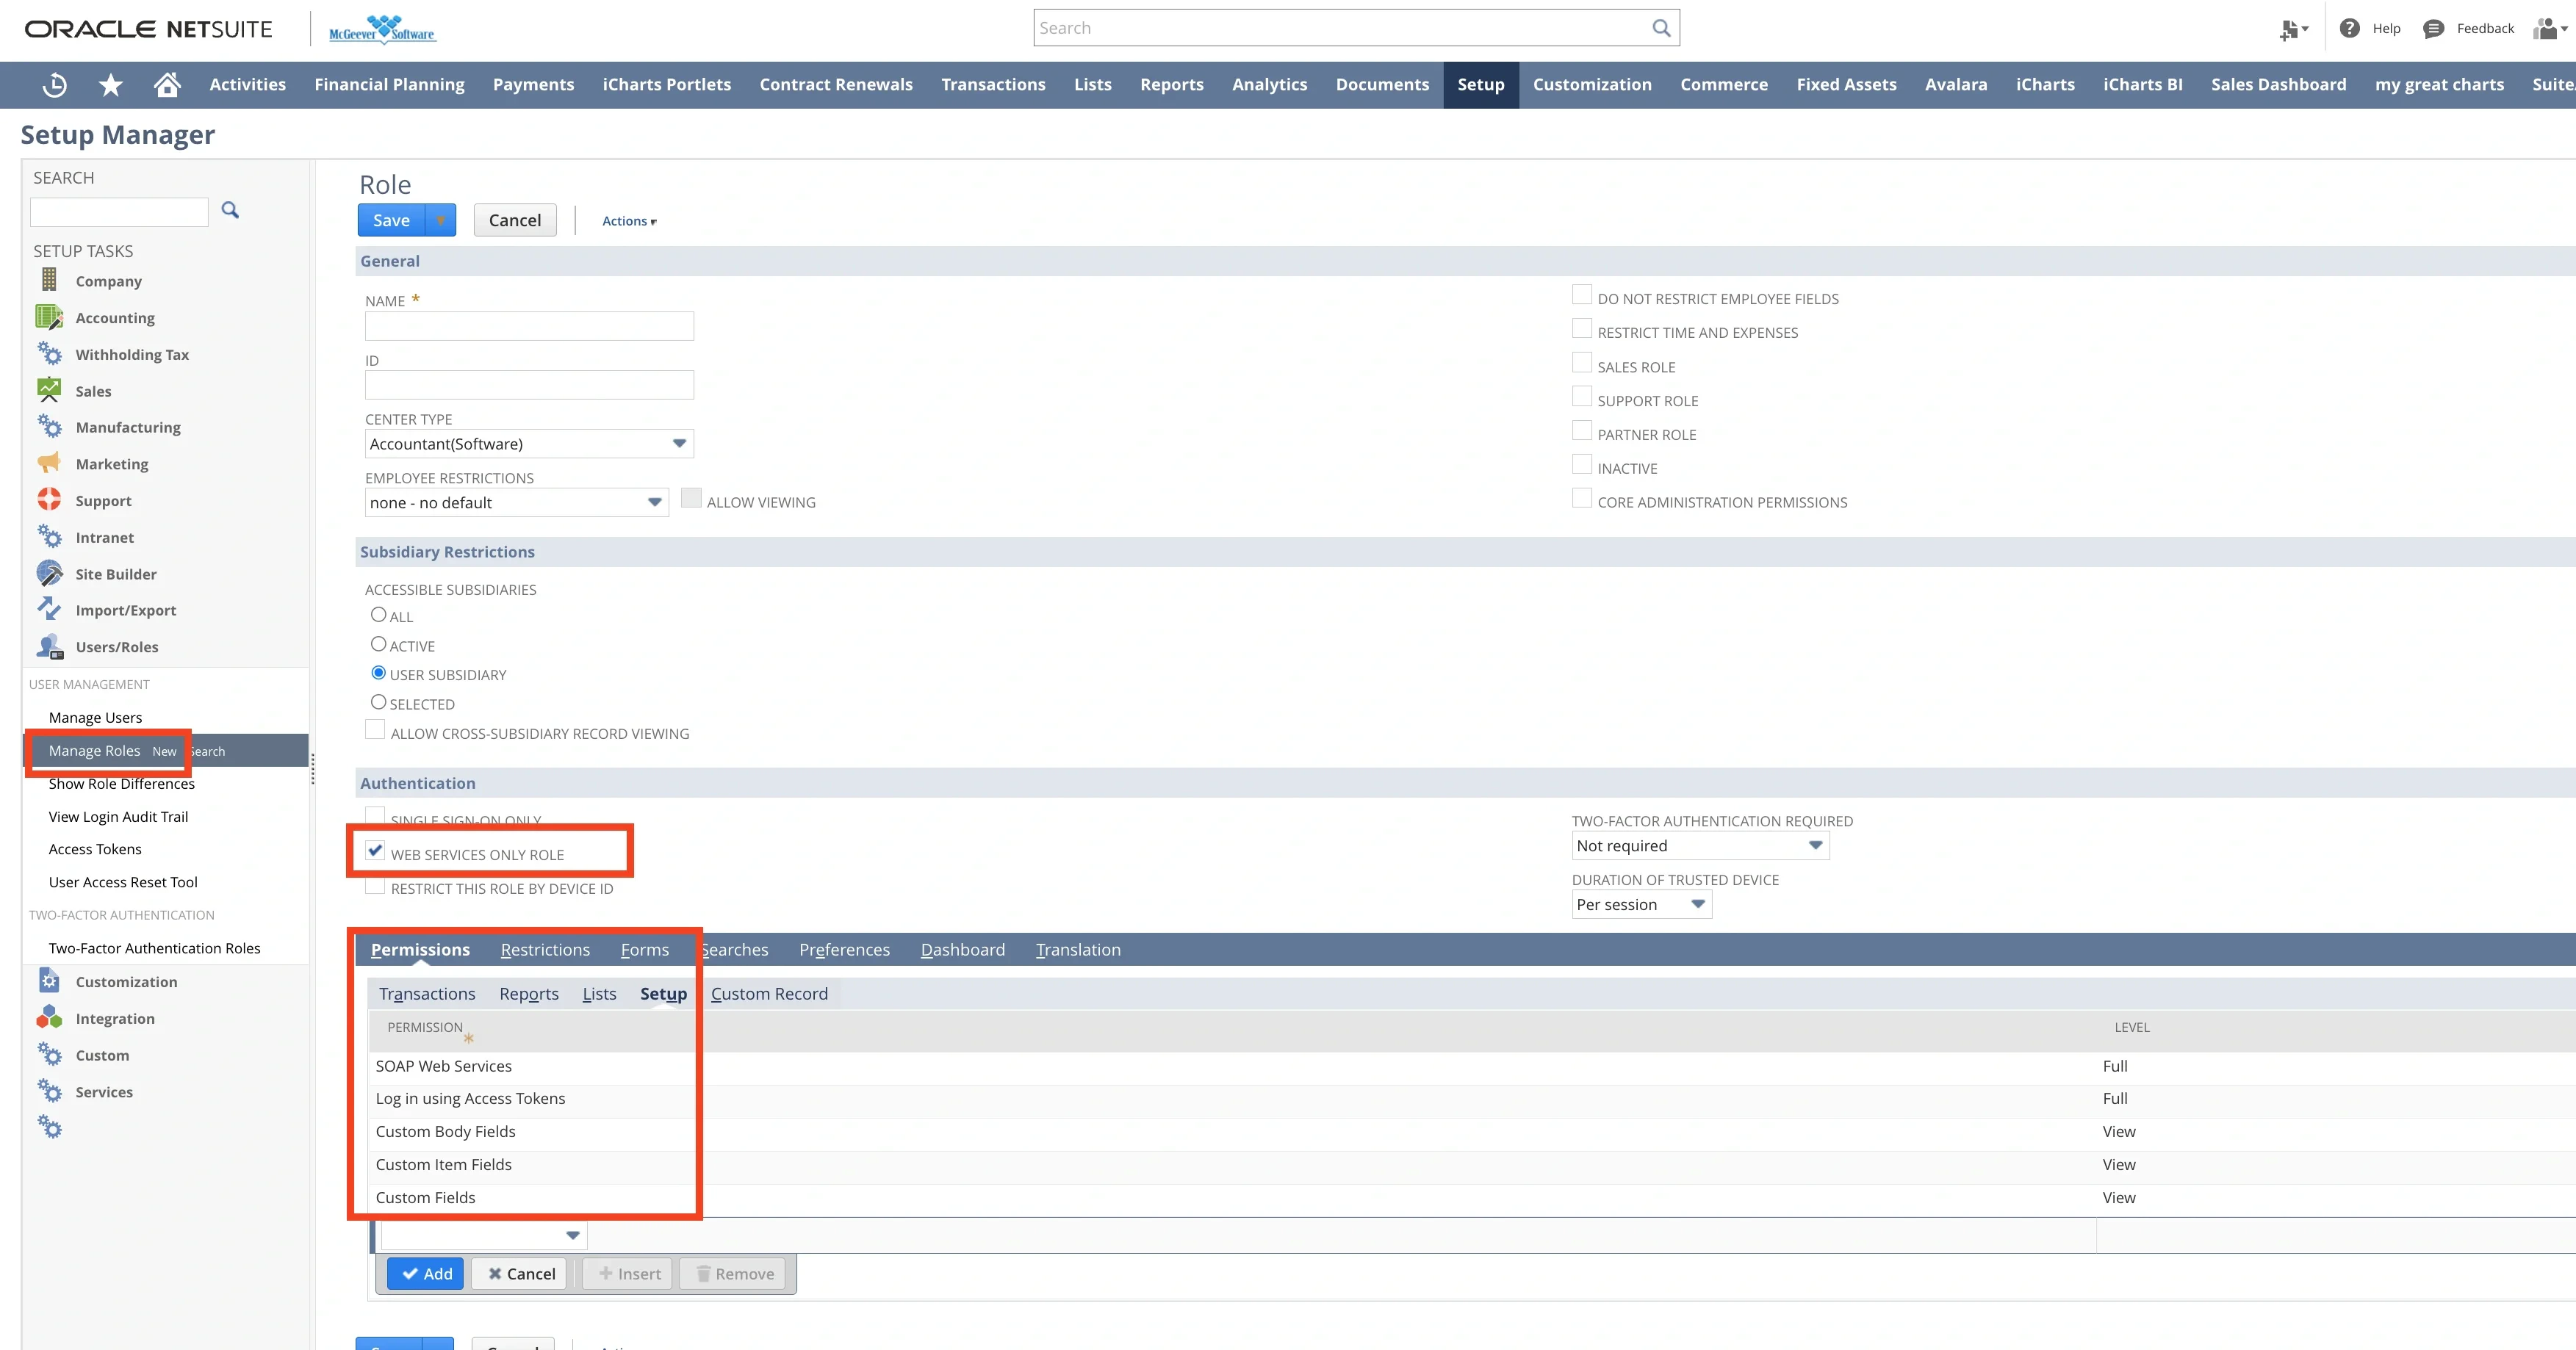 * SOAP Web Services
* Log in using Access Tokens
* Custom Body Fields
* Custom Item Fields
* Custom Fields
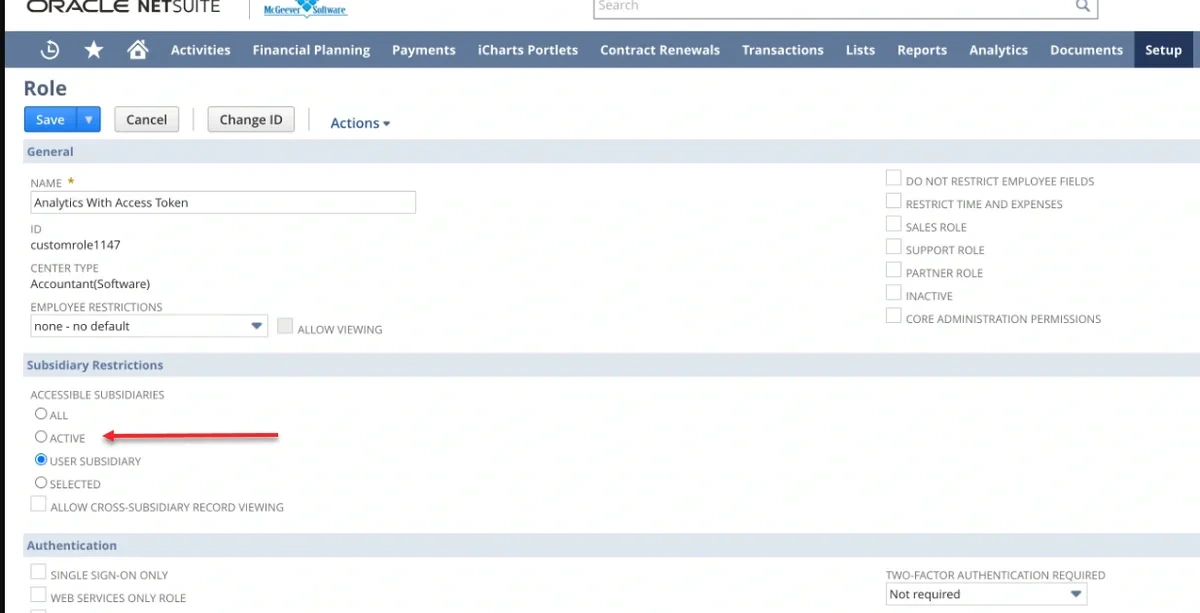
**Note:**
The 'Subsidiary Restriction' section may limit access to certain records you wish to retrieve. Depending on the type of subsidiary structure your organization operates under, you should carefully select these options to ensure you obtain the desired data.
* SOAP Web Services
* Log in using Access Tokens
* Custom Body Fields
* Custom Item Fields
* Custom Fields
**Note:**
The 'Subsidiary Restriction' section may limit access to certain records you wish to retrieve. Depending on the type of subsidiary structure your organization operates under, you should carefully select these options to ensure you obtain the desired data.
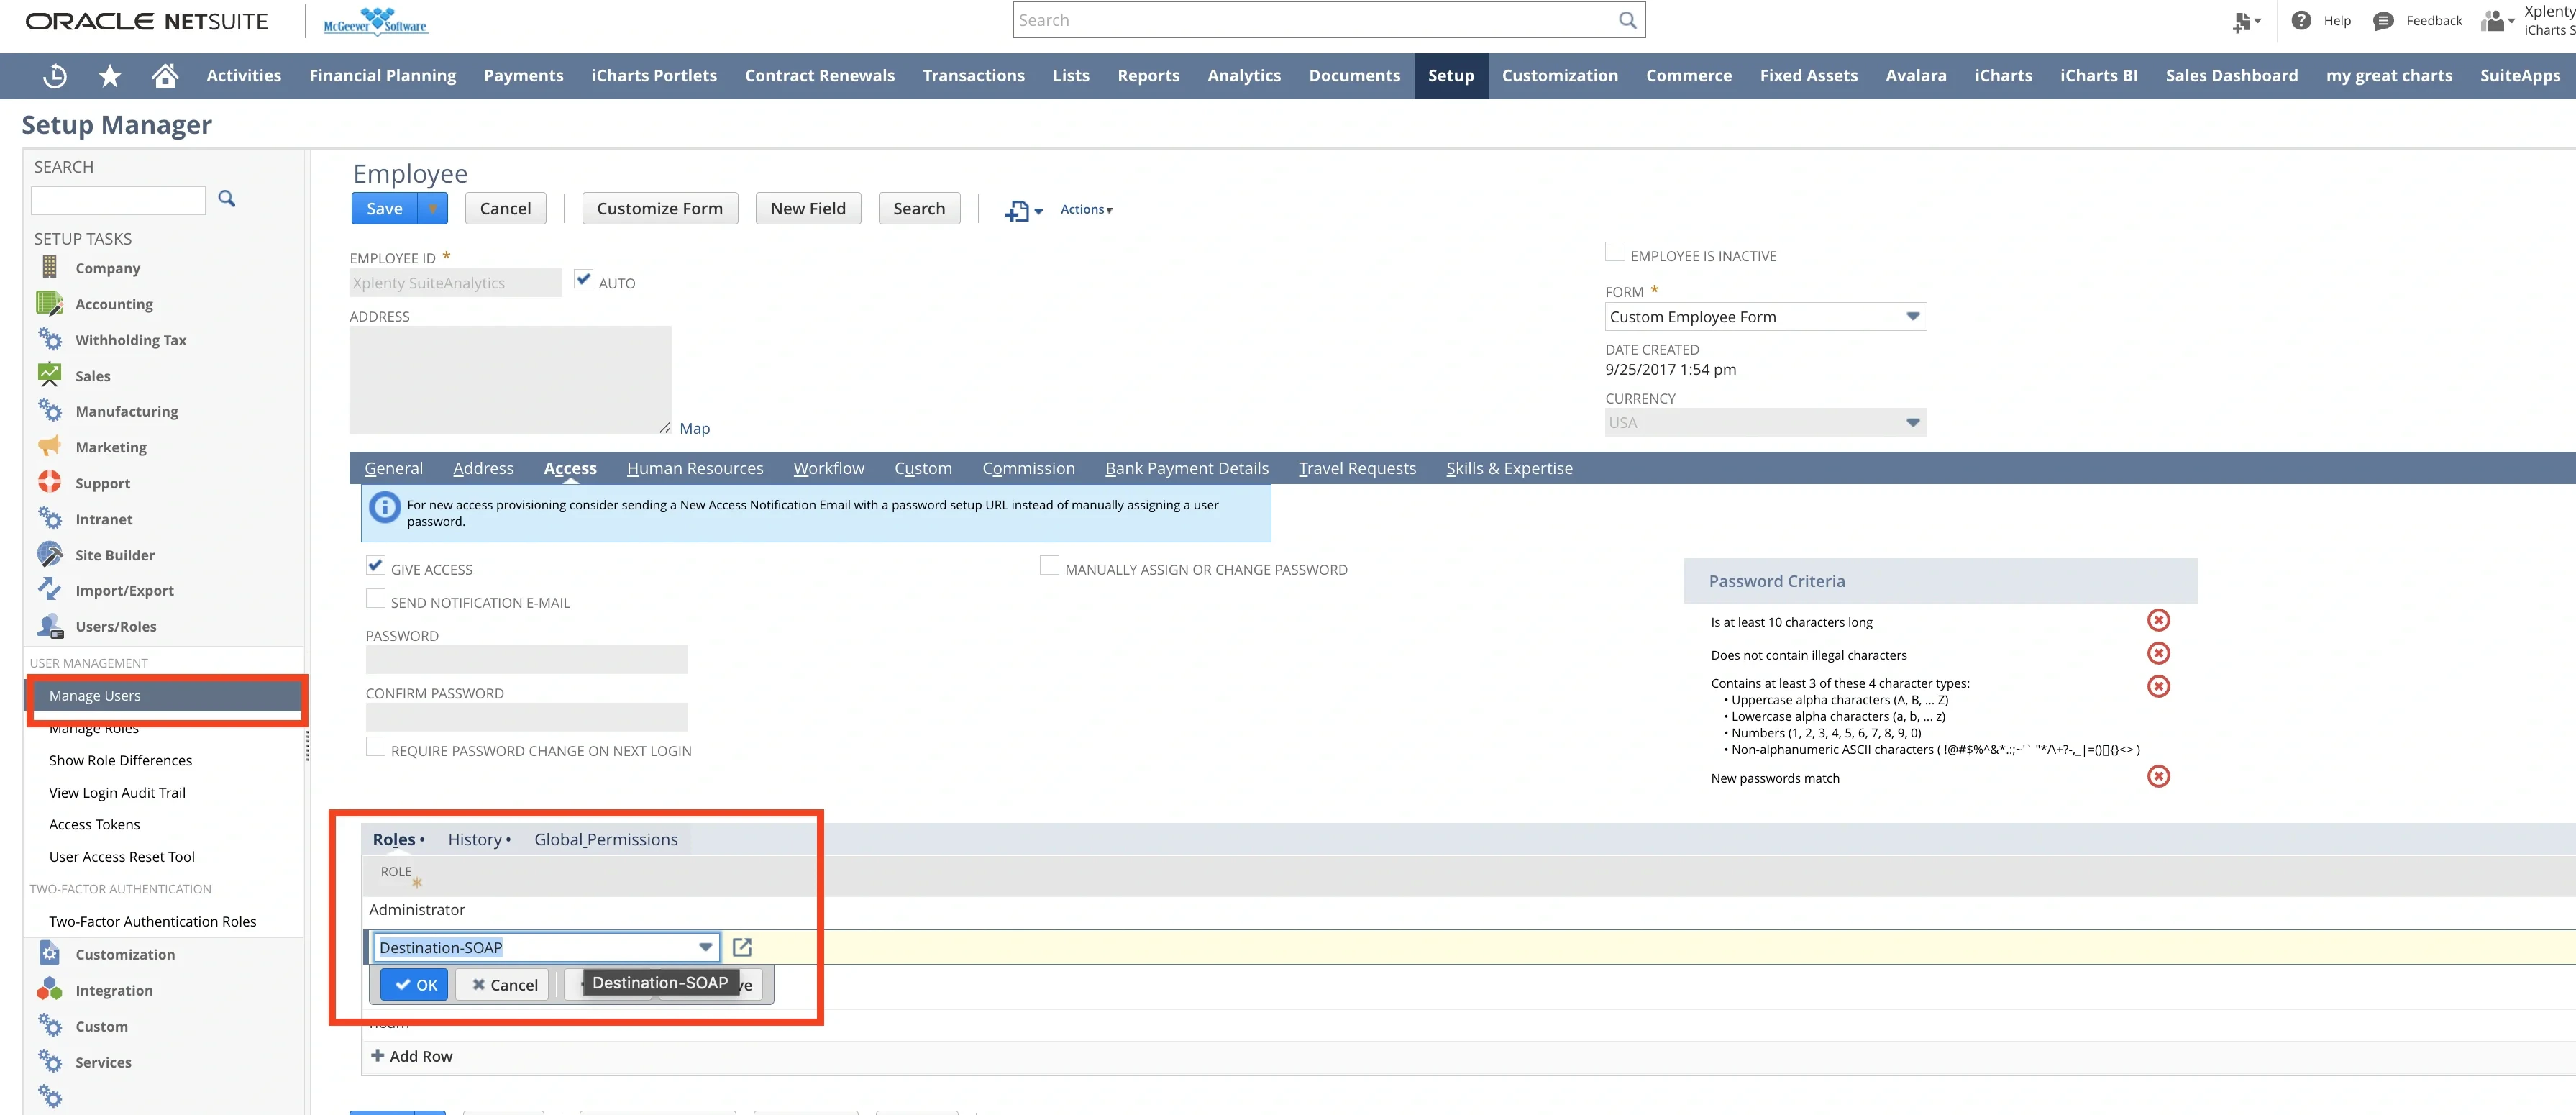
 1. Assign the role from previous step to existing or a new user. Navigate to Setup > User Management > Manage Users.
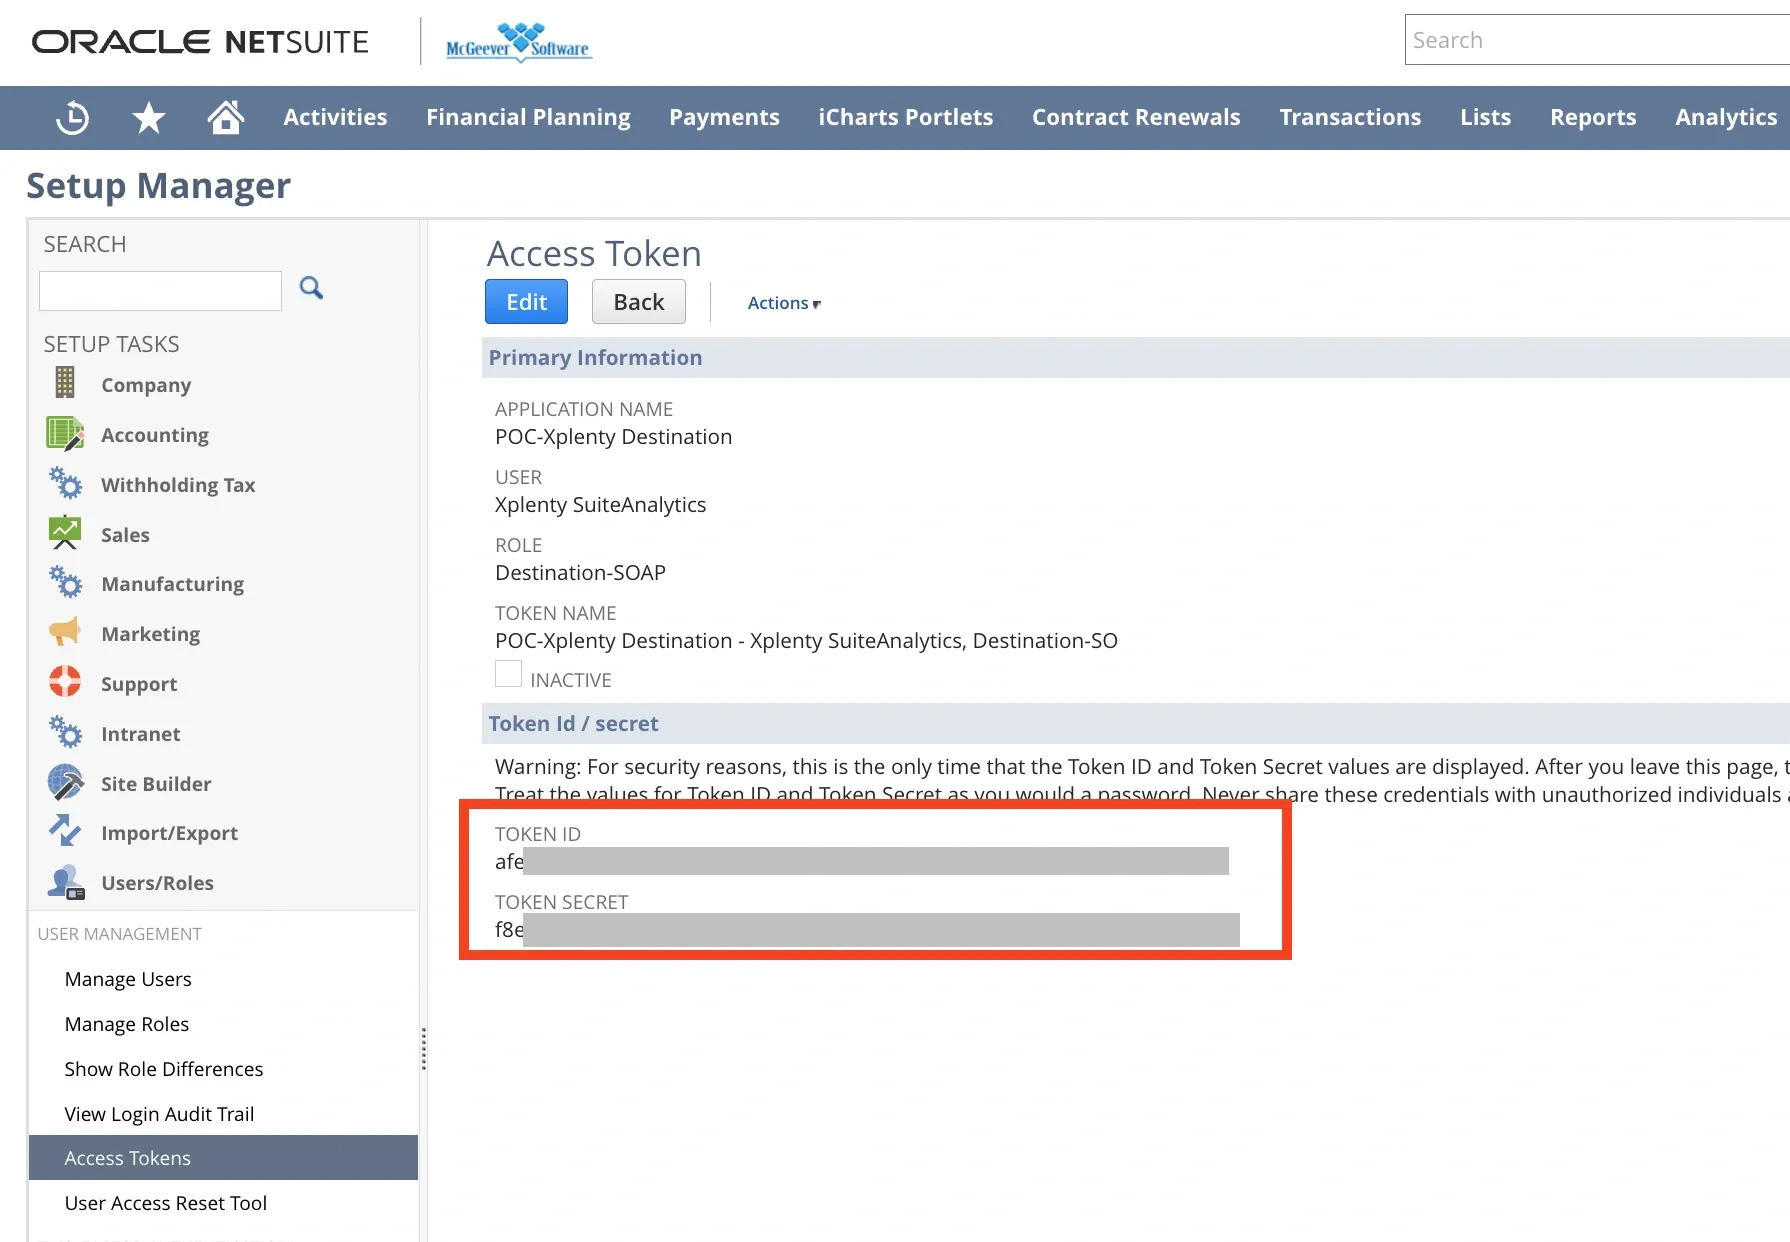
 2. Create a new access token. Go to Setup > User Management > Access Tokens. Select the name of Integration, User and Role from previous steps. After saving it, Token ID and Token Secret will be shown and keep those values securely.
 ## To create a NetSuite SOAP connection in Integrate.io ETL
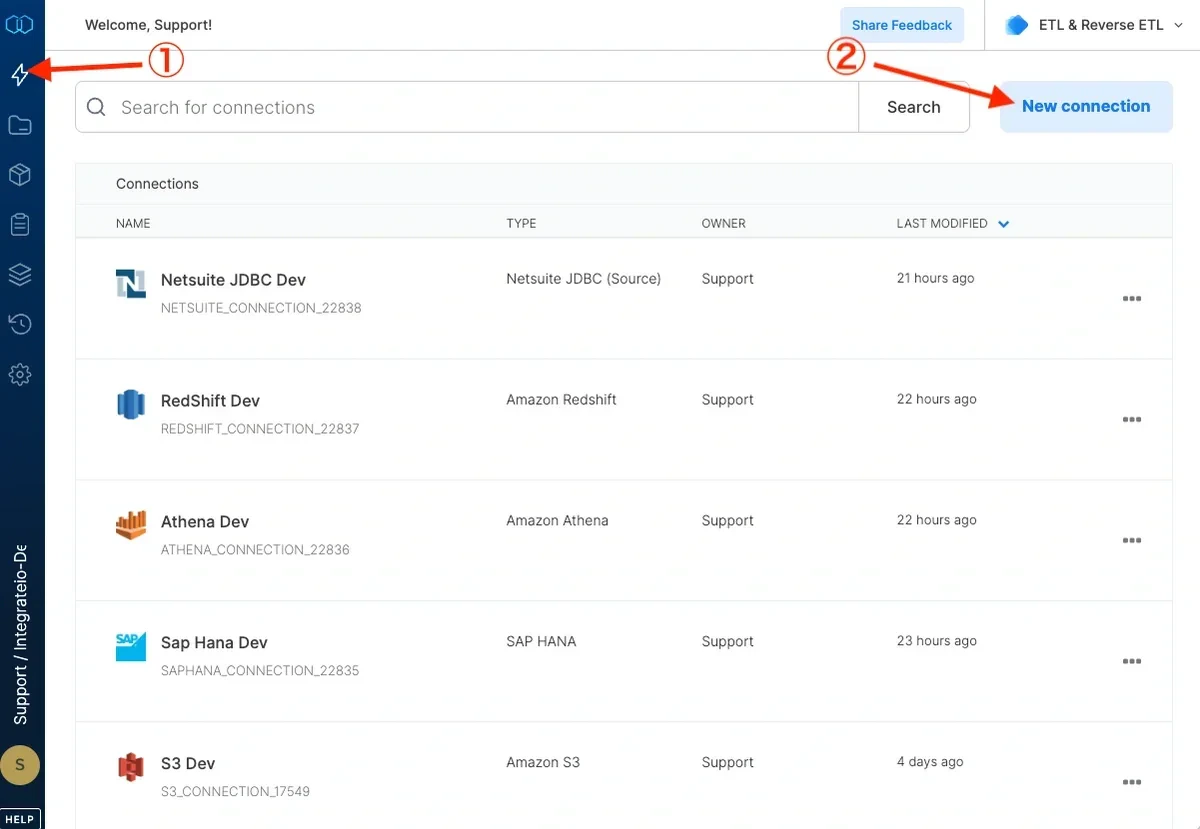
Click the Connections icon (lightning bolt) on the top left menu.
To create a connection, click **New connection**.
## To create a NetSuite SOAP connection in Integrate.io ETL
Click the Connections icon (lightning bolt) on the top left menu.
To create a connection, click **New connection**.
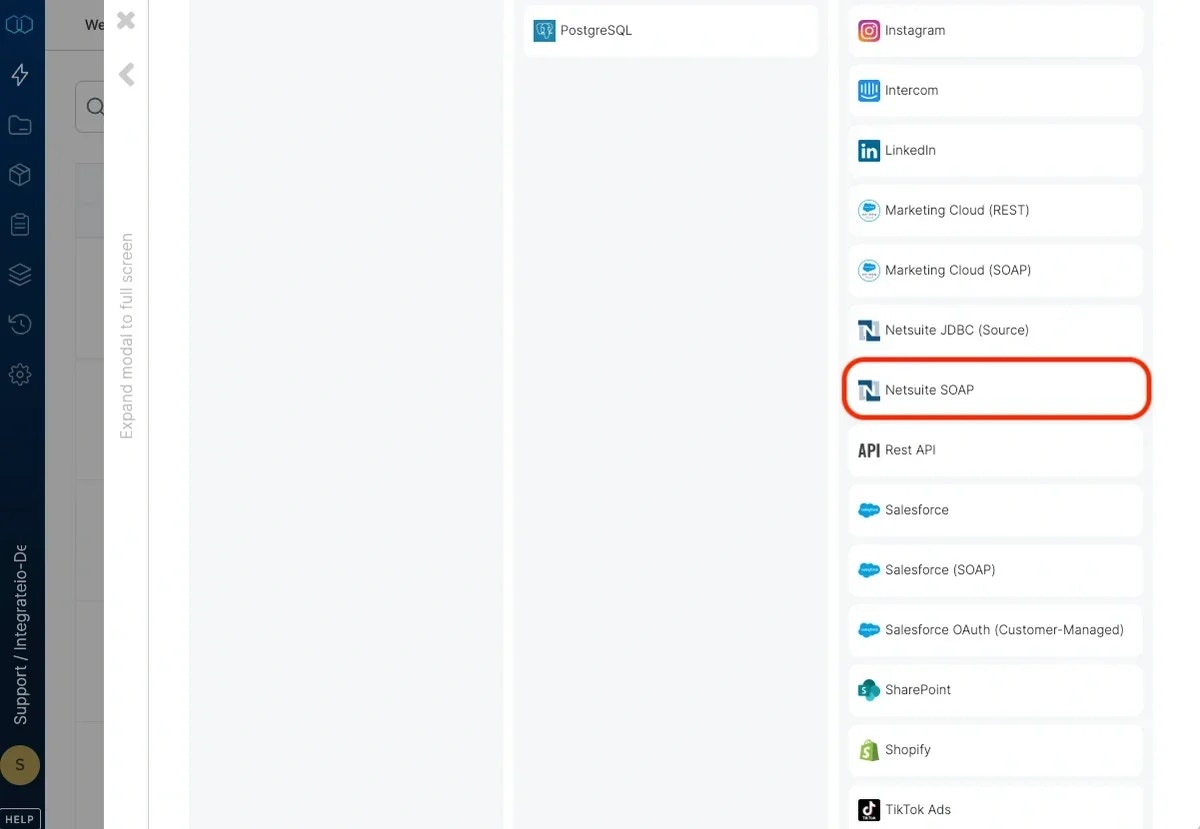
 Select **NetSuite SOAP**.
 In the new NetSuite connection window, name the connection and enter the connection information.
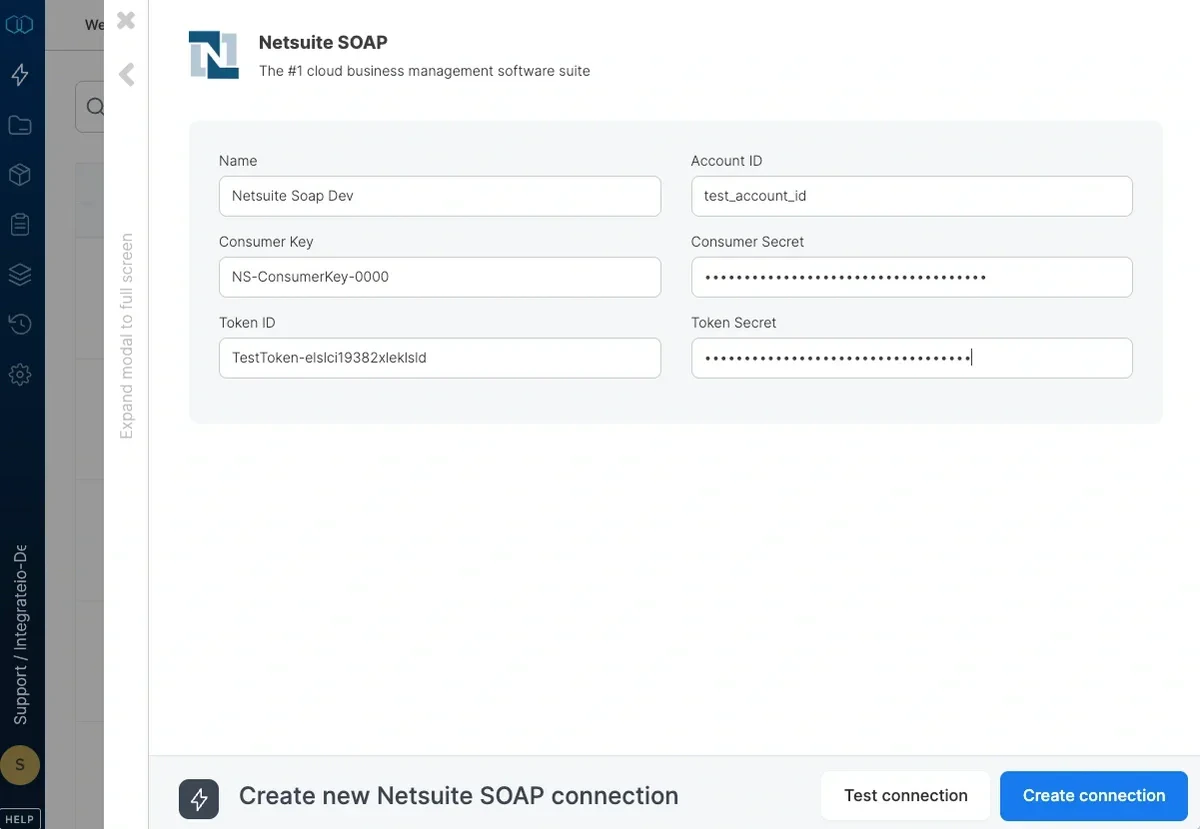 * **Name** - name for the new connection
* **Account ID** - need to include the suffix `_SB` for Sandbox account.
* **Consumer Key** - copy from previous step or SuiteAnalytics Connect configuration.
* **Consumer Secret** - copy from previous step or SuiteAnalytics Connect configuration.
* **Token ID** - copy from previous step or SuiteAnalytics Connect configuration.
* **Token Secret Account ID** - copy from previous step or SuiteAnalytics Connect configuration.
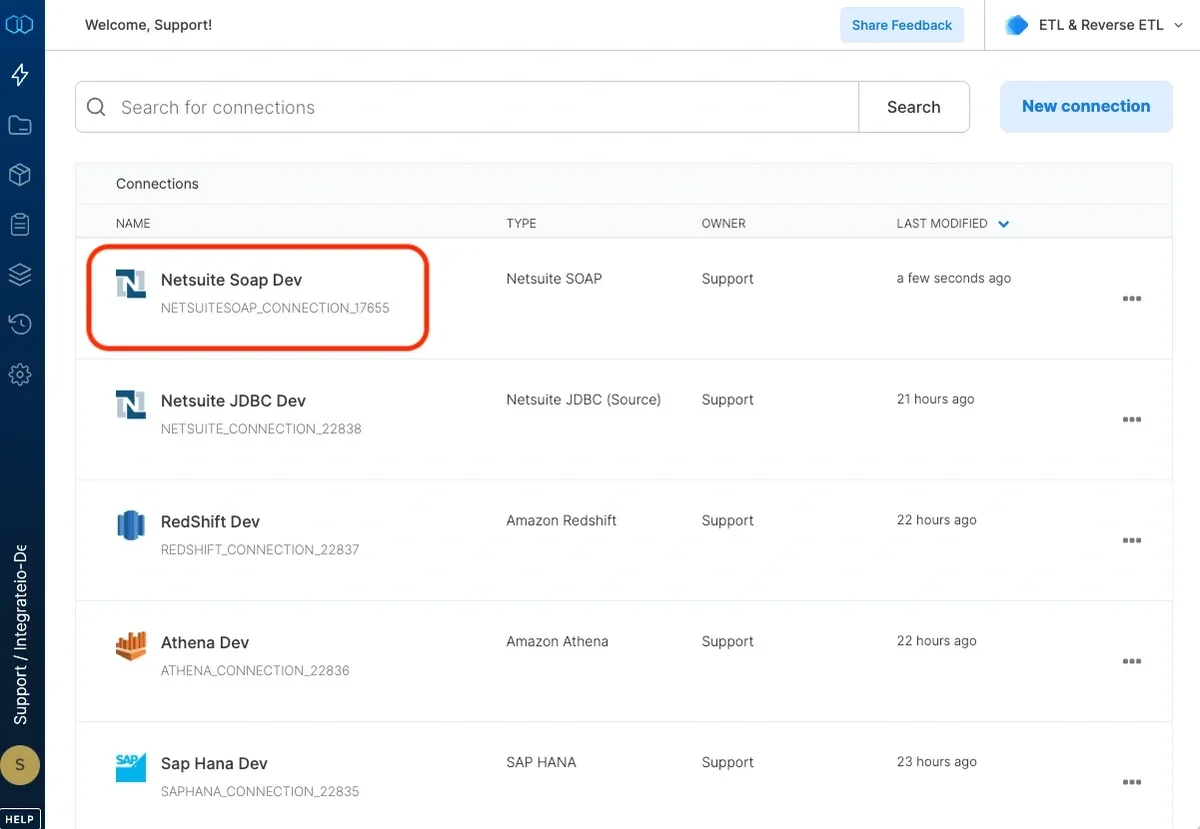
Then, test the NetSuite connection by clicking **Test connection.** Once the connection tests successful, click **Create connection.**
* **Name** - name for the new connection
* **Account ID** - need to include the suffix `_SB` for Sandbox account.
* **Consumer Key** - copy from previous step or SuiteAnalytics Connect configuration.
* **Consumer Secret** - copy from previous step or SuiteAnalytics Connect configuration.
* **Token ID** - copy from previous step or SuiteAnalytics Connect configuration.
* **Token Secret Account ID** - copy from previous step or SuiteAnalytics Connect configuration.
Then, test the NetSuite connection by clicking **Test connection.** Once the connection tests successful, click **Create connection.**
 ***
***
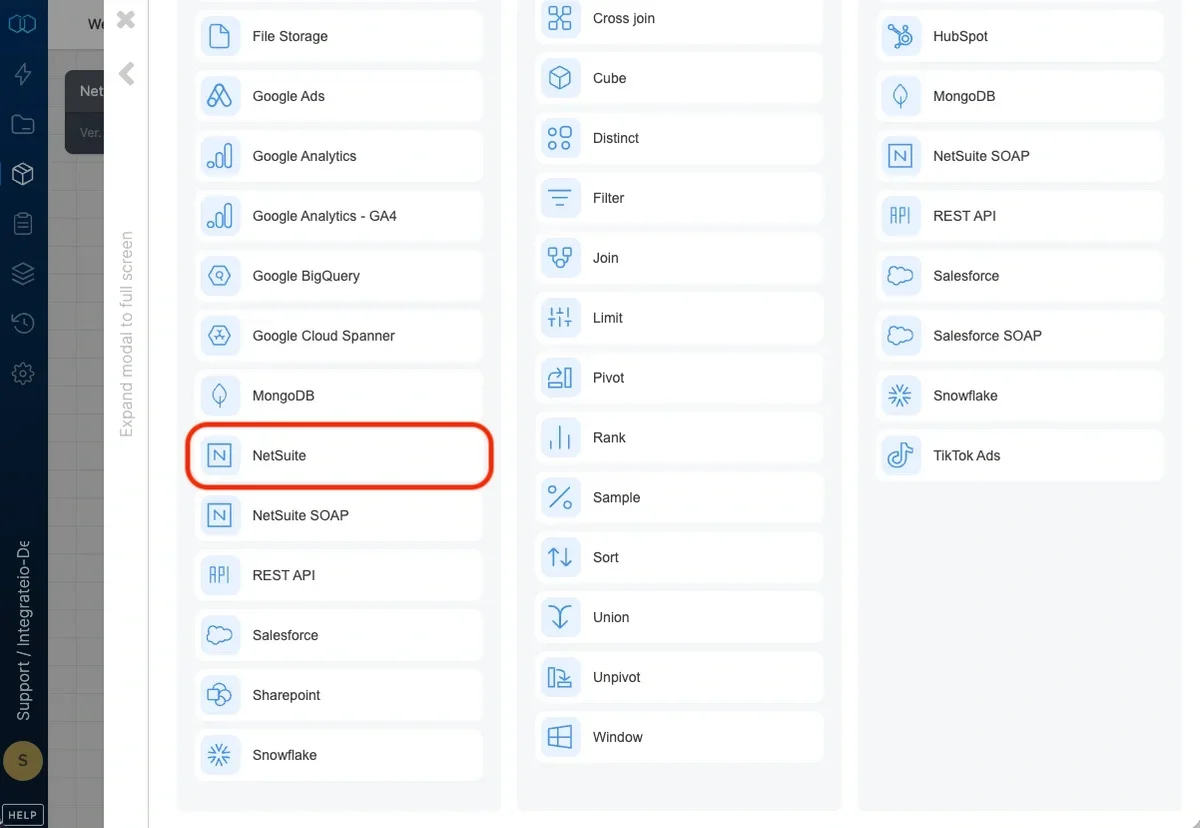 ## Connection
Select an existing NetSuite connection or create a new one (for more information, see [Allowing Integrate.io ETL access to NetSuite](/docs/etl/allowing-integrateio-etl-access-to-netsuite).)
## Source Properties
## Connection
Select an existing NetSuite connection or create a new one (for more information, see [Allowing Integrate.io ETL access to NetSuite](/docs/etl/allowing-integrateio-etl-access-to-netsuite).)
## Source Properties
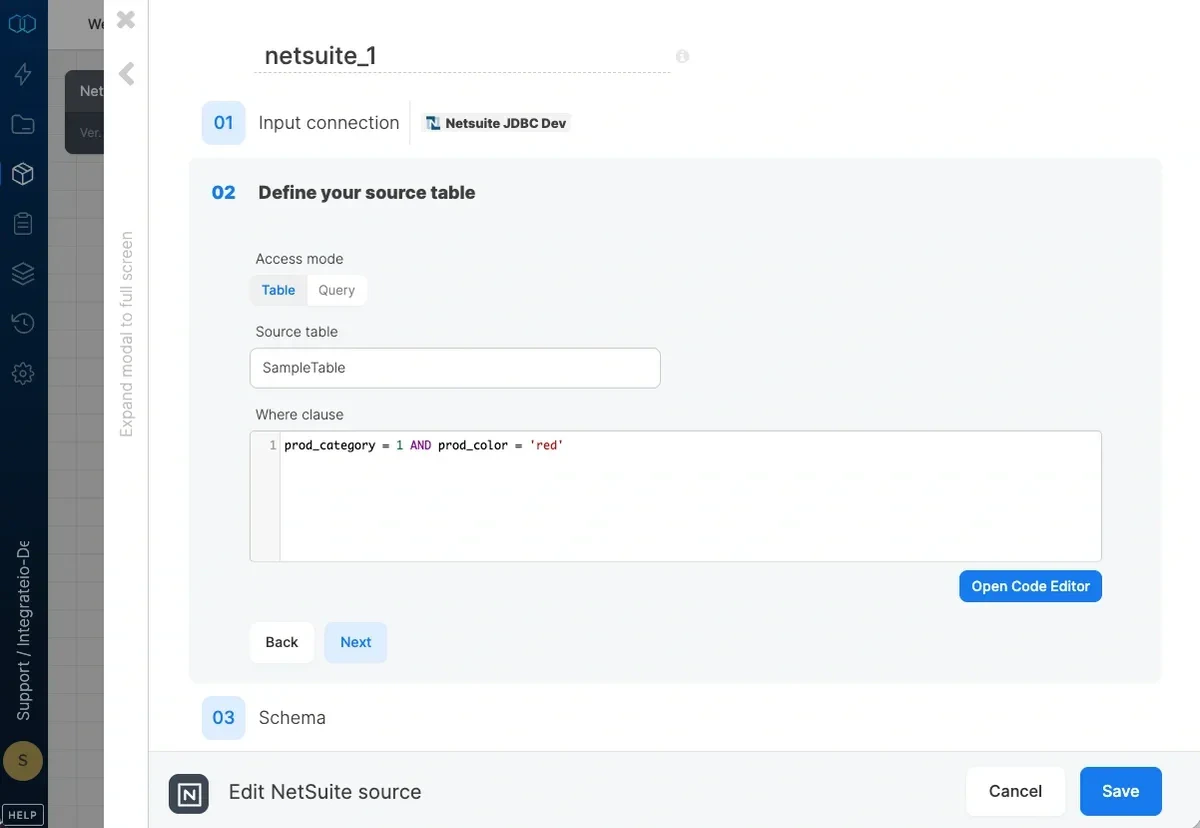 * **Source table** - the table name from which the data will be imported. Use the [Suitetalk Connect schema browser](https://www.netsuite.com/portal/developers/resources/suitetalk-documentation.shtml "Link: https://www.netsuite.com/portal/developers/resources/suitetalk-documentation.shtml") to look up standard records and columns.
* **where clause** - optional. You can add predicates clauses to the WHERE clause as part of the SQL query that is built in order to get the data from the database. Make sure to skip the keyword WHERE.
| Good | `prod_category = 1 AND prod_color = 'red'` |
| :---------------------------------------------------------------------------------------------------------------------------- | :----------------------------------------------- |
| Bad | `WHERE prod_category = 1 AND prod_color = 'red'` |
| **Notes:** in NetSuite2, the table names for entities such as customers, items, and contacts are singular rather than plural. | |
## Source Schema
After defining the source table/query select the fields to use in the source.
The fields you select are used to build the query that will be executed to read the data.
Define the data type for the field. Use the following table when matching NetSuite data types to Integrate.io ETL data types.
| NetSuite | Integrate.io ETL |
| :-------- | :--------------- |
| varchar2 | String |
| number | Double |
| timestamp | Datetime |
* **Source table** - the table name from which the data will be imported. Use the [Suitetalk Connect schema browser](https://www.netsuite.com/portal/developers/resources/suitetalk-documentation.shtml "Link: https://www.netsuite.com/portal/developers/resources/suitetalk-documentation.shtml") to look up standard records and columns.
* **where clause** - optional. You can add predicates clauses to the WHERE clause as part of the SQL query that is built in order to get the data from the database. Make sure to skip the keyword WHERE.
| Good | `prod_category = 1 AND prod_color = 'red'` |
| :---------------------------------------------------------------------------------------------------------------------------- | :----------------------------------------------- |
| Bad | `WHERE prod_category = 1 AND prod_color = 'red'` |
| **Notes:** in NetSuite2, the table names for entities such as customers, items, and contacts are singular rather than plural. | |
## Source Schema
After defining the source table/query select the fields to use in the source.
The fields you select are used to build the query that will be executed to read the data.
Define the data type for the field. Use the following table when matching NetSuite data types to Integrate.io ETL data types.
| NetSuite | Integrate.io ETL |
| :-------- | :--------------- |
| varchar2 | String |
| number | Double |
| timestamp | Datetime |