> ## Documentation Index
> Fetch the complete documentation index at: https://www.integrate.io/docs/llms.txt
> Use this file to discover all available pages before exploring further.
# ETL: Salesforce Source
> Configure the Salesforce source to read standard and custom objects using the Bulk API. Supports SOQL queries and incremental data loading.
## Connection Setup: Salesforce
Integrate.io ETL can read your Salesforce data. This article details creating the [Salesforce connection in Integrate.io ETL.](https://www.integrate.io/blog/salesforce-to-salesforce/) Note that Integrate.io ETL can only be used with [Salesforce](https://www.integrate.io/blog/category/salesforce/) editions that have API access. Some plan types, including trial versions, do not have API access by default and cannot be used with Integrate.io ETL.
**Salesforce orgs with IP login restrictions:** Salesforce connections now route through Integrate.io's secure proxy by default (enabled for all accounts). If your Salesforce org limits access by IP (for example, **Login IP Ranges** on a user profile, or **Trusted IP Ranges** under **Setup → Network Access**), allowlist Integrate.io's IP addresses so the connection can authenticate and run. Use the current list here: [Integrate.io ETL's IP addresses](/docs/etl/integrateio-etls-ip-list/).
### To create a Salesforce connection in Integrate.io ETL
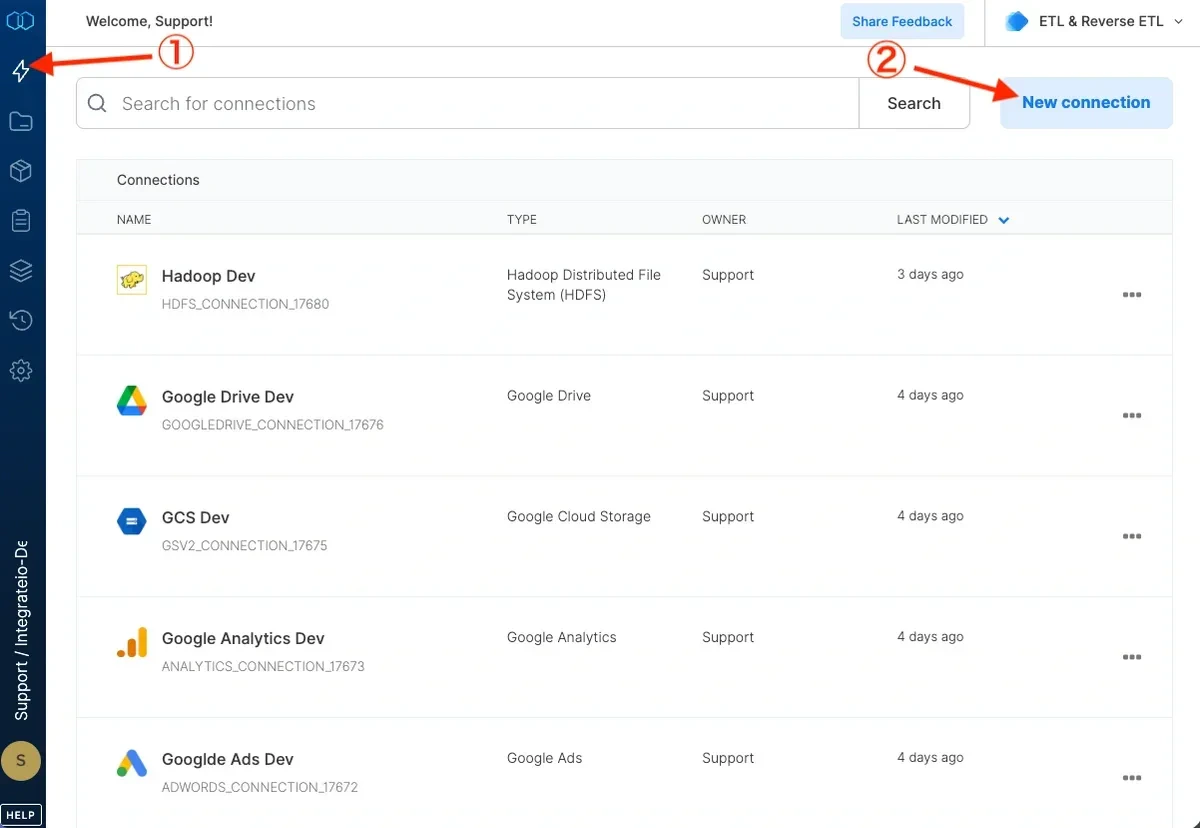
Click the **Connections** icon (lightning bolt) on the top left menu.
To create a connection, click **New connection.**
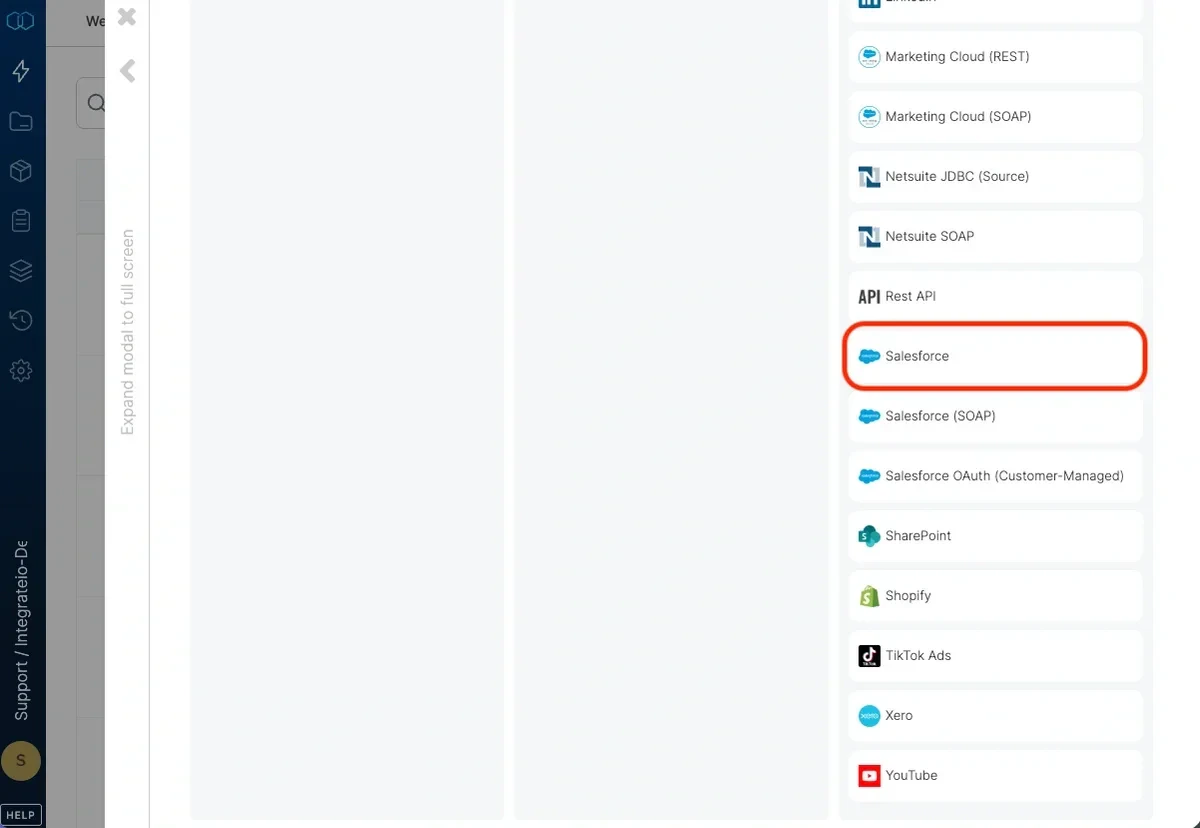
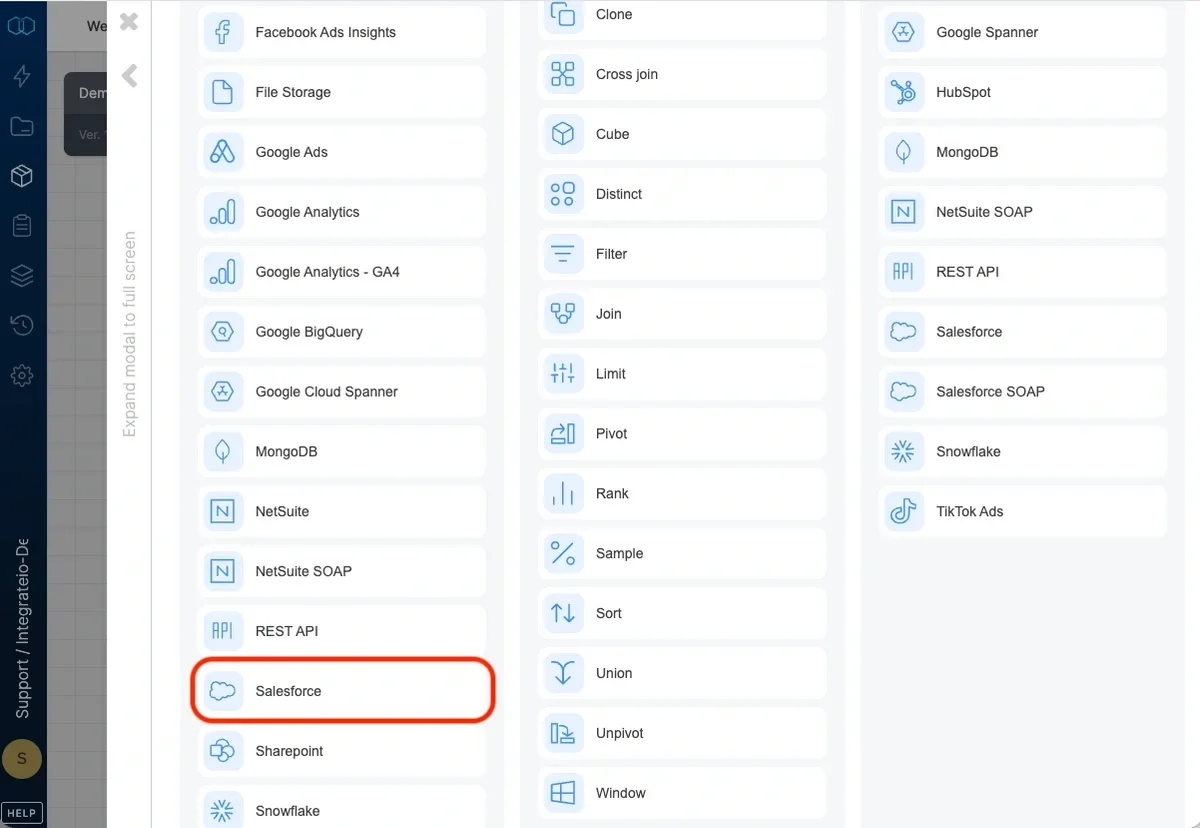
 Select Salesforce.
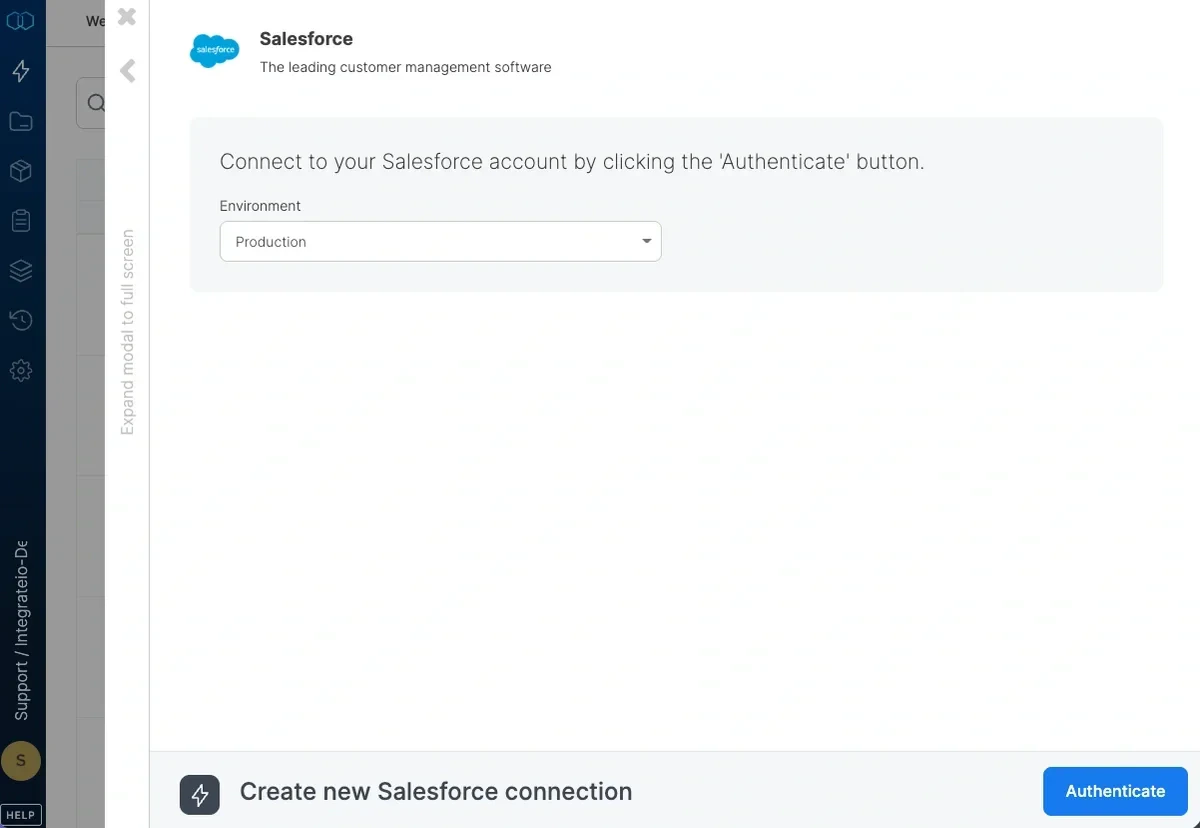
 Select the Salesforce environment you'd like to connect to - production or sandbox - and click **authorize**.
 In the Salesforce login window, sign in with your Salesforce account. (Note: The user name for a sandbox account is your user name with a dot sandbox account name suffix. For example, If your user name is [danielle@ilovemycompany.com](mailto:danielle@ilovemycompany.com) and your sandbox account name is test, your user name for it is [danielle@ilovemycompany.com.test](mailto:danielle@ilovemycompany.com.test))
In the next page, click "Allow" to allow Integrate.io ETL access on your behalf to Salesforce.
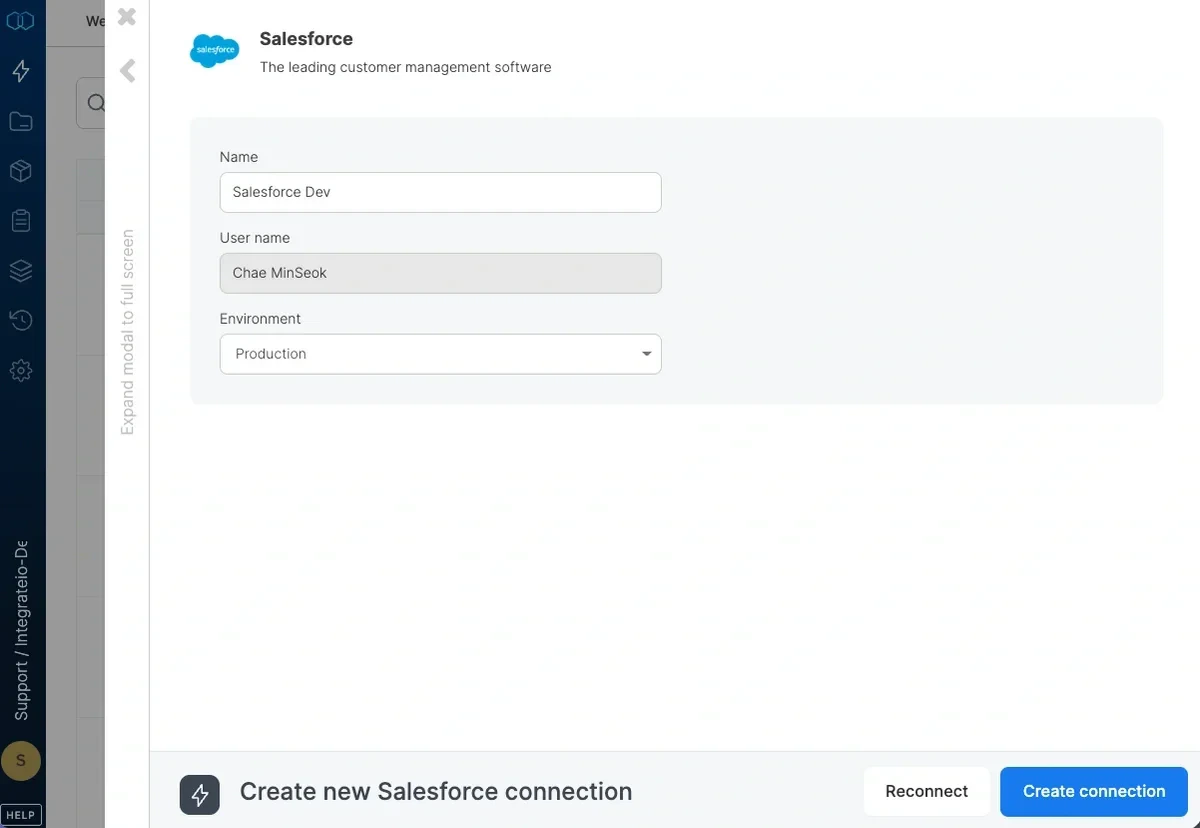
In the new Salesforce connection window, name the connection and click **create salesforce connection.**
In the Salesforce login window, sign in with your Salesforce account. (Note: The user name for a sandbox account is your user name with a dot sandbox account name suffix. For example, If your user name is [danielle@ilovemycompany.com](mailto:danielle@ilovemycompany.com) and your sandbox account name is test, your user name for it is [danielle@ilovemycompany.com.test](mailto:danielle@ilovemycompany.com.test))
In the next page, click "Allow" to allow Integrate.io ETL access on your behalf to Salesforce.
In the new Salesforce connection window, name the connection and click **create salesforce connection.**
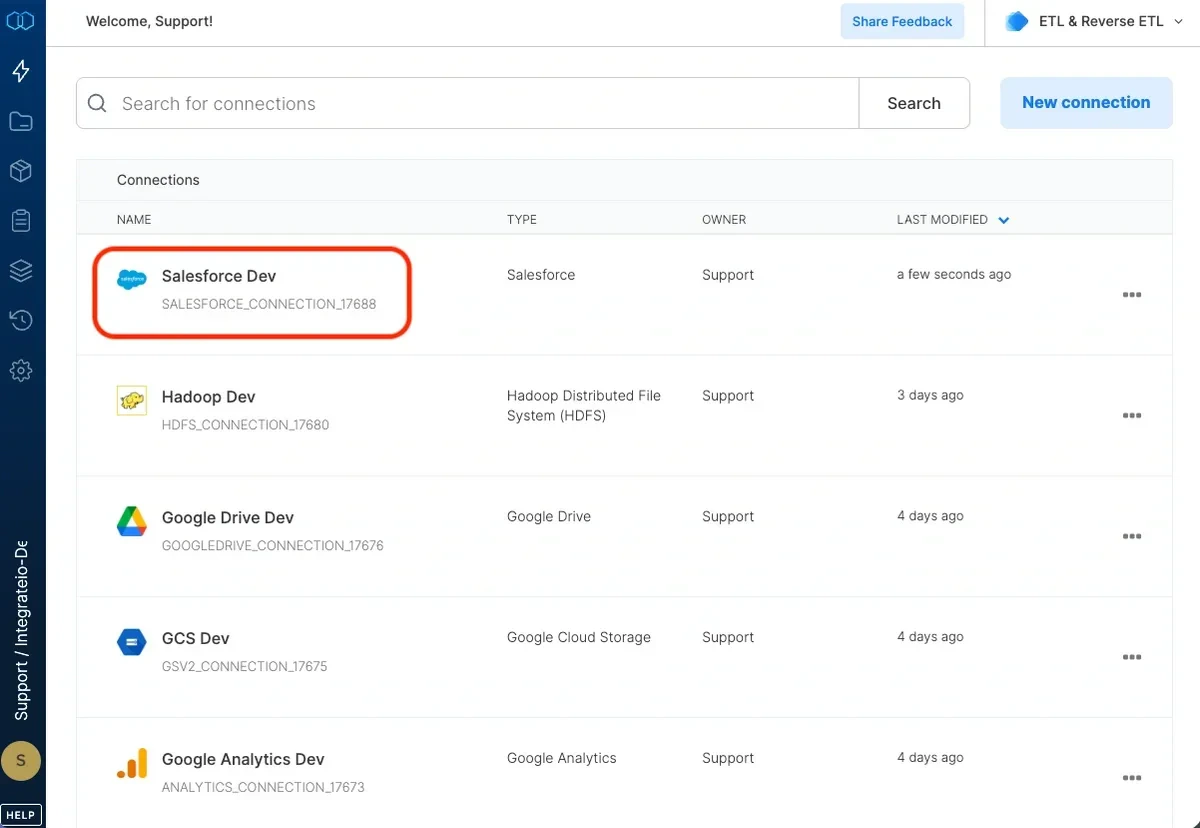 ### To modify Salesforce connections in Integrate.io ETL
Click the **Connections** icon (lightning bolt) on the top left menu.
Click a connection to open and modify it. Make any necessary changes, then click **Reconnect**, and **Save changes**. To exit the Salesforce connection window without changes, click **Back to connections** (grey tab on the left side) on the Salesforce connection window.
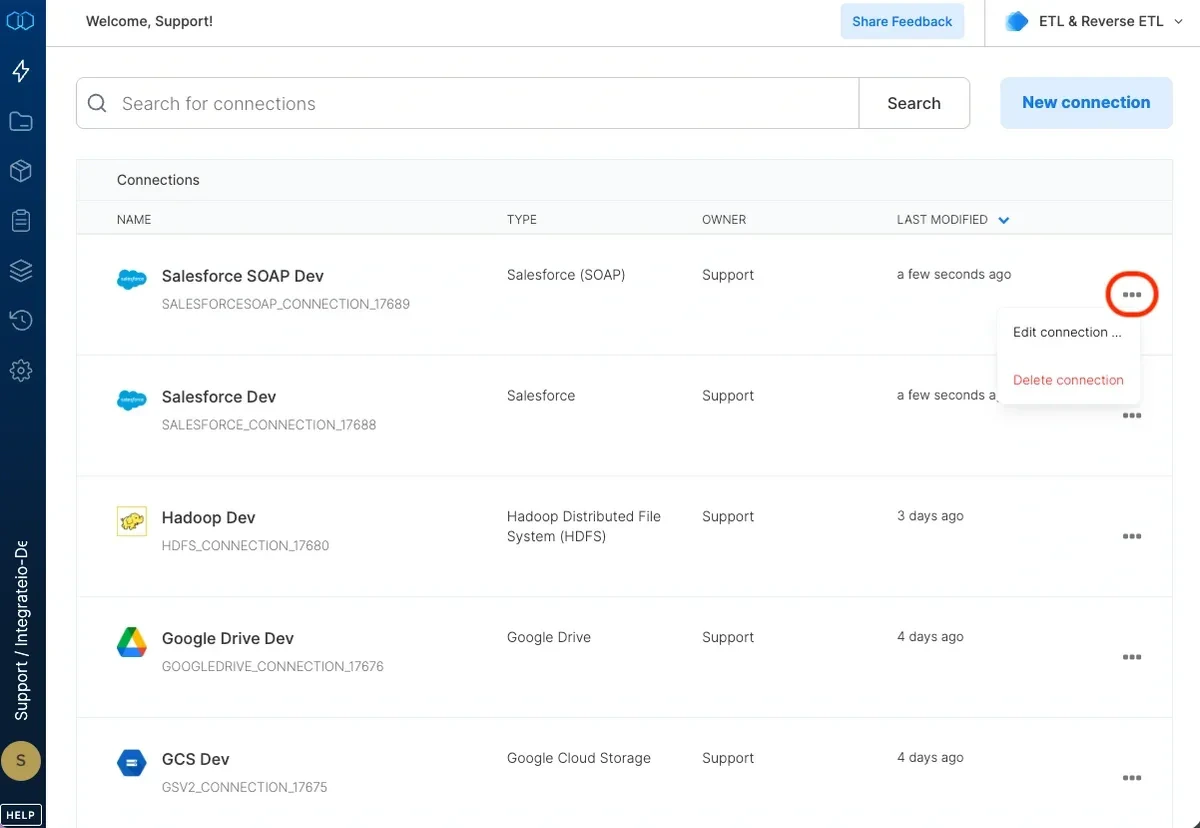
To delete a Salesforce connection, click the three vertical dots on the far right of the connection listing and select the **Delete connection** option.
### To modify Salesforce connections in Integrate.io ETL
Click the **Connections** icon (lightning bolt) on the top left menu.
Click a connection to open and modify it. Make any necessary changes, then click **Reconnect**, and **Save changes**. To exit the Salesforce connection window without changes, click **Back to connections** (grey tab on the left side) on the Salesforce connection window.
To delete a Salesforce connection, click the three vertical dots on the far right of the connection listing and select the **Delete connection** option.
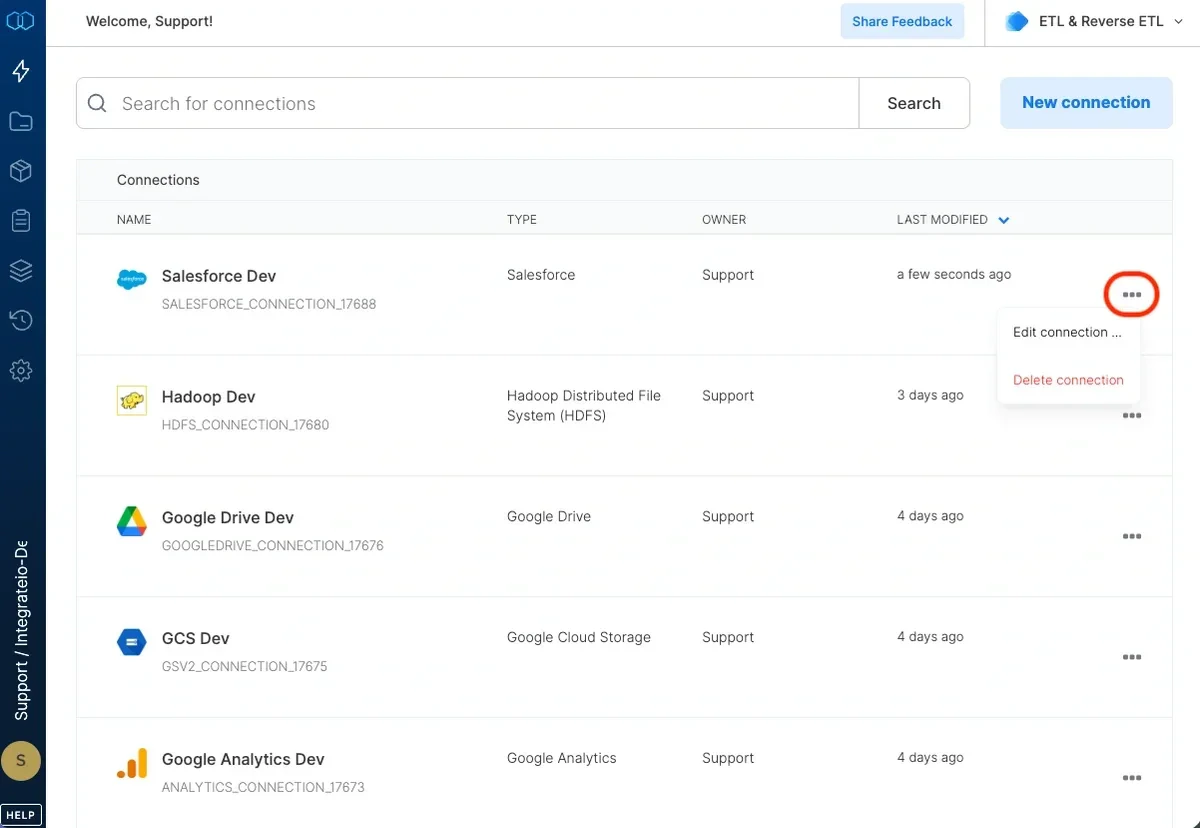 ## Salesforce Apps Installation Restrictions (Oct 2025)
Salesforce recently introduced controls for **uninstalled connected apps**, which affect how users can approve third-party integrations like our ETL Salesforce connector. If a connected app isn't explicitly installed in a customer's Salesforce org, users without the proper permissions will encounter OAuth errors (such as `OAUTH_APPROVAL_ERROR_GENERIC`) during authentication. To fix this, customers must either install the connected app within their org or grant users the **"Approve Uninstalled Connected Apps"** permission through a profile or permission set. This permission allows users to authorize and connect to apps that aren't officially installed in their org.
For orgs that have **API Access Control** enabled, Salesforce replaces this with the **"Use Any API Client"** permission, which serves the same purpose. Support teams should advise customers to check their **Connected Apps OAuth Usage** page to confirm whether our ETL app appears as "uninstalled." If so, the Salesforce admin should either install it or assign one of the above permissions to affected users. This change ensures users can continue authenticating successfully with third-party apps like ours.
For more info, please check Salesforce article [here](https://help.salesforce.com/s/articleView?id=005132365\&type=1).
## Connection Setup: Salesforce (SOAP)
Integrate.io ETL can read your Salesforce SOAP data. This article details creating the Salesforce SOAP connection in Integrate.io ETL. Note that Integrate.io ETL can only be used with [Salesforce](https://www.integrate.io/blog/category/salesforce/) editions that have API access. Some plan types, including trial versions, do not have API access by default and cannot be used with Integrate.io ETL.
### To create a Salesforce SOAP connection in Integrate.io ETL
Click the **Connections** icon (lightning bolt) on the top left menu.
To create a connection, click **New connection.**
## Salesforce Apps Installation Restrictions (Oct 2025)
Salesforce recently introduced controls for **uninstalled connected apps**, which affect how users can approve third-party integrations like our ETL Salesforce connector. If a connected app isn't explicitly installed in a customer's Salesforce org, users without the proper permissions will encounter OAuth errors (such as `OAUTH_APPROVAL_ERROR_GENERIC`) during authentication. To fix this, customers must either install the connected app within their org or grant users the **"Approve Uninstalled Connected Apps"** permission through a profile or permission set. This permission allows users to authorize and connect to apps that aren't officially installed in their org.
For orgs that have **API Access Control** enabled, Salesforce replaces this with the **"Use Any API Client"** permission, which serves the same purpose. Support teams should advise customers to check their **Connected Apps OAuth Usage** page to confirm whether our ETL app appears as "uninstalled." If so, the Salesforce admin should either install it or assign one of the above permissions to affected users. This change ensures users can continue authenticating successfully with third-party apps like ours.
For more info, please check Salesforce article [here](https://help.salesforce.com/s/articleView?id=005132365\&type=1).
## Connection Setup: Salesforce (SOAP)
Integrate.io ETL can read your Salesforce SOAP data. This article details creating the Salesforce SOAP connection in Integrate.io ETL. Note that Integrate.io ETL can only be used with [Salesforce](https://www.integrate.io/blog/category/salesforce/) editions that have API access. Some plan types, including trial versions, do not have API access by default and cannot be used with Integrate.io ETL.
### To create a Salesforce SOAP connection in Integrate.io ETL
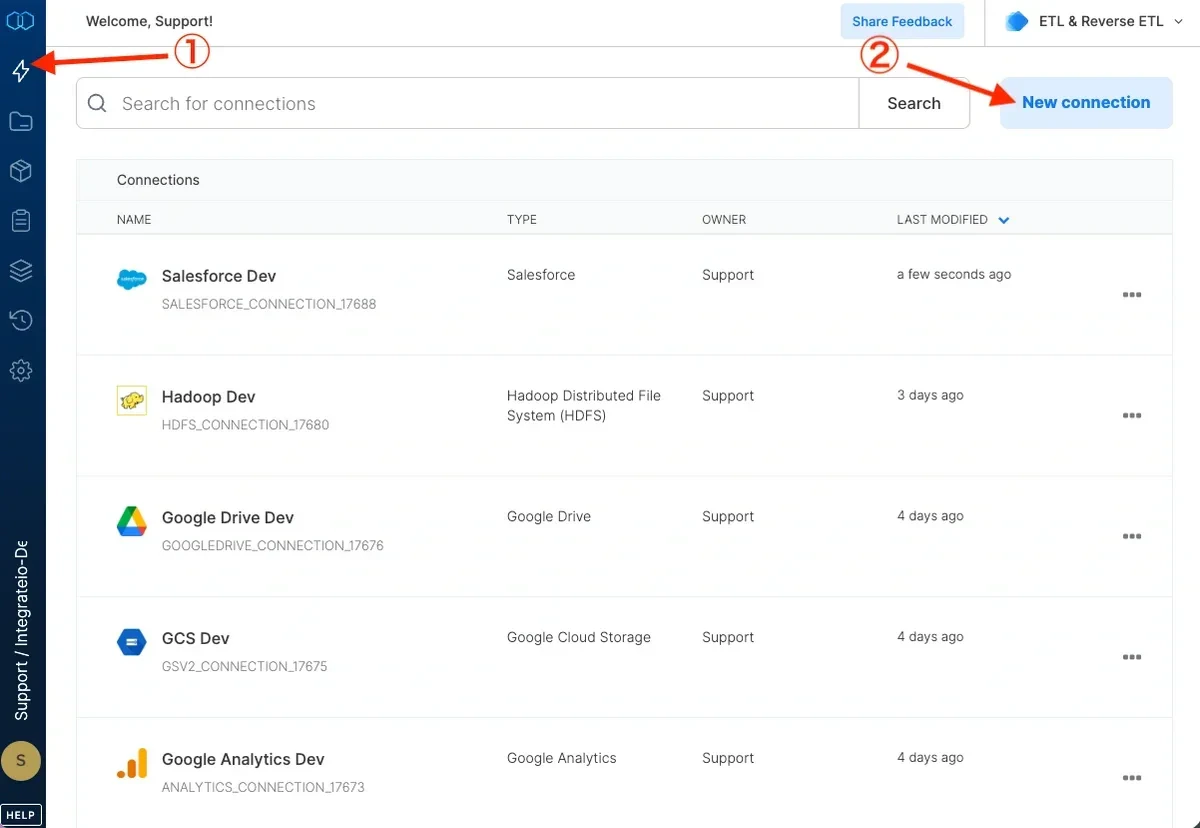
Click the **Connections** icon (lightning bolt) on the top left menu.
To create a connection, click **New connection.**
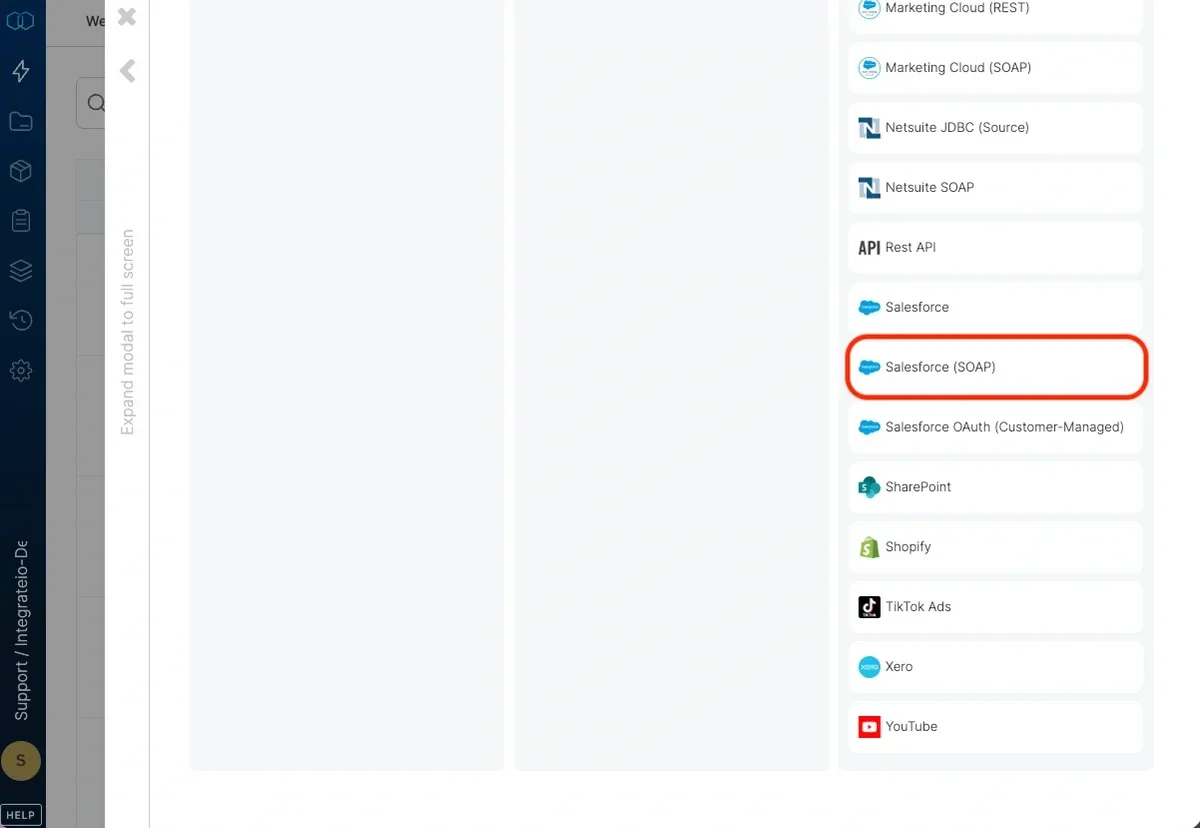
 Select Salesforce (SOAP).
 In the new Salesforce (SOAP) window, name the connection and enter the connection information.
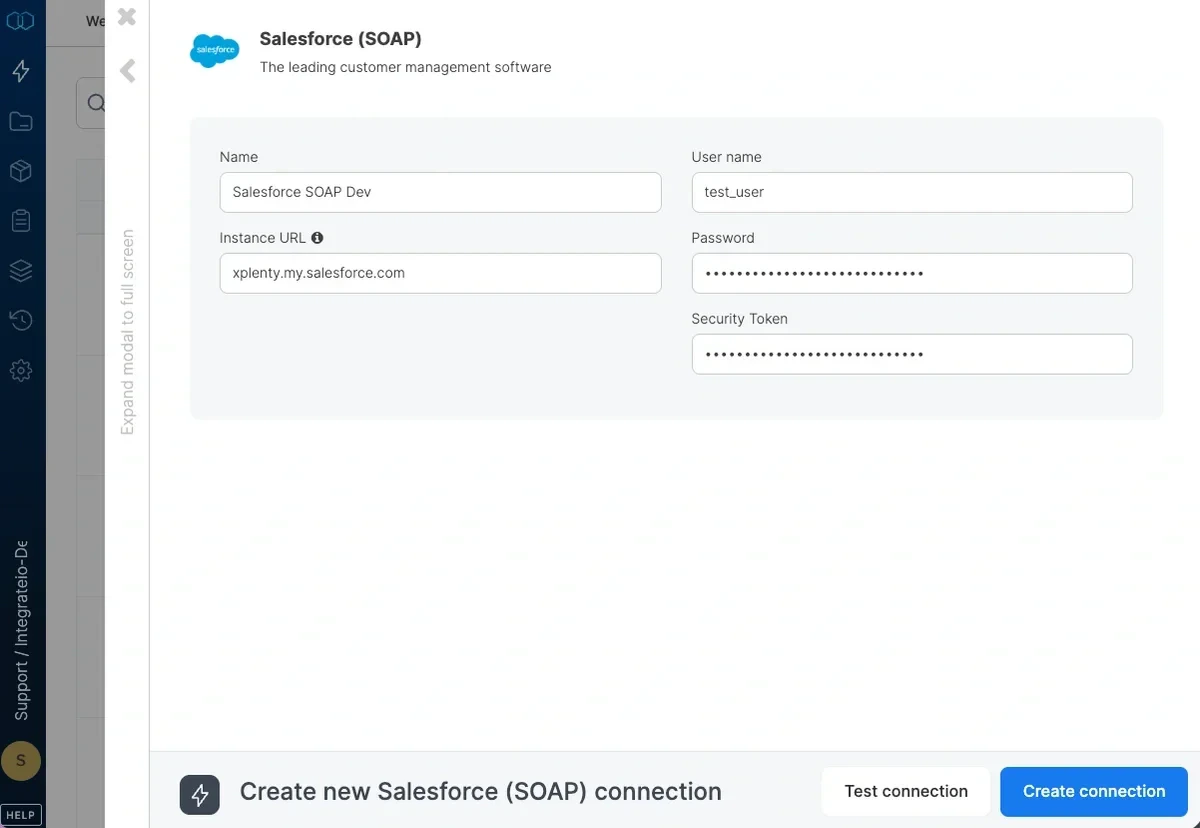 * **Name** - Name of the new connection
* **Instance URL** - Your Salesforce SOAP Instance URL (Login Server URL)
* **Username** - Your Salesforce SOAP Account Username
* **Password** - Your Salesforce SOAP Account Password
* **Security Token** - Your Salesforce SOAP Security Token. Obtain your security token by changing your password or resetting or security via Salesforce user interface. For more information, please refer to the [documentation](https://developer.salesforce.com/docs/atlas.en-us.api.meta/api/sforce_api_concepts_security.htm)
Test the Salesforce SOAP connection by clicking Test connection. Once the connection tests successful, click Create connection.
* **Name** - Name of the new connection
* **Instance URL** - Your Salesforce SOAP Instance URL (Login Server URL)
* **Username** - Your Salesforce SOAP Account Username
* **Password** - Your Salesforce SOAP Account Password
* **Security Token** - Your Salesforce SOAP Security Token. Obtain your security token by changing your password or resetting or security via Salesforce user interface. For more information, please refer to the [documentation](https://developer.salesforce.com/docs/atlas.en-us.api.meta/api/sforce_api_concepts_security.htm)
Test the Salesforce SOAP connection by clicking Test connection. Once the connection tests successful, click Create connection.
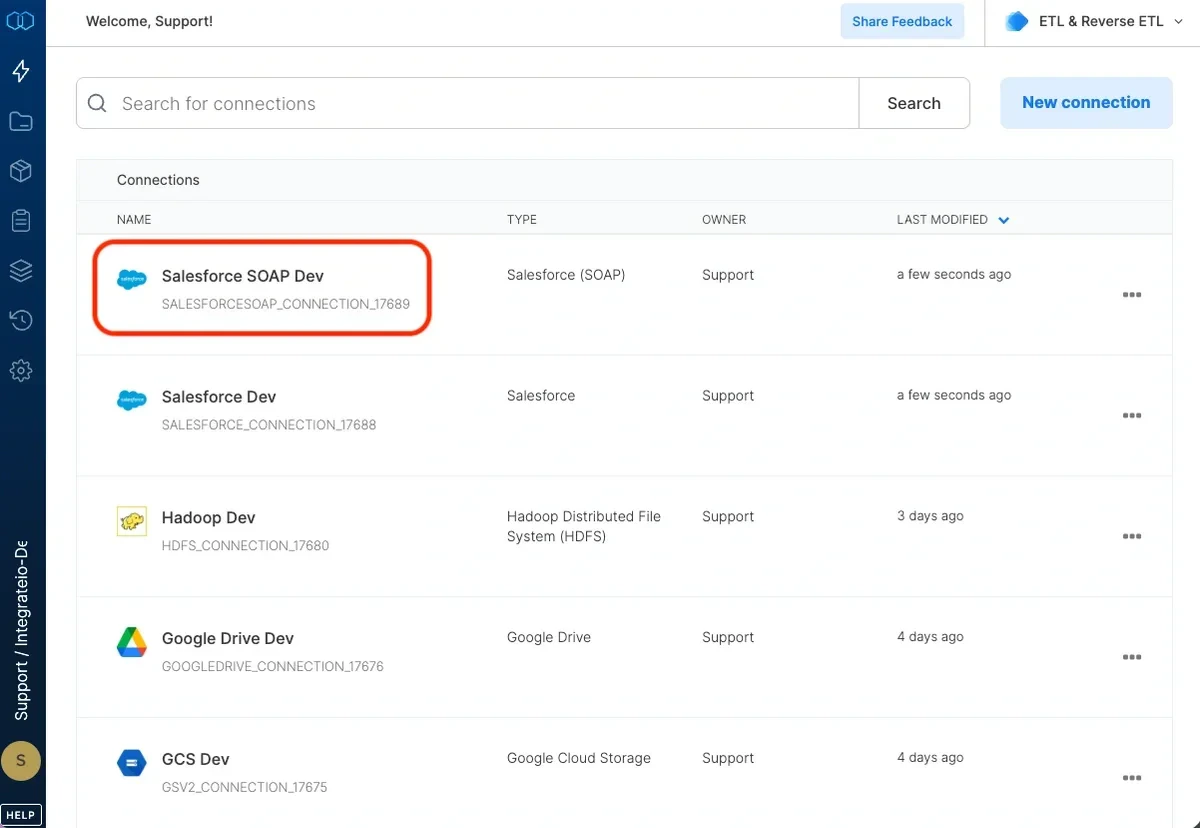 ### To modify Salesforce SOAP connections in Integrate.io ETL
Click the **Connections** icon (lightning bolt) on the top left menu.
Click a connection to open and modify it. Make any necessary changes, then click **Reconnect**, and **Save changes**. To exit the Salesforce SOAP connection window without changes, click **Back to connections** (grey tab on the left side) on the Salesforce SOAP connection window.
To delete a Salesforce SOAP connection, click the three vertical dots on the far right of the connection listing and select the **Delete connection** option.
### To modify Salesforce SOAP connections in Integrate.io ETL
Click the **Connections** icon (lightning bolt) on the top left menu.
Click a connection to open and modify it. Make any necessary changes, then click **Reconnect**, and **Save changes**. To exit the Salesforce SOAP connection window without changes, click **Back to connections** (grey tab on the left side) on the Salesforce SOAP connection window.
To delete a Salesforce SOAP connection, click the three vertical dots on the far right of the connection listing and select the **Delete connection** option.
 ## Connection Setup: Salesforce (Customer OAuth)
This guide explains how to retrieve the **Client ID**, **Client Secret**, **Authorization Code**, **Access Token**, **Refresh Token**, and **Instance URL** for OAuth 2.0 integration with Salesforce. We'll use **Postman** and curl to demonstrate the flow.
### Step 1: Get `Client ID` and `Client Secret` from Salesforce Dashboard
Log into Salesforce with an admin account.
In the top-right, click the **gear icon → Setup**.
In the left sidebar, search for **App Manager** and click it.
Click **New External Client App** (or find an existing one and click **View**).
Fill in:
* **Connected App Name**: `My OAuth App`
* **API Name**: auto-generated
* **Contact Email**: your email.
Scroll down to **API (Enable OAuth Settings)** and:
* Check **Enable OAuth Settings**
* **Callback URL**: use `https://oauth.pstmn.io/v1/callback` for Postman testing
* **Selected OAuth Scopes**:
* Perform requests at any time (refresh\_token, offline\_access)
* Manage user data via APIs (api)
* Full access (full)
* Uncheck **Require Proof Key for Code Exchange (PKCE)** option
* Check **Require secret for Web Server Flow** and **Require secret for Refresh Token Flow** options.
Click **Save**. You may need to wait a few minutes for the app to become active.
Go back to **App Manager**, find your app, and click **View**.
You'll now see:
* **Consumer Key** → this is your `client_id`
* **Consumer Secret** → this is your `client_secret` (click "Reveal")
### Step 2: Generate Authorization Code (using Postman)
Open Postman.
Create a new **OAuth 2.0** authorization under the **Authorization tab**.
Fill in:
* **Grant Type**: Authorization Code
* **Callback URL**: `https://oauth.pstmn.io/v1/callback`
* **Auth URL**: `https://login.salesforce.com/services/oauth2/authorize`
* **Access Token URL**: `https://login.salesforce.com/services/oauth2/token`
* **Client ID**: *(from Salesforce Dashboard)*
* **Client Secret**: *(from Salesforce Dashboard)*
* **Scope**: `full refresh_token api`
Click **Get New Access Token**.
You will be redirected to Salesforce → login and allow access.
Postman will receive a redirect like: `https://oauth.pstmn.io/v1/callback?code=YOUR_AUTH_CODE`
Copy the value of `code=...` – this is your **Authorization Code**.
### Step 3: Exchange Authorization Code for Tokens
Use the following `curl` command to exchange the authorization code for:
* `access_token`
* `refresh_token`
* `instance_url`
### CURL example:
```bash theme={null}
curl -X POST https://login.salesforce.com/services/oauth2/token \
-d "grant_type=authorization_code" \
-d "client_id=YOUR_CLIENT_ID" \
-d "client_secret=YOUR_CLIENT_SECRET" \
-d "redirect_uri=https://oauth.pstmn.io/v1/callback" \
-d "code=YOUR_AUTHORIZATION_CODE"
```
### Example Response:
```json theme={null}
{
"access_token": "00Dxx000000S1on!...",
"refresh_token": "5Aep86...etc",
"instance_url": "https://na123.salesforce.com",
"id": "https://login.salesforce.com/id/...",
"issued_at": "1711734351000",
"signature": "abcdef123456="
}
```
***
## Connection Setup: Salesforce (Customer OAuth)
This guide explains how to retrieve the **Client ID**, **Client Secret**, **Authorization Code**, **Access Token**, **Refresh Token**, and **Instance URL** for OAuth 2.0 integration with Salesforce. We'll use **Postman** and curl to demonstrate the flow.
### Step 1: Get `Client ID` and `Client Secret` from Salesforce Dashboard
Log into Salesforce with an admin account.
In the top-right, click the **gear icon → Setup**.
In the left sidebar, search for **App Manager** and click it.
Click **New External Client App** (or find an existing one and click **View**).
Fill in:
* **Connected App Name**: `My OAuth App`
* **API Name**: auto-generated
* **Contact Email**: your email.
Scroll down to **API (Enable OAuth Settings)** and:
* Check **Enable OAuth Settings**
* **Callback URL**: use `https://oauth.pstmn.io/v1/callback` for Postman testing
* **Selected OAuth Scopes**:
* Perform requests at any time (refresh\_token, offline\_access)
* Manage user data via APIs (api)
* Full access (full)
* Uncheck **Require Proof Key for Code Exchange (PKCE)** option
* Check **Require secret for Web Server Flow** and **Require secret for Refresh Token Flow** options.
Click **Save**. You may need to wait a few minutes for the app to become active.
Go back to **App Manager**, find your app, and click **View**.
You'll now see:
* **Consumer Key** → this is your `client_id`
* **Consumer Secret** → this is your `client_secret` (click "Reveal")
### Step 2: Generate Authorization Code (using Postman)
Open Postman.
Create a new **OAuth 2.0** authorization under the **Authorization tab**.
Fill in:
* **Grant Type**: Authorization Code
* **Callback URL**: `https://oauth.pstmn.io/v1/callback`
* **Auth URL**: `https://login.salesforce.com/services/oauth2/authorize`
* **Access Token URL**: `https://login.salesforce.com/services/oauth2/token`
* **Client ID**: *(from Salesforce Dashboard)*
* **Client Secret**: *(from Salesforce Dashboard)*
* **Scope**: `full refresh_token api`
Click **Get New Access Token**.
You will be redirected to Salesforce → login and allow access.
Postman will receive a redirect like: `https://oauth.pstmn.io/v1/callback?code=YOUR_AUTH_CODE`
Copy the value of `code=...` – this is your **Authorization Code**.
### Step 3: Exchange Authorization Code for Tokens
Use the following `curl` command to exchange the authorization code for:
* `access_token`
* `refresh_token`
* `instance_url`
### CURL example:
```bash theme={null}
curl -X POST https://login.salesforce.com/services/oauth2/token \
-d "grant_type=authorization_code" \
-d "client_id=YOUR_CLIENT_ID" \
-d "client_secret=YOUR_CLIENT_SECRET" \
-d "redirect_uri=https://oauth.pstmn.io/v1/callback" \
-d "code=YOUR_AUTHORIZATION_CODE"
```
### Example Response:
```json theme={null}
{
"access_token": "00Dxx000000S1on!...",
"refresh_token": "5Aep86...etc",
"instance_url": "https://na123.salesforce.com",
"id": "https://login.salesforce.com/id/...",
"issued_at": "1711734351000",
"signature": "abcdef123456="
}
```
***
 ## Connection
Connections are part of configuring a no-code Salesforce integration, allowing secure API-based access without writing custom code.
Select an existing Salesforce connection or create a new one (for more information, see [Allowing Integrate.io ETL access to my data on Salesforce](/docs/etl/allowing-integrateio-etl-access-to-my-data-on-salesforce).)
## Source Properties
## Connection
Connections are part of configuring a no-code Salesforce integration, allowing secure API-based access without writing custom code.
Select an existing Salesforce connection or create a new one (for more information, see [Allowing Integrate.io ETL access to my data on Salesforce](/docs/etl/allowing-integrateio-etl-access-to-my-data-on-salesforce).)
## Source Properties
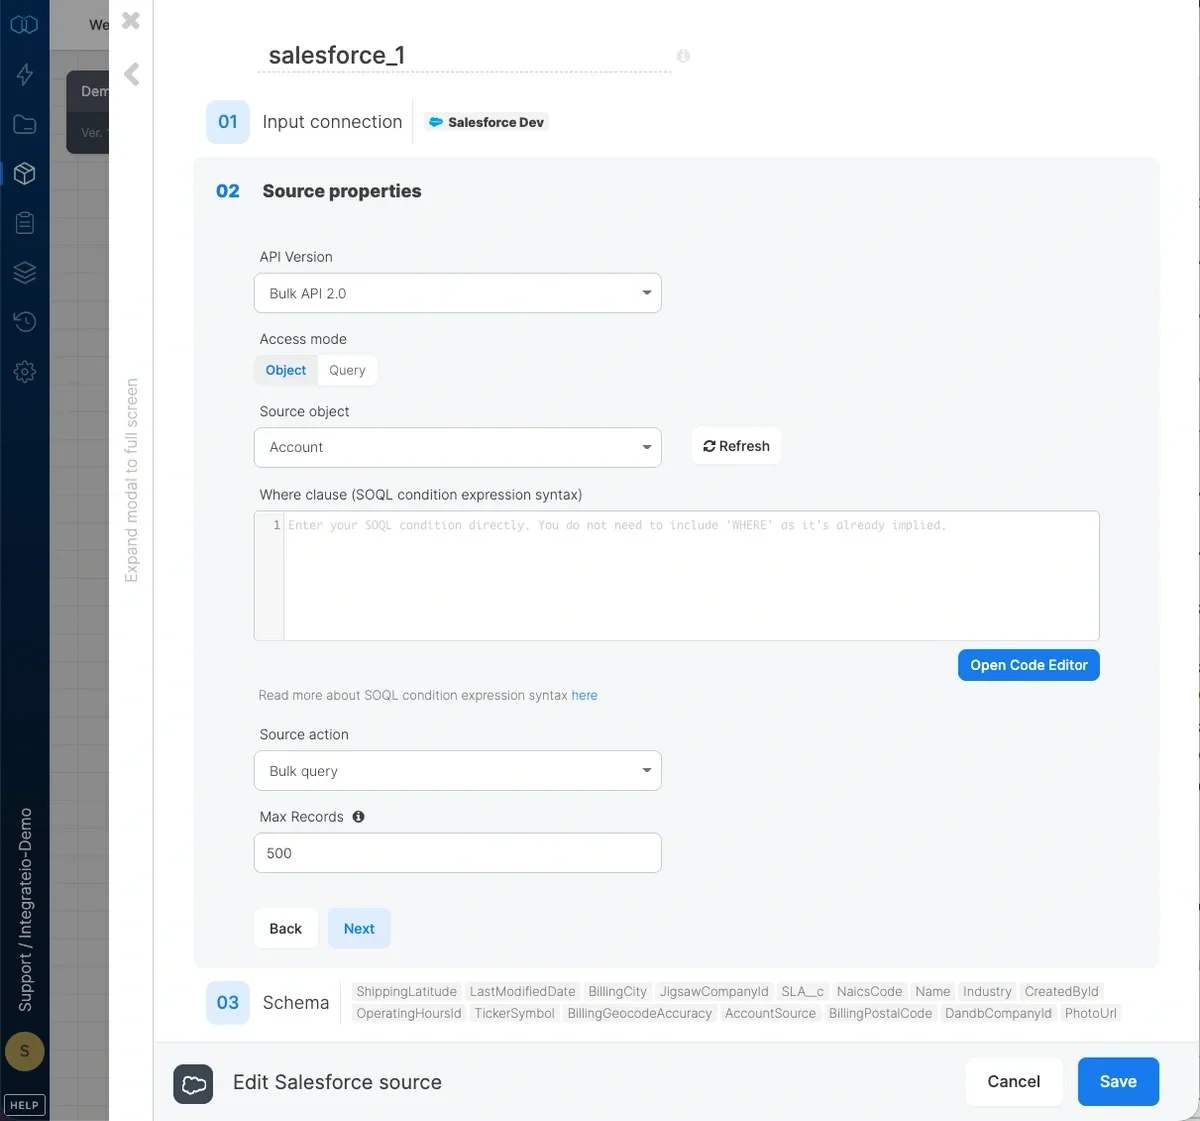 * **API Version -** list of Salesforce Bulk API versions we support. Read more about Bulk API 2.0 [here](https://developer.salesforce.com/docs/atlas.en-us.api_asynch.meta/api_asynch/asynch_api_intro.htm)
* **Access mode** - select object to extract an entire object or query to execute a SOQL query.
* **Source object** - the table name from which the data will be imported.
* **where clause** - optional. You can add predicates clauses to the WHERE clause as part of the SQL query that is built in order to get the data from the database. Make sure to skip the keyword WHERE.
| Good | `prod_category = 1 AND prod_color = 'red'` |
| :--- | :----------------------------------------------- |
| Bad | `WHERE prod_category = 1 AND prod_color = 'red'` |
* **Source action** - Use `bulk query` (default) to read available records or `bulk query all` to read available and deleted records.
* **Query** - type in a SOQL query. Read more about SOQL syntax [here](https://developer.salesforce.com/docs/atlas.en-us.soql_sosl.meta/soql_sosl/sforce_api_calls_soql.htm).
* **Max records** - Specify the number of records to retrieve per page/API call to prevent timeouts. If left empty, all records will be retrieved in a single API call. Only available in Bulk API 2.0
## Source Schema
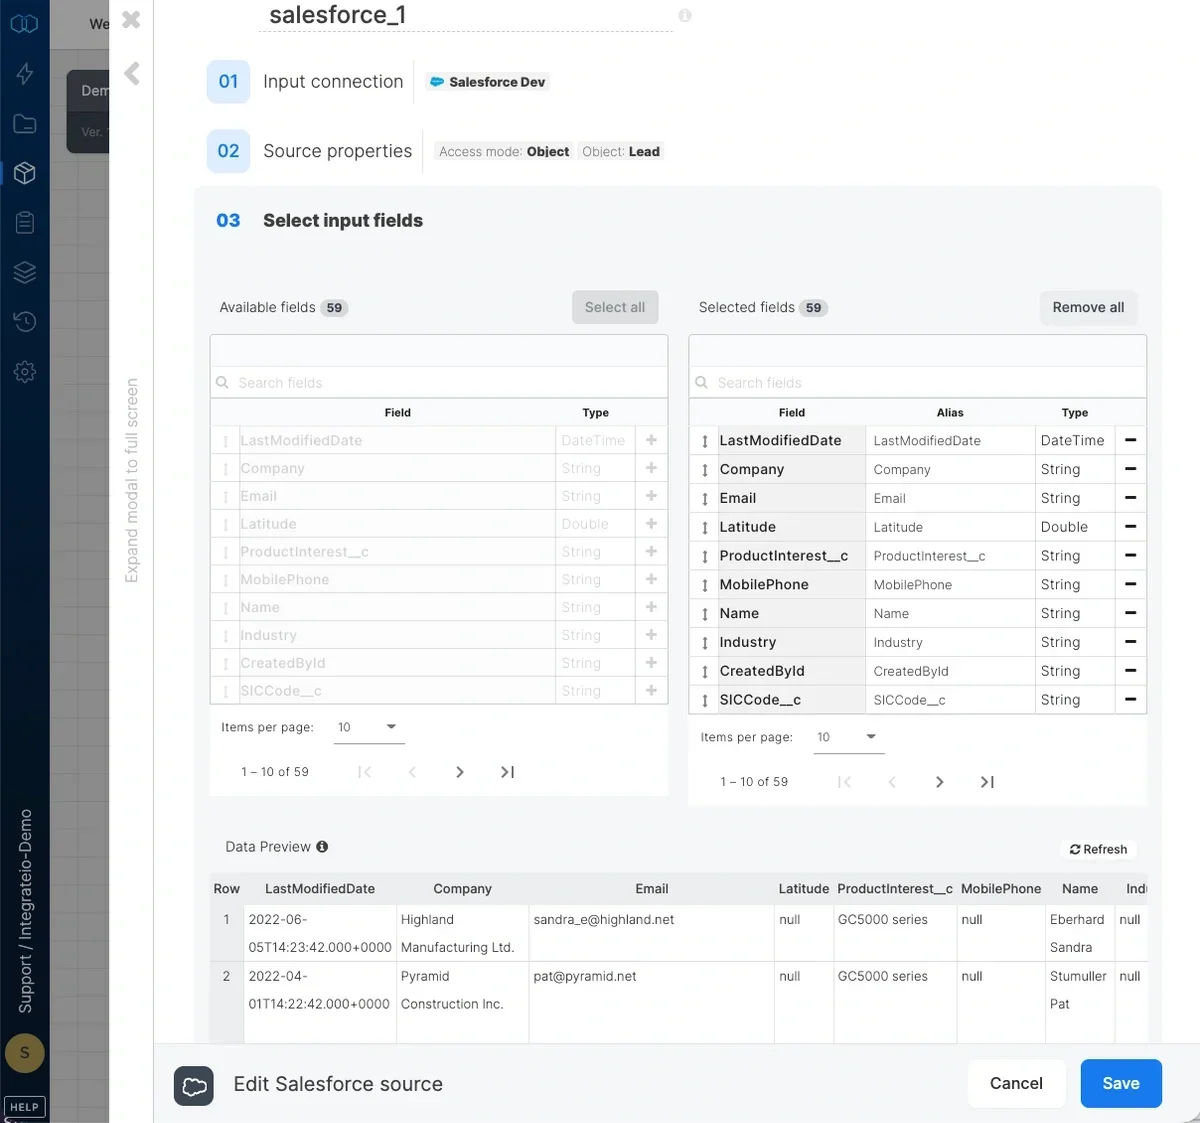
After defining the source object, select the fields to use in the source.
The fields you select are used to build the SOQL query that will be executed to read the data. Careful field selection helps reduce unnecessary API usage and improves performance in no-code Salesforce integrations.
## Loading data incrementally from Salesforce
Incremental loading is a common pattern in ETL products that support pulling data from systems like Marketing Cloud, transforming it, and writing updates back into Salesforce while minimizing API consumption
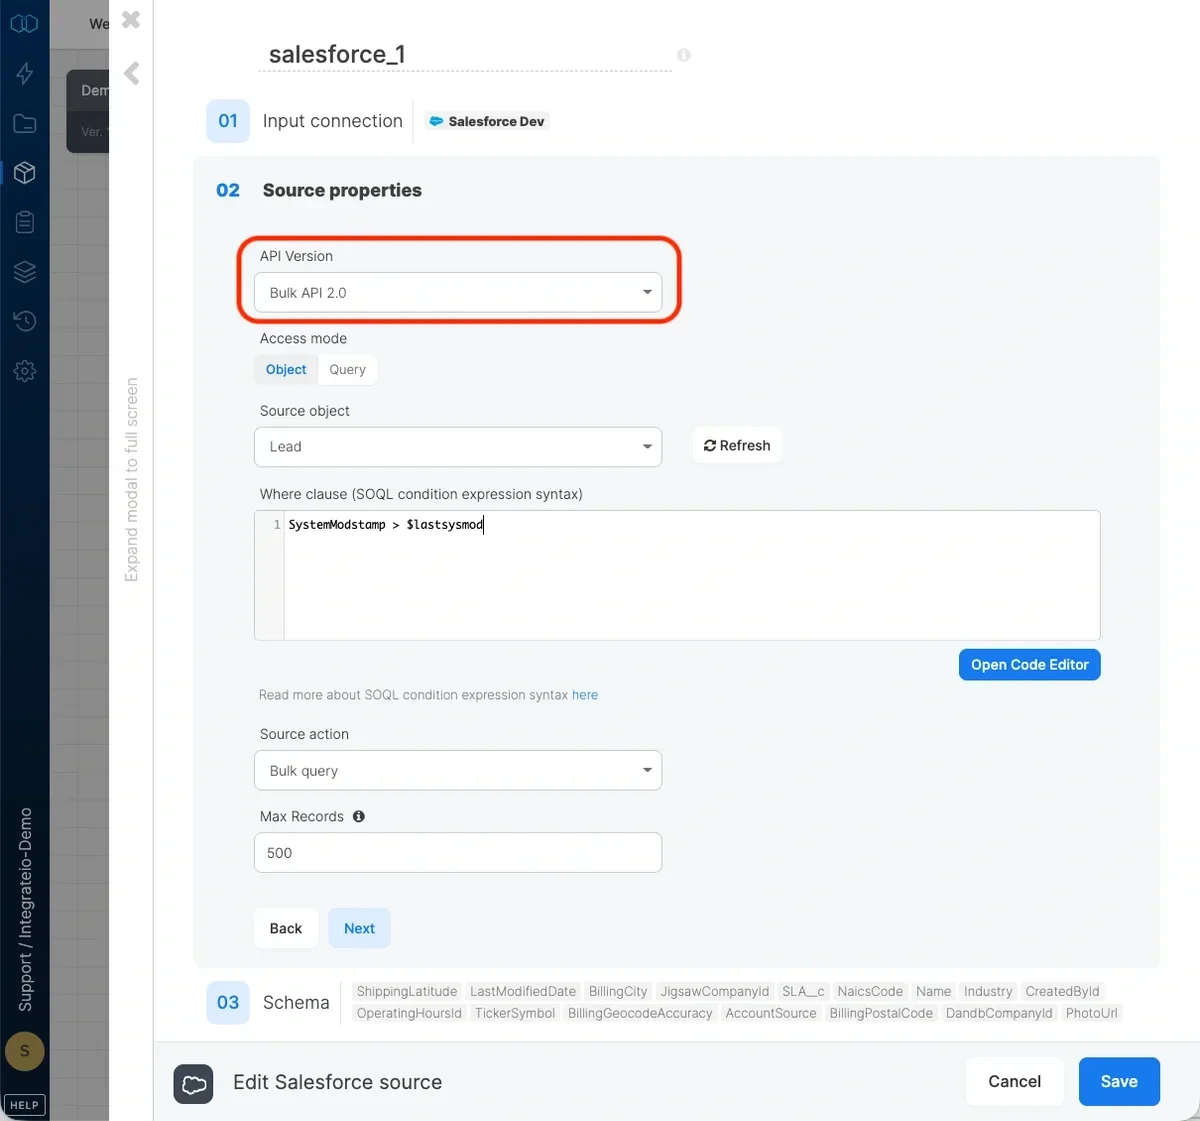
In order to load data incrementally (changes and additions) to objects, the object to synchronize should have the *systemmodstamp* column. This column is automatically updated whenever a user or an automated process updates a record. Use the following condition in the **where clause** field with a variable:
SystemModstamp > \$lastsysmod
* **API Version -** list of Salesforce Bulk API versions we support. Read more about Bulk API 2.0 [here](https://developer.salesforce.com/docs/atlas.en-us.api_asynch.meta/api_asynch/asynch_api_intro.htm)
* **Access mode** - select object to extract an entire object or query to execute a SOQL query.
* **Source object** - the table name from which the data will be imported.
* **where clause** - optional. You can add predicates clauses to the WHERE clause as part of the SQL query that is built in order to get the data from the database. Make sure to skip the keyword WHERE.
| Good | `prod_category = 1 AND prod_color = 'red'` |
| :--- | :----------------------------------------------- |
| Bad | `WHERE prod_category = 1 AND prod_color = 'red'` |
* **Source action** - Use `bulk query` (default) to read available records or `bulk query all` to read available and deleted records.
* **Query** - type in a SOQL query. Read more about SOQL syntax [here](https://developer.salesforce.com/docs/atlas.en-us.soql_sosl.meta/soql_sosl/sforce_api_calls_soql.htm).
* **Max records** - Specify the number of records to retrieve per page/API call to prevent timeouts. If left empty, all records will be retrieved in a single API call. Only available in Bulk API 2.0
## Source Schema
After defining the source object, select the fields to use in the source.
The fields you select are used to build the SOQL query that will be executed to read the data. Careful field selection helps reduce unnecessary API usage and improves performance in no-code Salesforce integrations.
## Loading data incrementally from Salesforce
Incremental loading is a common pattern in ETL products that support pulling data from systems like Marketing Cloud, transforming it, and writing updates back into Salesforce while minimizing API consumption
In order to load data incrementally (changes and additions) to objects, the object to synchronize should have the *systemmodstamp* column. This column is automatically updated whenever a user or an automated process updates a record. Use the following condition in the **where clause** field with a variable:
SystemModstamp > \$lastsysmod
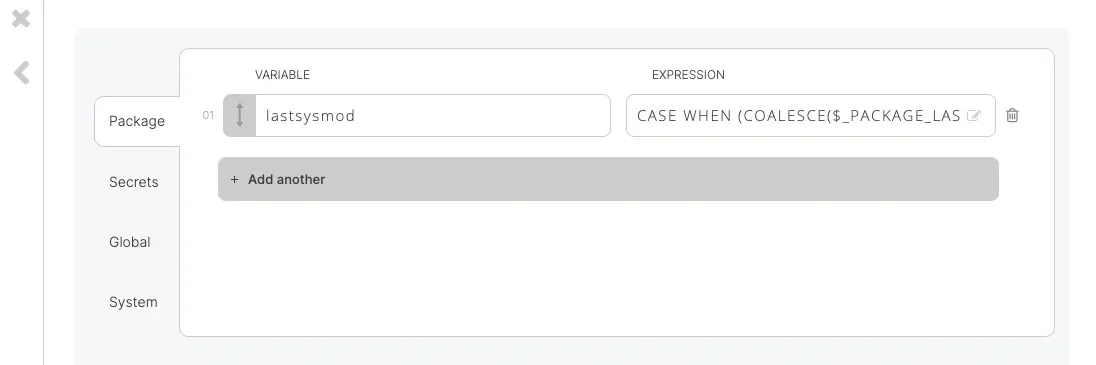
 You can use the last successful submission timestamp for the package as you can see in the example below as a value for the variable, or use ExecuteSqlDatetime function to get the last SystemModstamp in your destination database table.
```sql theme={null}
lastsysmod = CASE
WHEN (COALESCE($_PACKAGE_LAST_SUCCESSFUL_JOB_SUBMISSION_TIMESTAMP,'')=='') THEN '1900-01-01T00:00:00Z'
ELSE $_PACKAGE_LAST_SUCCESSFUL_JOB_SUBMISSION_TIMESTAMP END
```
You can use the last successful submission timestamp for the package as you can see in the example below as a value for the variable, or use ExecuteSqlDatetime function to get the last SystemModstamp in your destination database table.
```sql theme={null}
lastsysmod = CASE
WHEN (COALESCE($_PACKAGE_LAST_SUCCESSFUL_JOB_SUBMISSION_TIMESTAMP,'')=='') THEN '1900-01-01T00:00:00Z'
ELSE $_PACKAGE_LAST_SUCCESSFUL_JOB_SUBMISSION_TIMESTAMP END
```
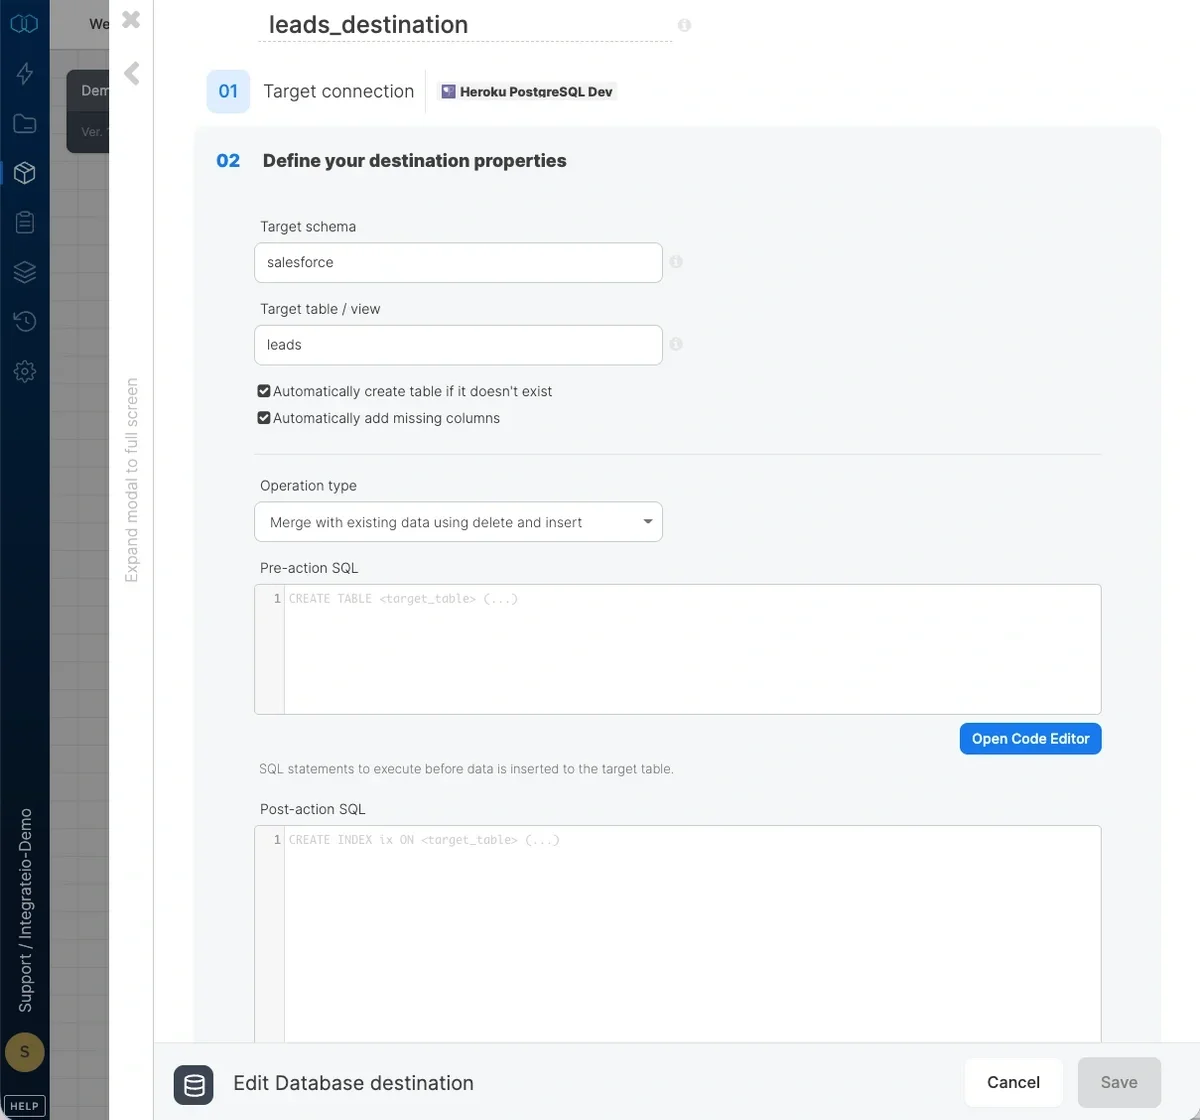
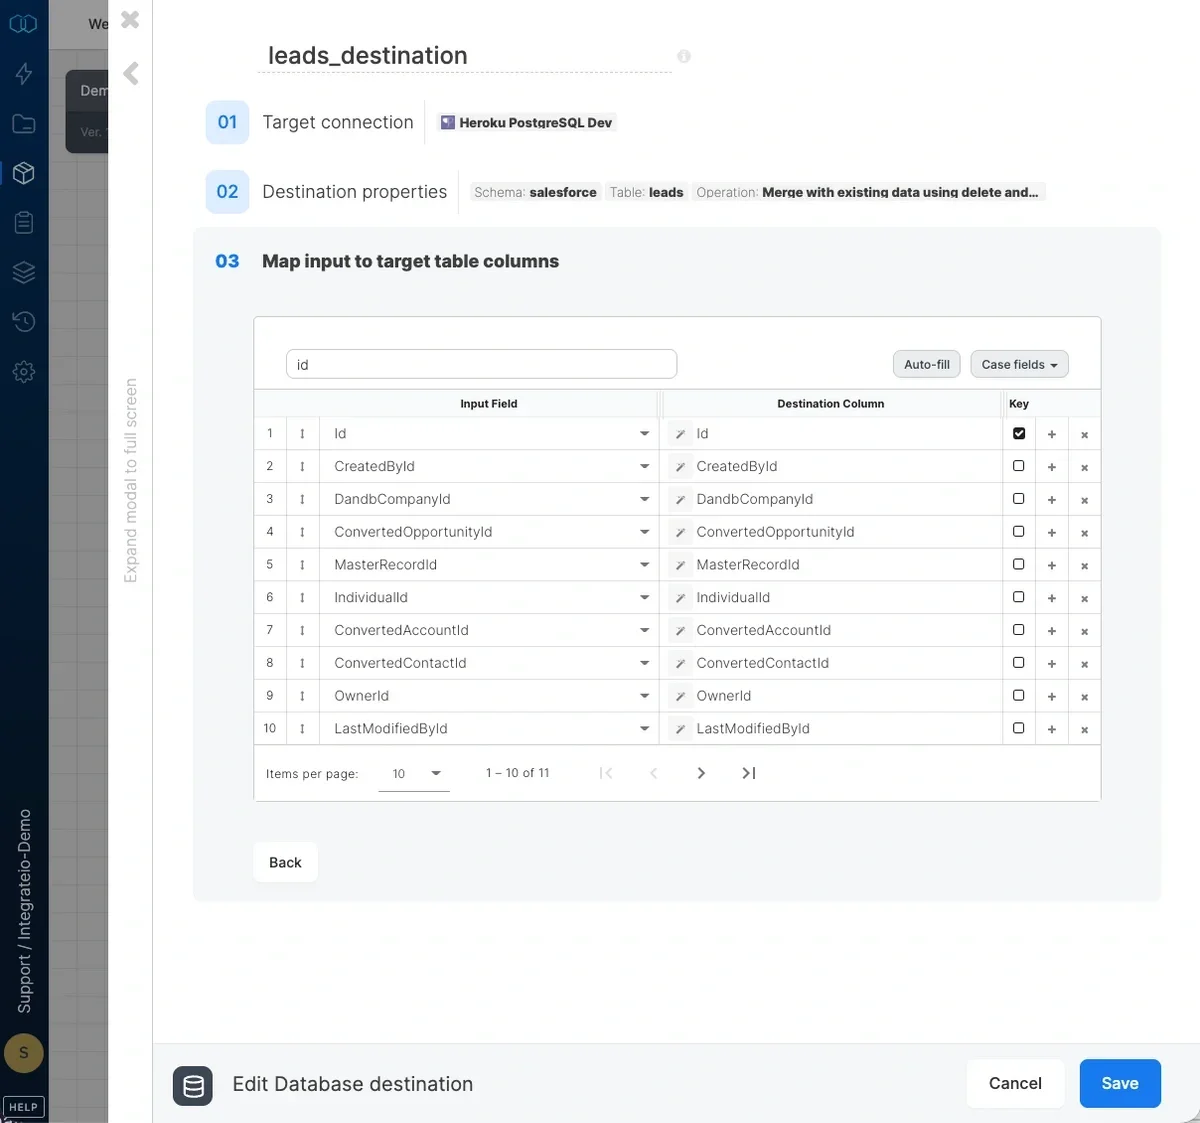
 Merge operations are typically used when synchronizing transformed data back into Salesforce to avoid duplicate records. In order to store additions or changes in your database destination, make sure to mark the id column as key and change the operation type to "merge":
 ## Enabling PK Chunking
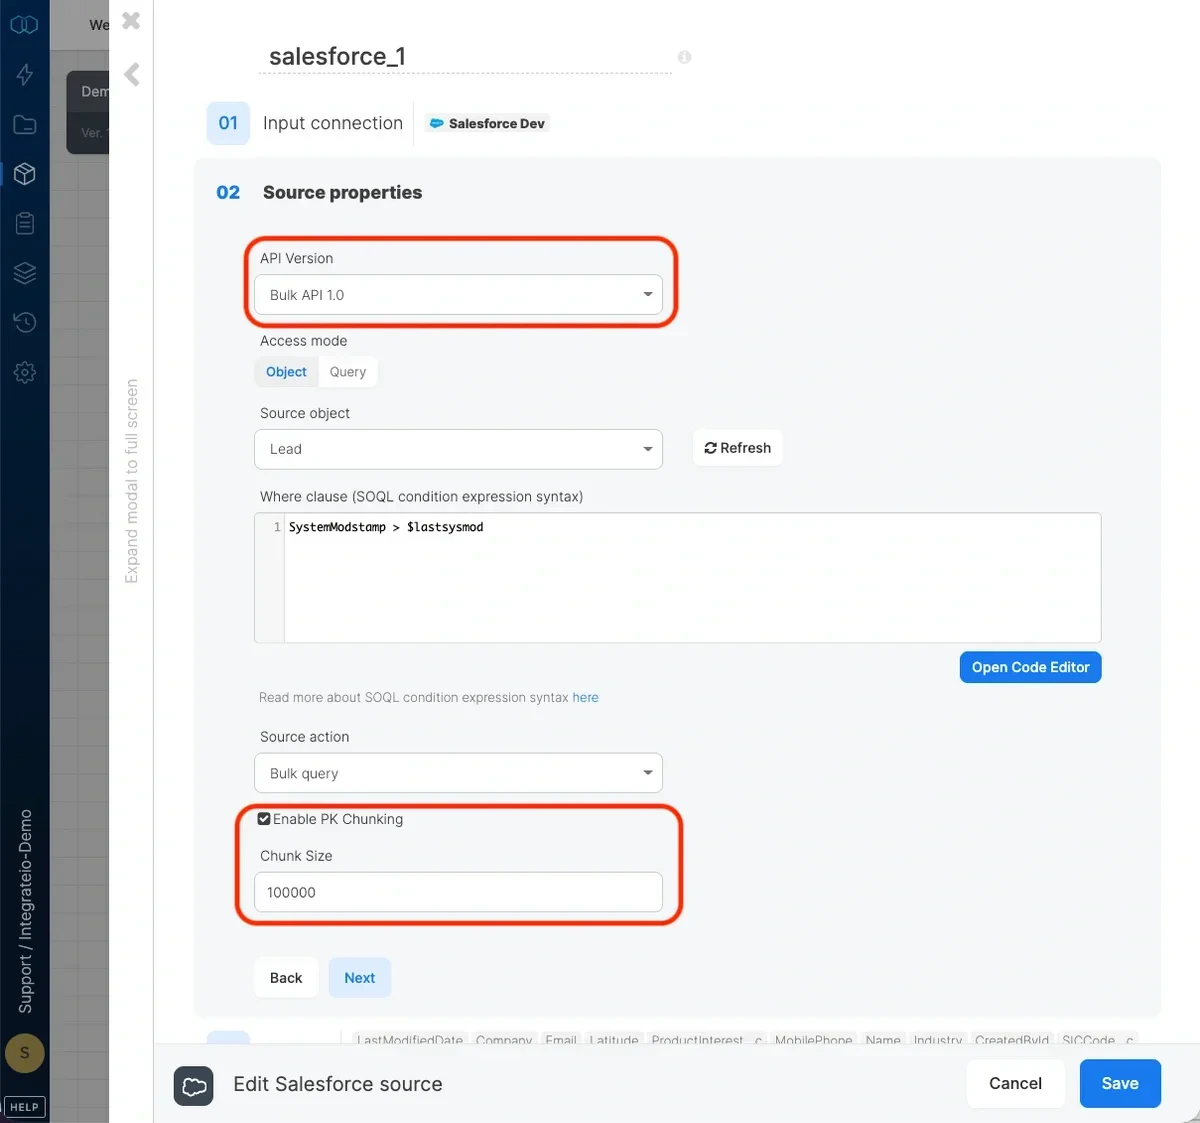
You can enable **PK Chunking** for large datasets such as initial bulk load. By enabling this feature, Salesforce automatically splits the Bulk API Query job into multiple batches. Integrate.io ETL then polls for the progress of each of the batch then process them in parallel once all are done. The parallelism depends on the cluster node count (higher node count can pull more batches in parallel). Note that PK Chunking is disabled in Bulk API 2.0
## Enabling PK Chunking
You can enable **PK Chunking** for large datasets such as initial bulk load. By enabling this feature, Salesforce automatically splits the Bulk API Query job into multiple batches. Integrate.io ETL then polls for the progress of each of the batch then process them in parallel once all are done. The parallelism depends on the cluster node count (higher node count can pull more batches in parallel). Note that PK Chunking is disabled in Bulk API 2.0
 ## Limitations
It is currently not possible to join a Salesforce Sandbox environment source connection with a Salesforce Production environment source connection.
This limitation applies to Join, Union and Cross-join components to join Sandbox with Production source data.
## Querying Parent Fields
It is possible to execute query containing parent fields, for example following query:
```sql theme={null}
SELECT CreatedDate, Id, Sales_User__r.Id, Sales_User__r.Name
FROM Account
```
`Sales_User__r.Id` and `Sales_User__r.Name` are fields from `Account`'s parent object: `Sales__User__c` (`Sales_User__r` is the relationship name prefix for the `Account` object, for more details about the difference on `__c` and `__r` is [here](https://developer.salesforce.com/forums/?id=906F00000008llXIAQ))
Please note that when doing the query, the schema column might not pop up if the data returned is empty.
## Related
## Limitations
It is currently not possible to join a Salesforce Sandbox environment source connection with a Salesforce Production environment source connection.
This limitation applies to Join, Union and Cross-join components to join Sandbox with Production source data.
## Querying Parent Fields
It is possible to execute query containing parent fields, for example following query:
```sql theme={null}
SELECT CreatedDate, Id, Sales_User__r.Id, Sales_User__r.Name
FROM Account
```
`Sales_User__r.Id` and `Sales_User__r.Name` are fields from `Account`'s parent object: `Sales__User__c` (`Sales_User__r` is the relationship name prefix for the `Account` object, for more details about the difference on `__c` and `__r` is [here](https://developer.salesforce.com/forums/?id=906F00000008llXIAQ))
Please note that when doing the query, the schema column might not pop up if the data returned is empty.
## Related