> ## Documentation Index
> Fetch the complete documentation index at: https://www.integrate.io/docs/llms.txt
> Use this file to discover all available pages before exploring further.
# ETL: XplentyでSAP HANA CloudにOData経由で接続し、データを取得してみた
> Integrate.io ETLのREST APIコンポーネントを使用し、SAP HANA CloudのSandbox環境にあるSales OrderのODataサービスへ接続してデータを取得する方法を解説します。
## ODataとは?
こちらのブログに詳細が分かりやすくまとまってますので、こちらを参照ください。
[https://qiita.com/tami/items/411a226d1ea6bb25b5f1](https://qiita.com/tami/items/411a226d1ea6bb25b5f1)
## SAP API Business Hubでリクエストに必要な情報を取得する
今回はSandboxにあるSales OrderのODataサービスに接続します
まず、[SAP API Business Hub](https://api.sap.com/package/SAPS4HANACloud?section=Artifacts)にアクセスします。
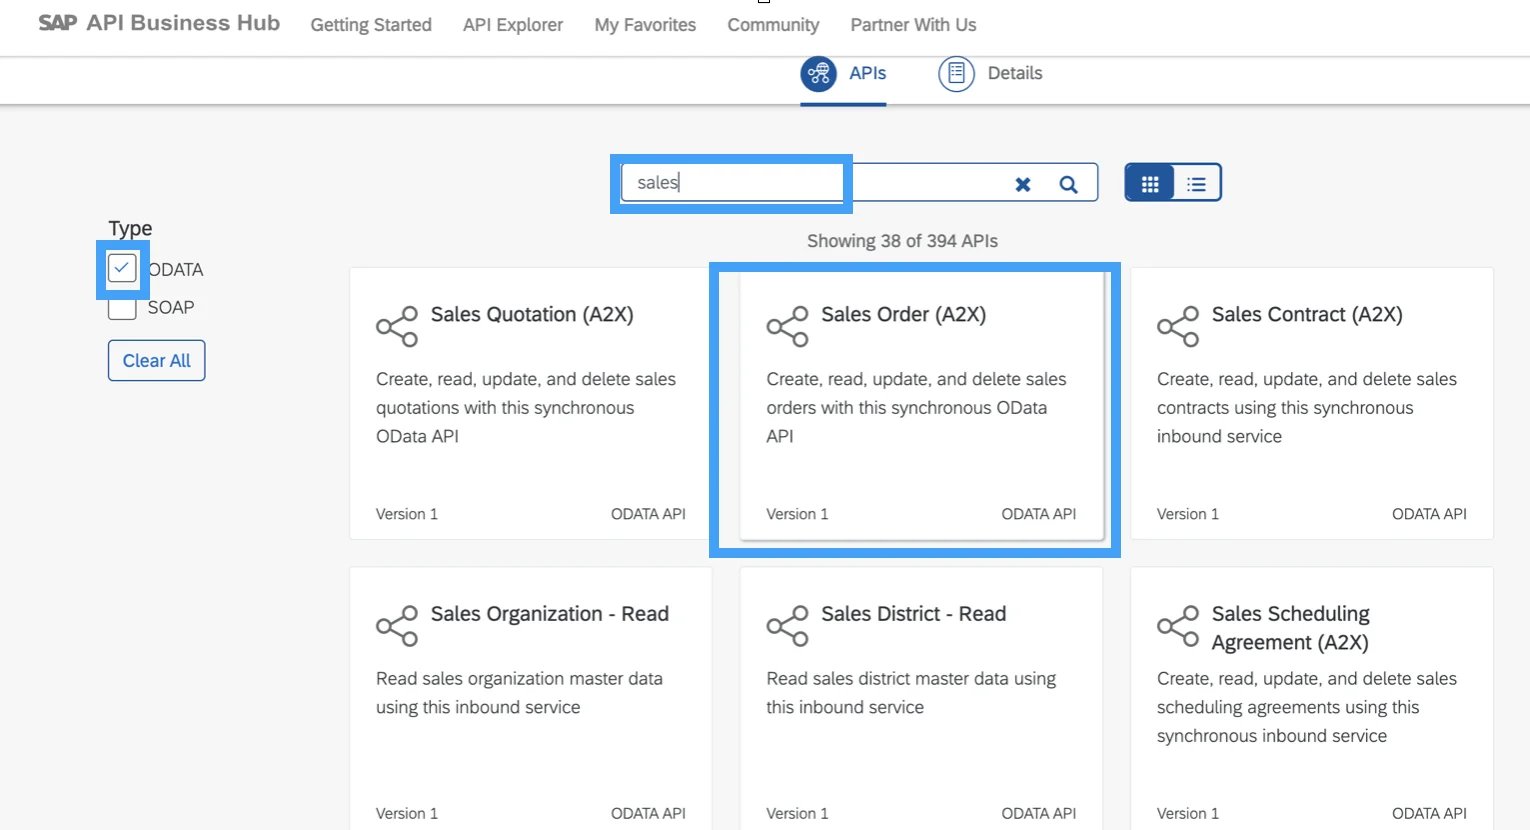
1.条件を指定し、Sales Order (A2X)を選択します。(同期 OData API)
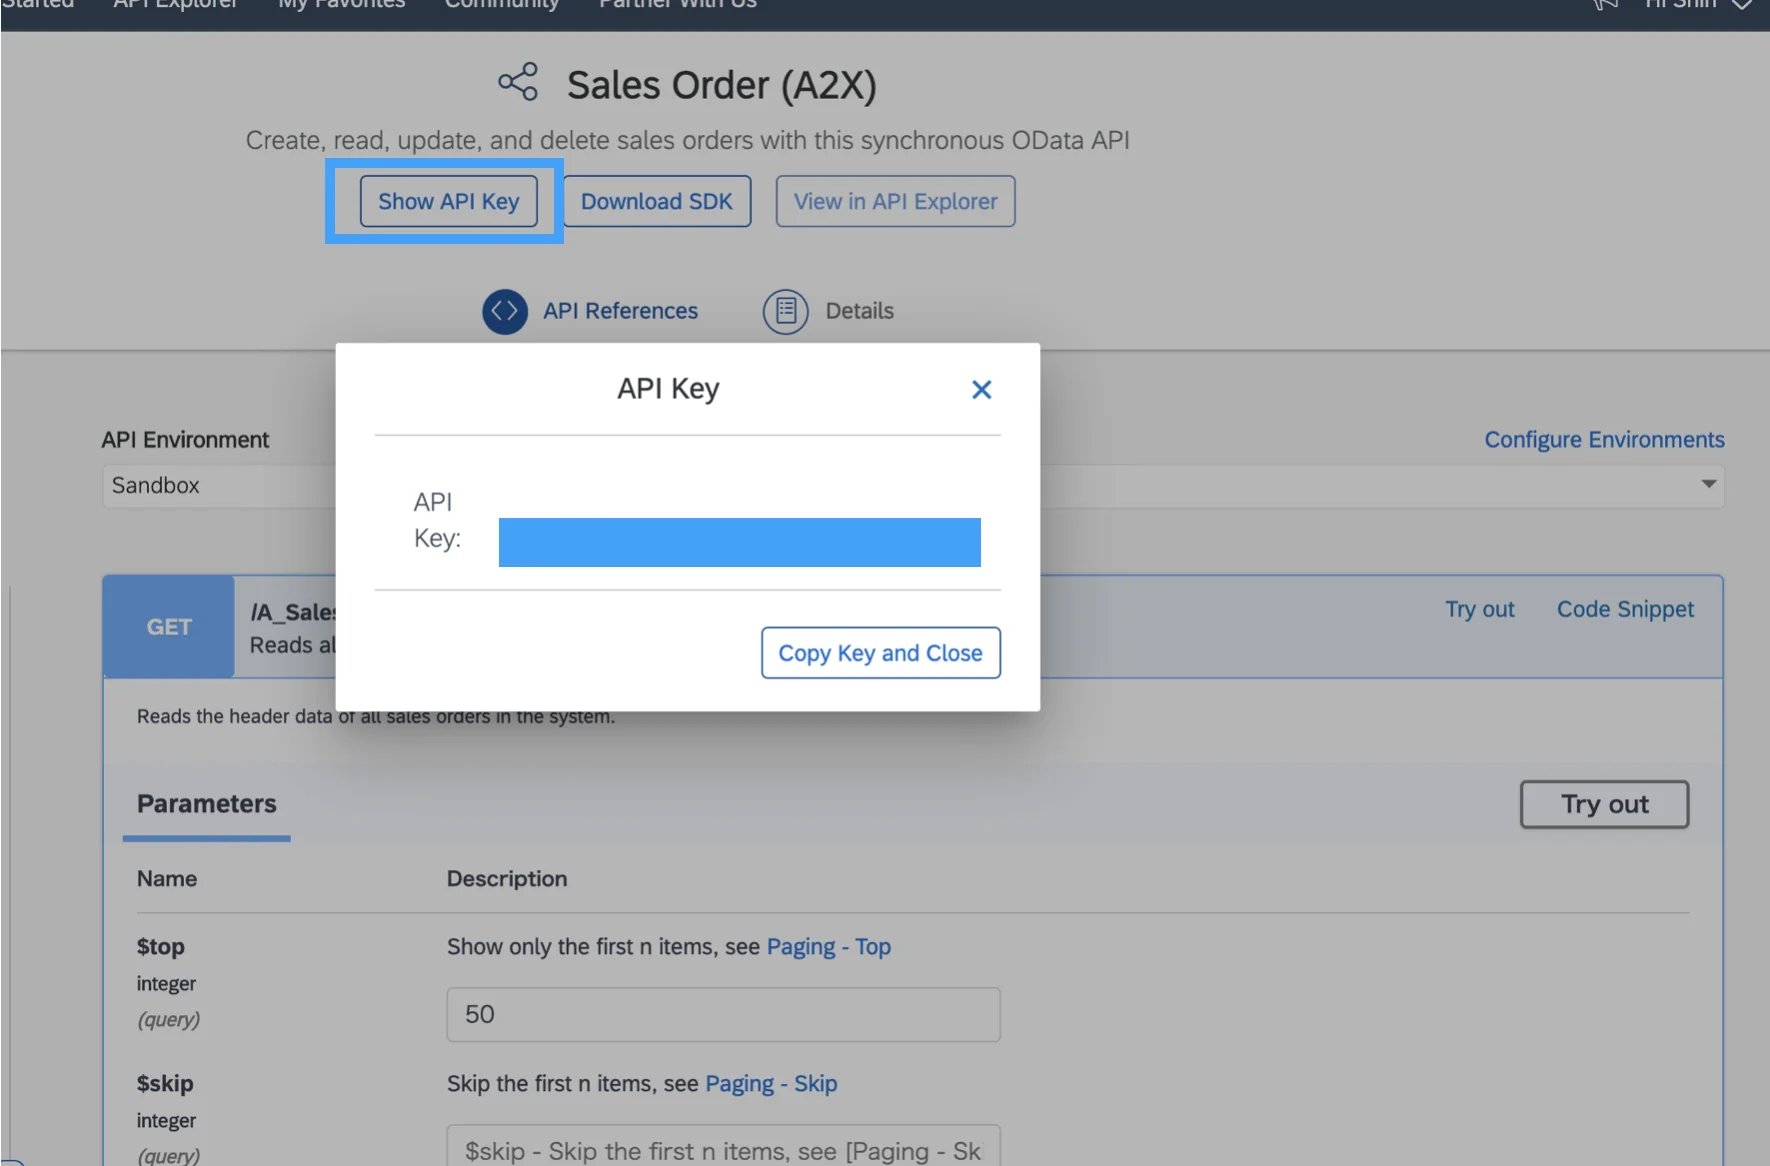
 2.ログインし、Show API keyクリックすると、API keyを取得することができます。ここで表示されたAPI Keyをメモしておきます。(Basic認証でアクセスが必要なODataサービスの場合、ユーザー、パスワードをメモします)
 3.Sandbox環境に対してリクエストを実行すると、実行時の条件に応じて設定されたURLを確認できます。
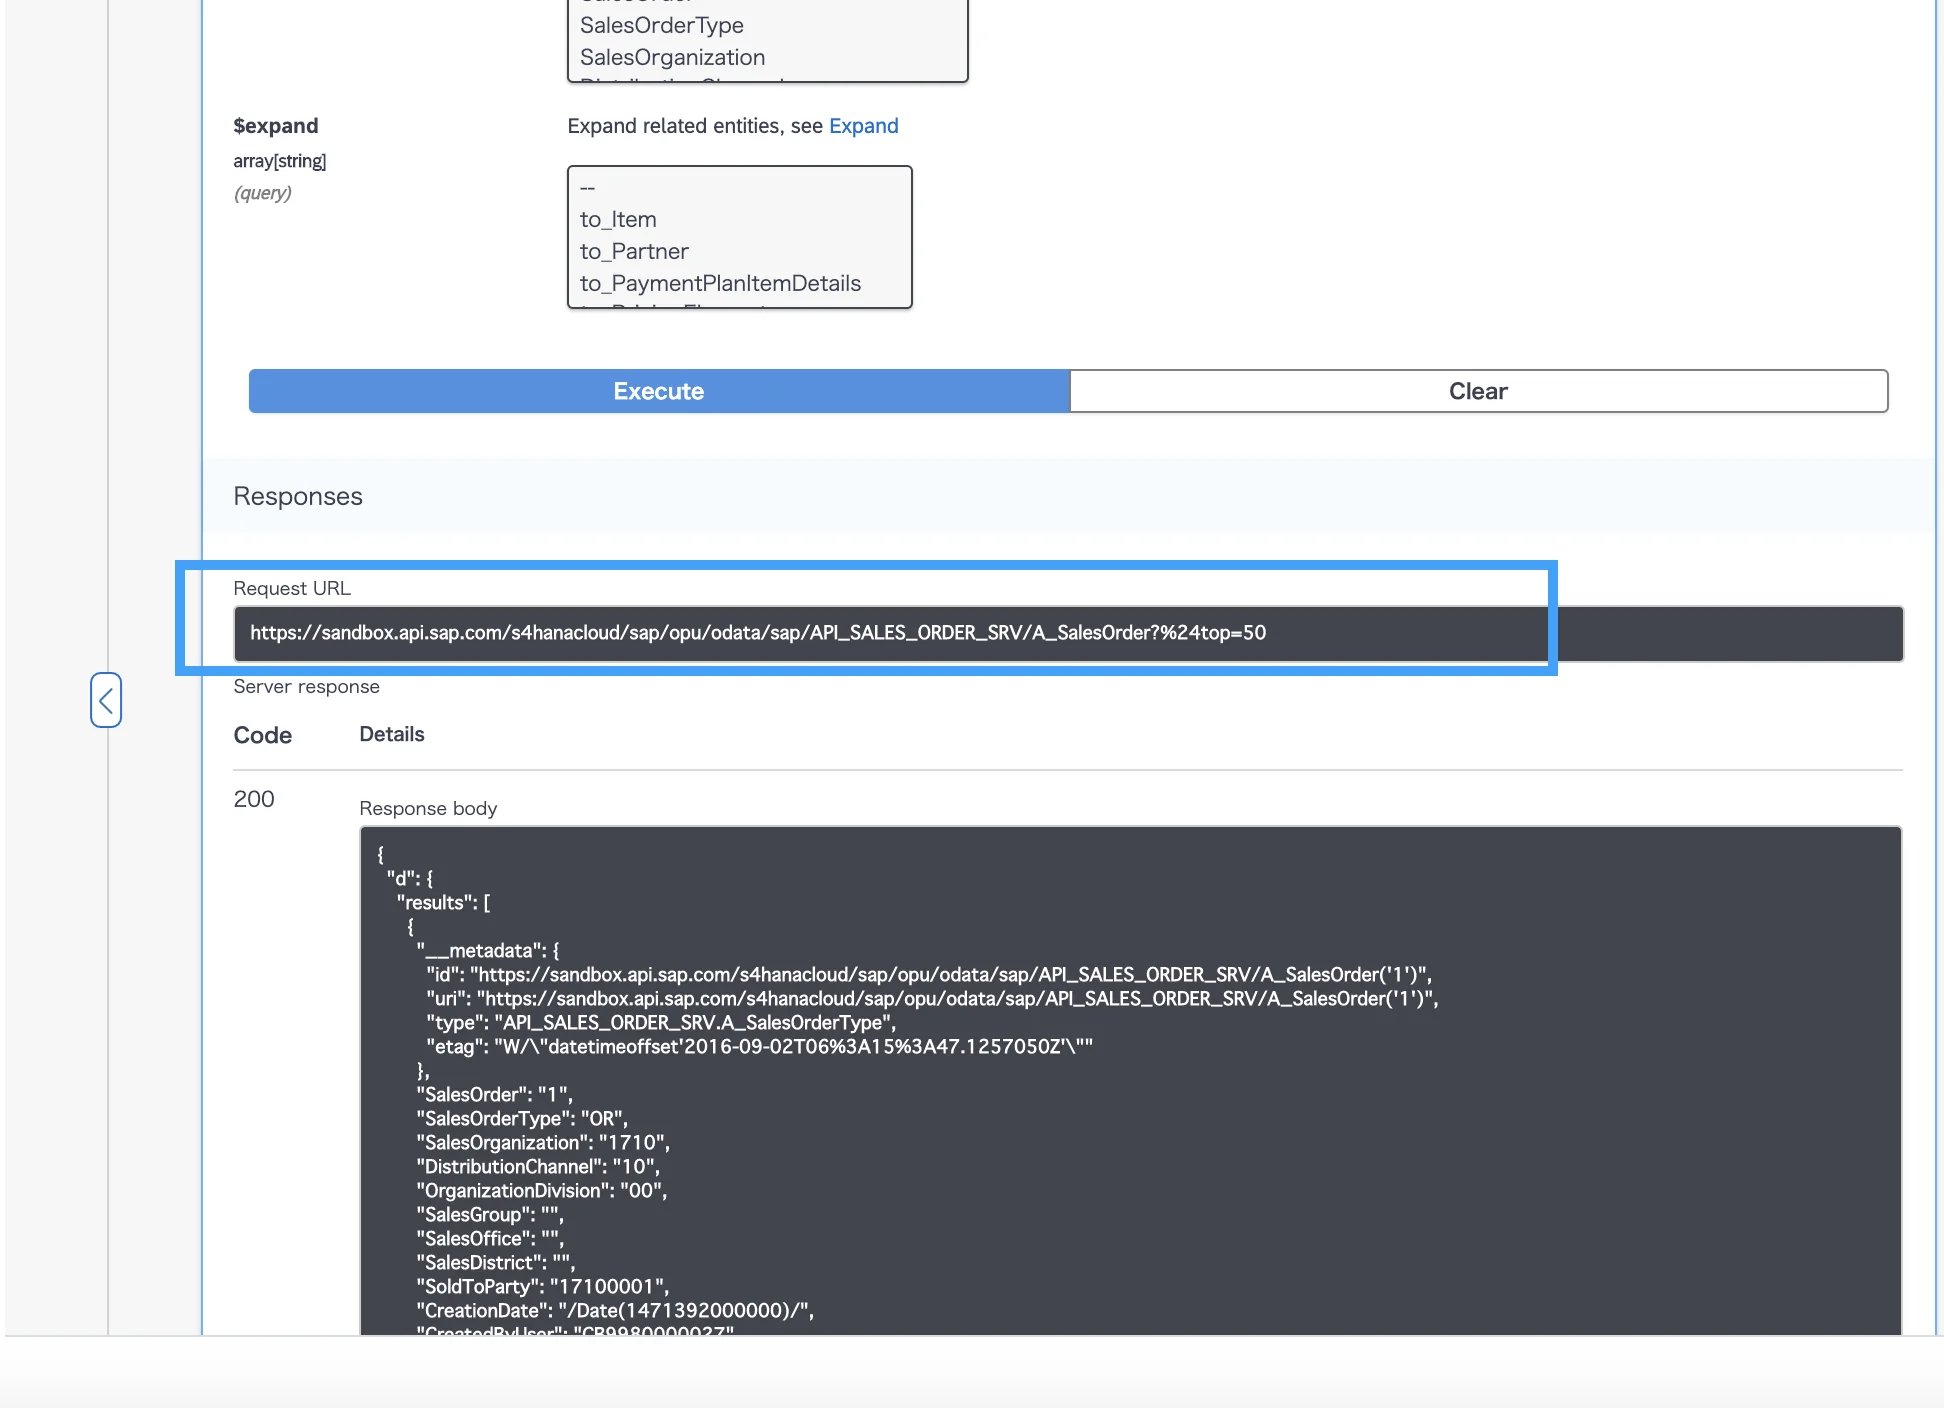 URLは以下のとおりです。
[https://sandbox.api.sap.com/s4hanacloud/sap/opu/odata/sap/API\_SALES\_ORDER\_SRV/A\_SalesOrder?%24top=50](https://sandbox.api.sap.com/s4hanacloud/sap/opu/odata/sap/API_SALES_ORDER_SRV/A_SalesOrder?%24top=50)
## XplentyでSAP HANA CloudにOData経由で接続しデータを取得する
### 1. Xplenty データソース接続
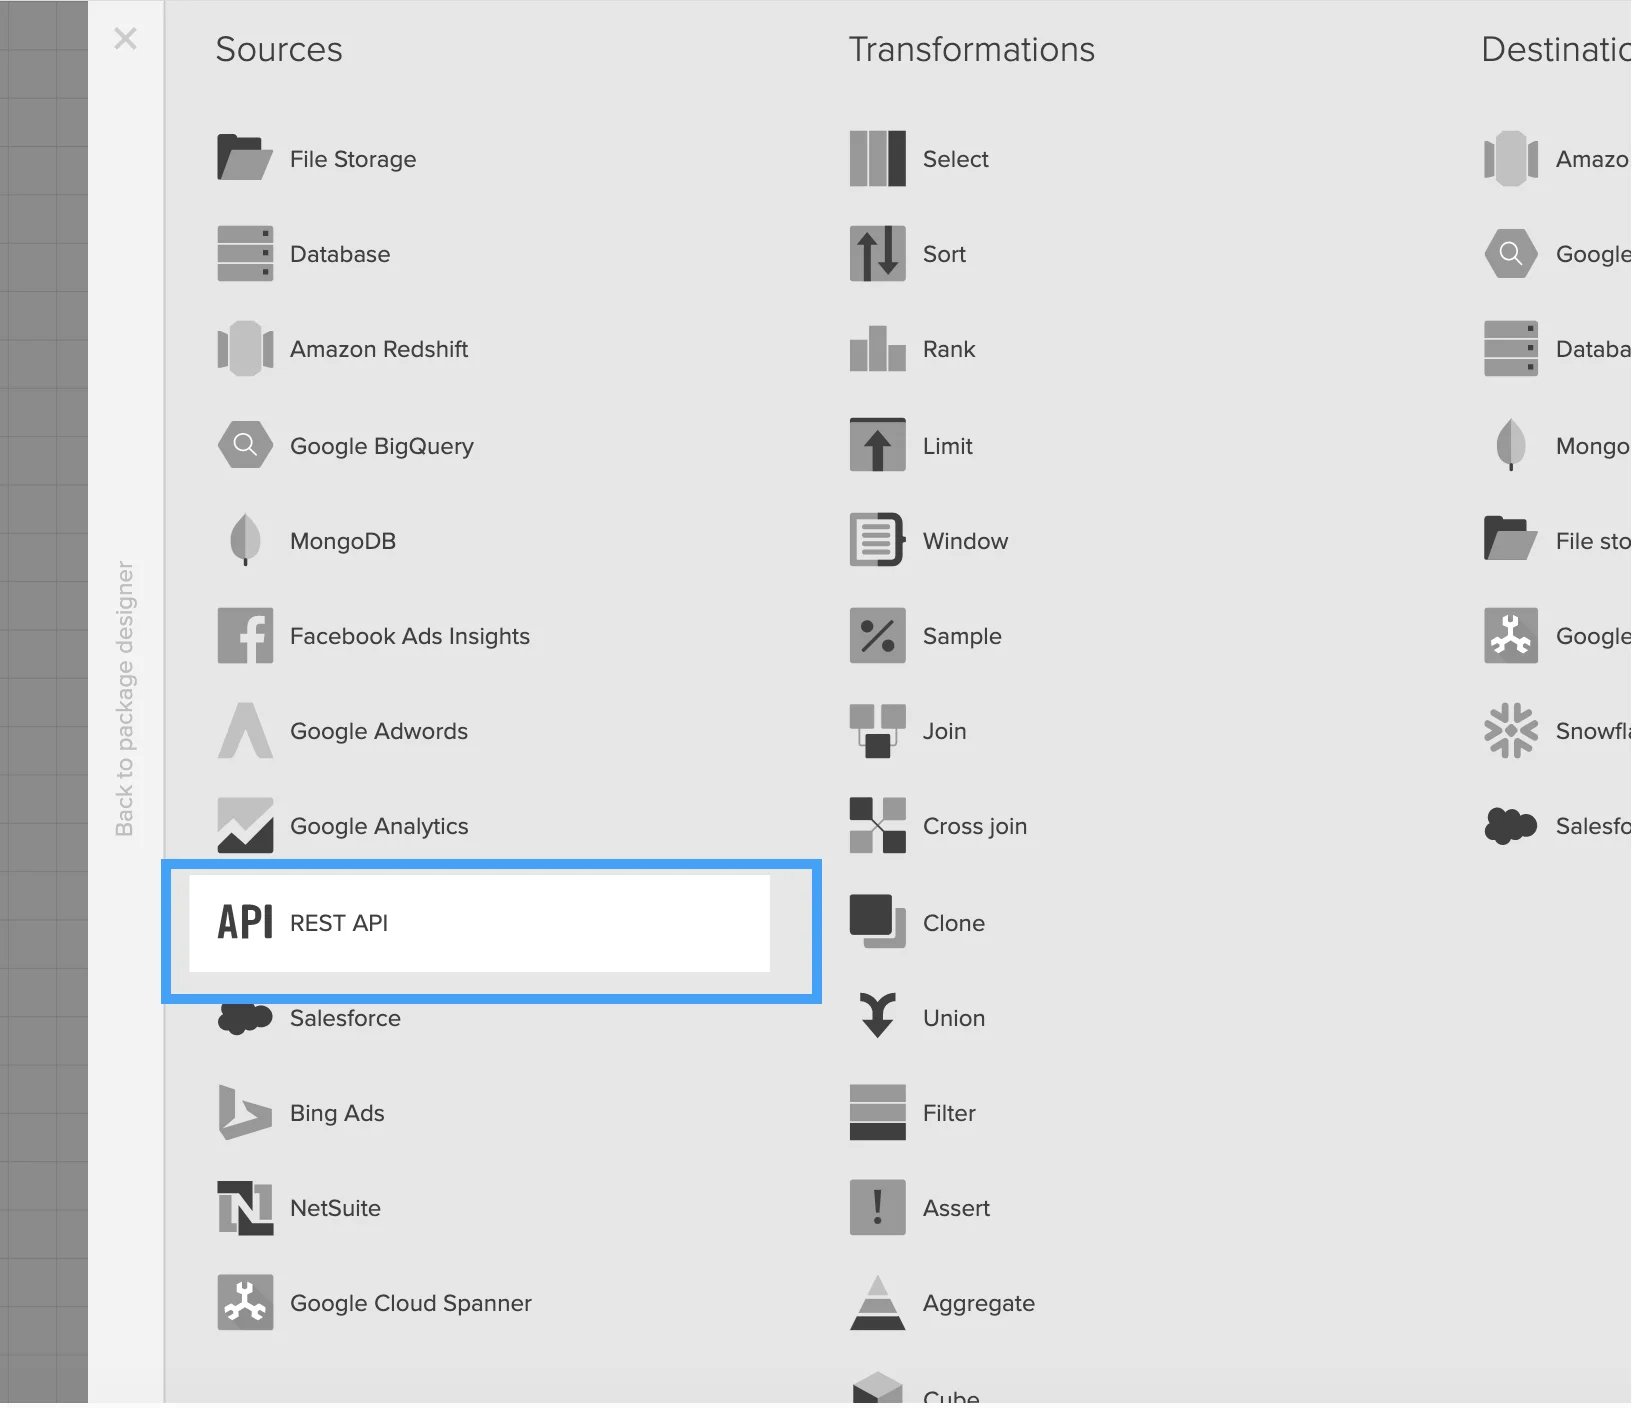
1.パッケージ作成画面で「**REST API**」コンポーネントを選択する。
URLは以下のとおりです。
[https://sandbox.api.sap.com/s4hanacloud/sap/opu/odata/sap/API\_SALES\_ORDER\_SRV/A\_SalesOrder?%24top=50](https://sandbox.api.sap.com/s4hanacloud/sap/opu/odata/sap/API_SALES_ORDER_SRV/A_SalesOrder?%24top=50)
## XplentyでSAP HANA CloudにOData経由で接続しデータを取得する
### 1. Xplenty データソース接続
1.パッケージ作成画面で「**REST API**」コンポーネントを選択する。
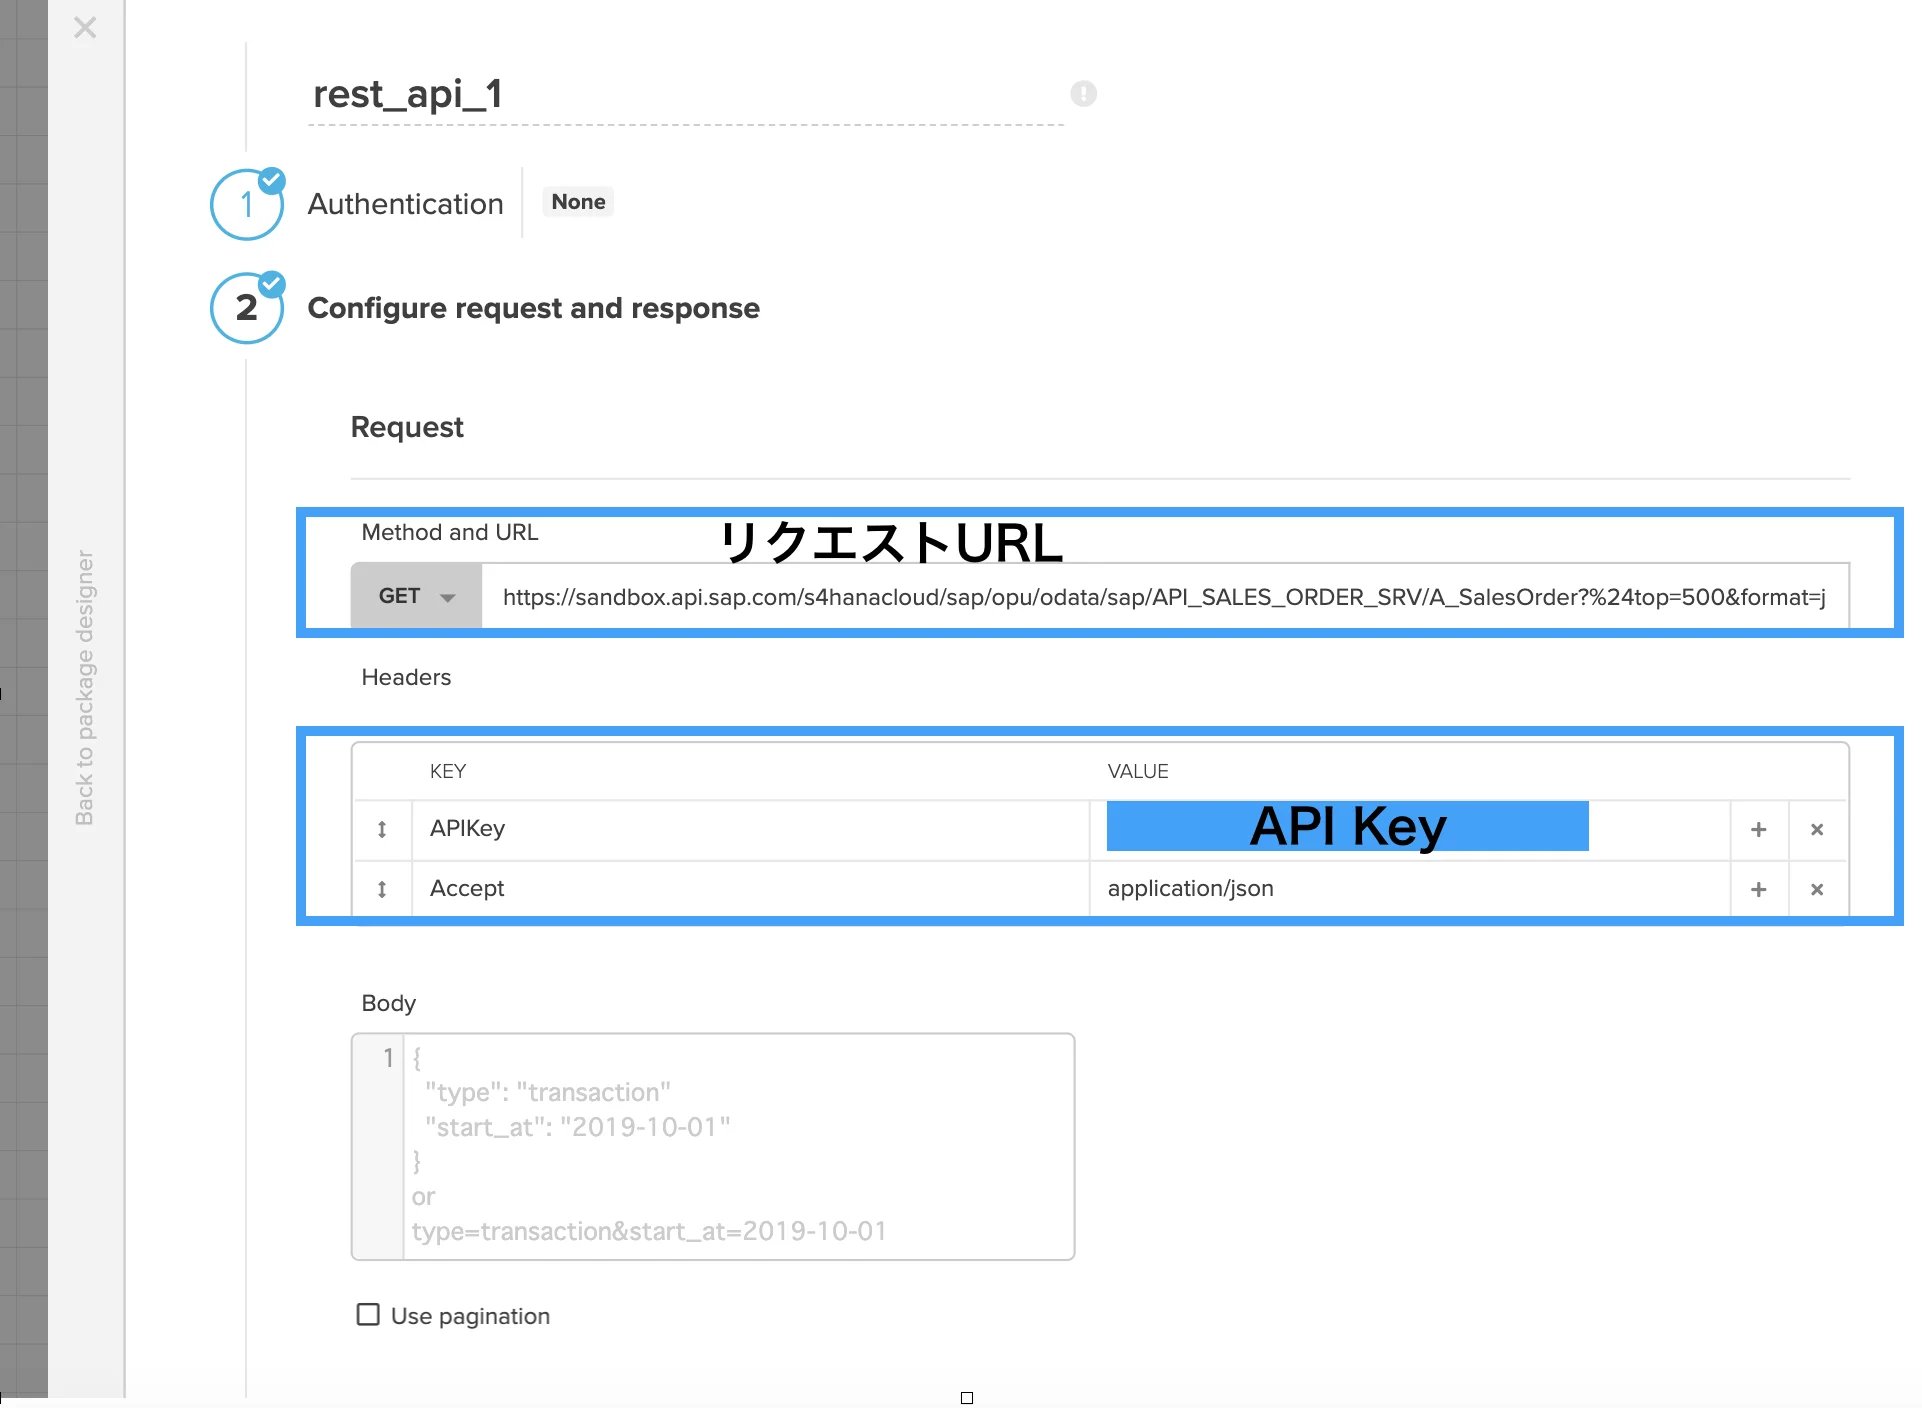
 2.認証およびリクエストURLの設定
**API Keyによるアクセスの場合**
前の章の手順2と3でメモしたAPI KeyとURLをそれぞれ、以下のようにセットする。
2.認証およびリクエストURLの設定
**API Keyによるアクセスの場合**
前の章の手順2と3でメモしたAPI KeyとURLをそれぞれ、以下のようにセットする。
 **(注)Basic認証によるアクセスの場合は以下を参照ください。**
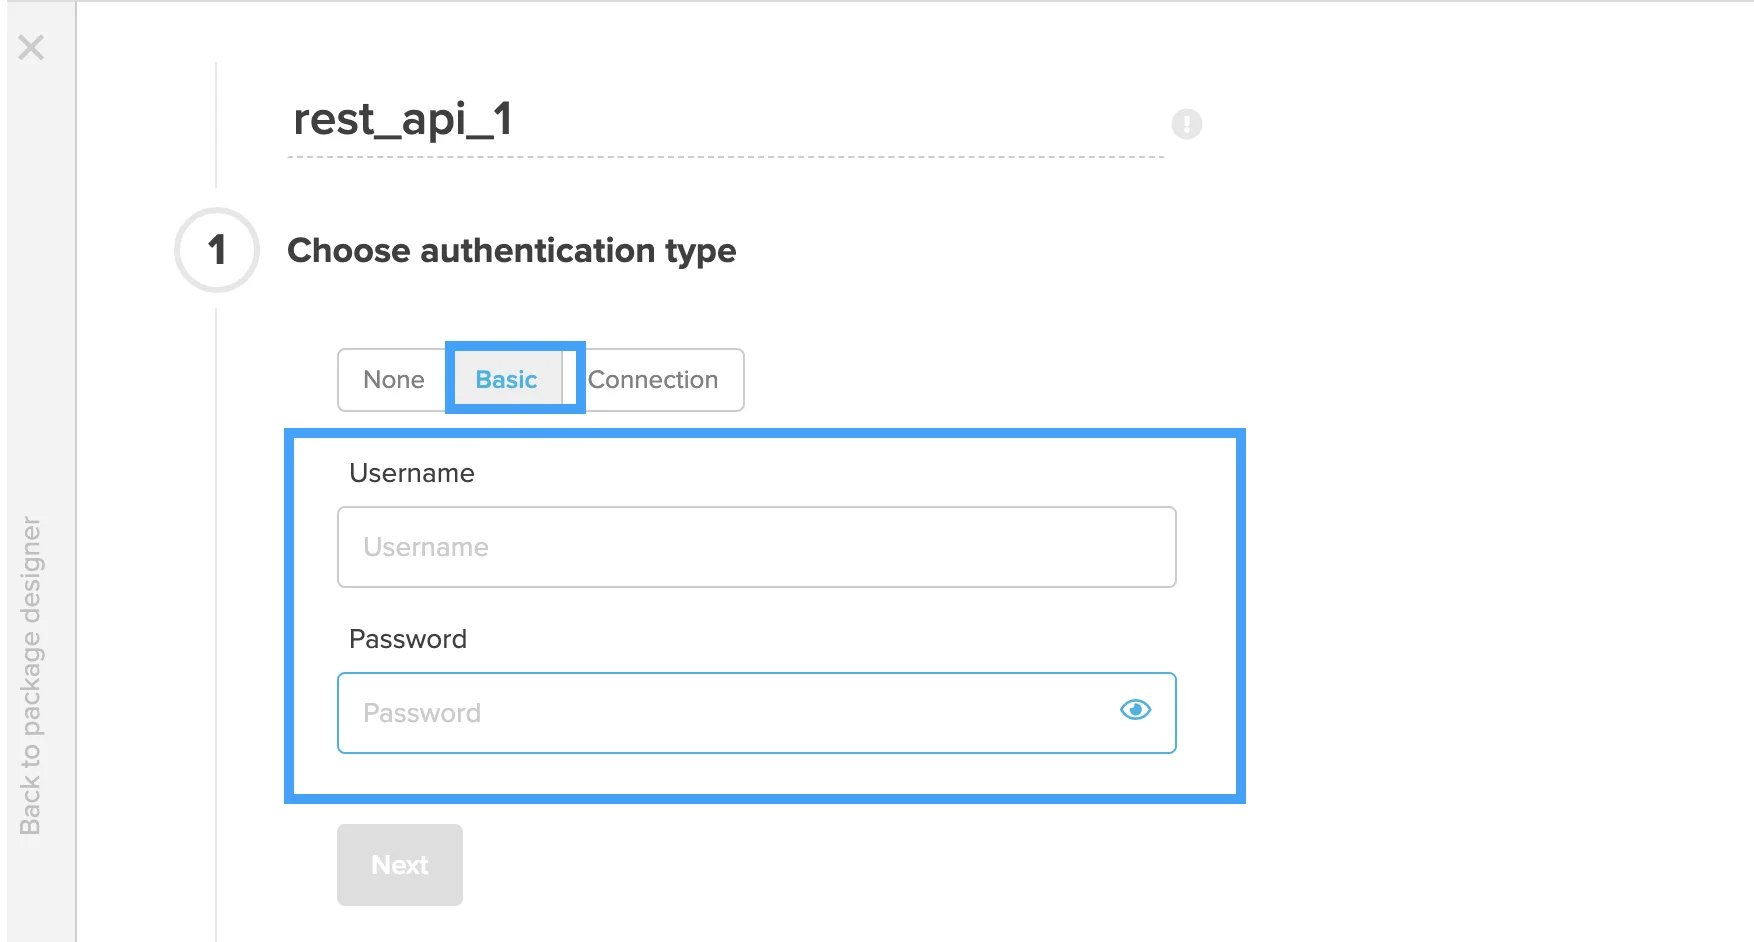
AuthenticationでBasicを選択し、ログインユーザーとパスワードをセットした後、手順3でメモしたURLを入力します。
**(注)Basic認証によるアクセスの場合は以下を参照ください。**
AuthenticationでBasicを選択し、ログインユーザーとパスワードをセットした後、手順3でメモしたURLを入力します。
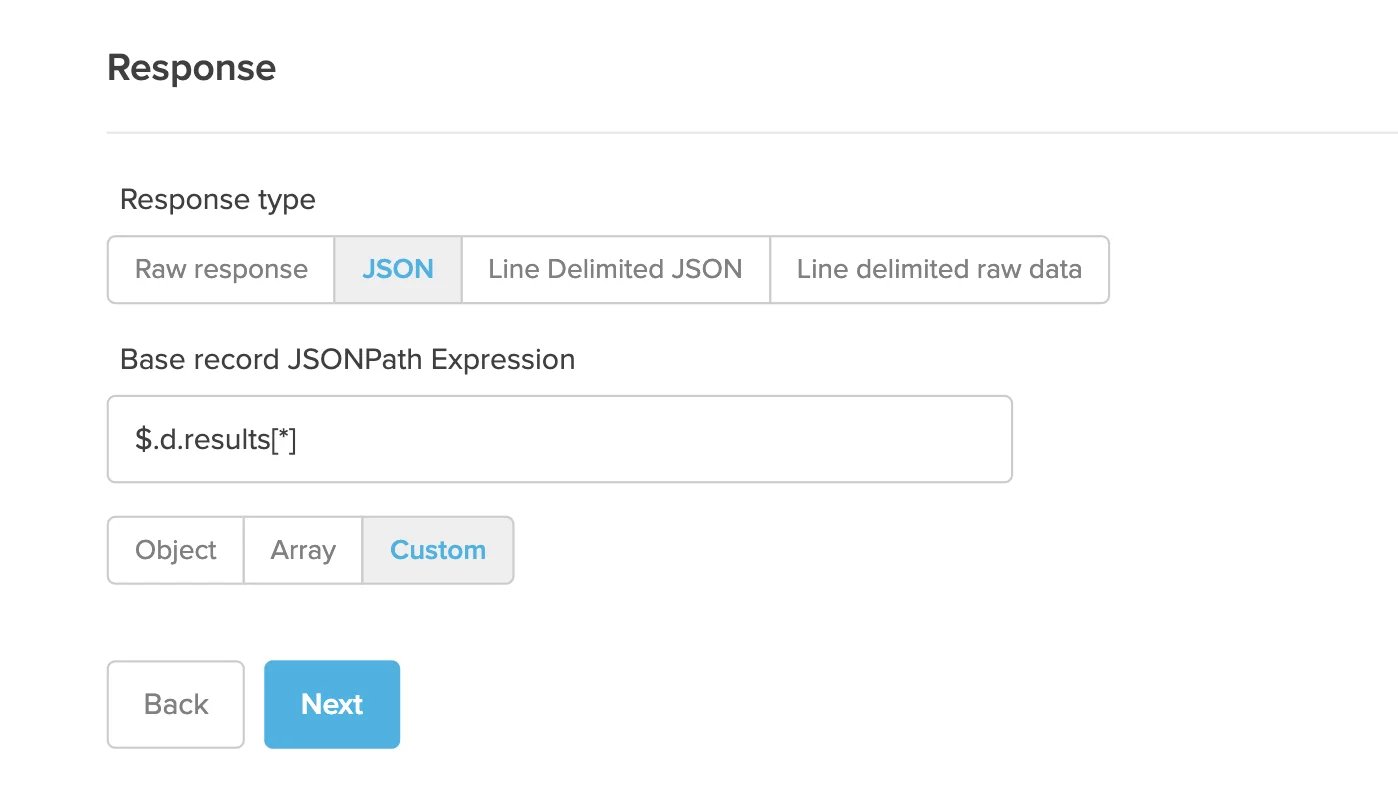
 3.レスポンスのJSONのパスをセットする。
 4.取得した結果を確認
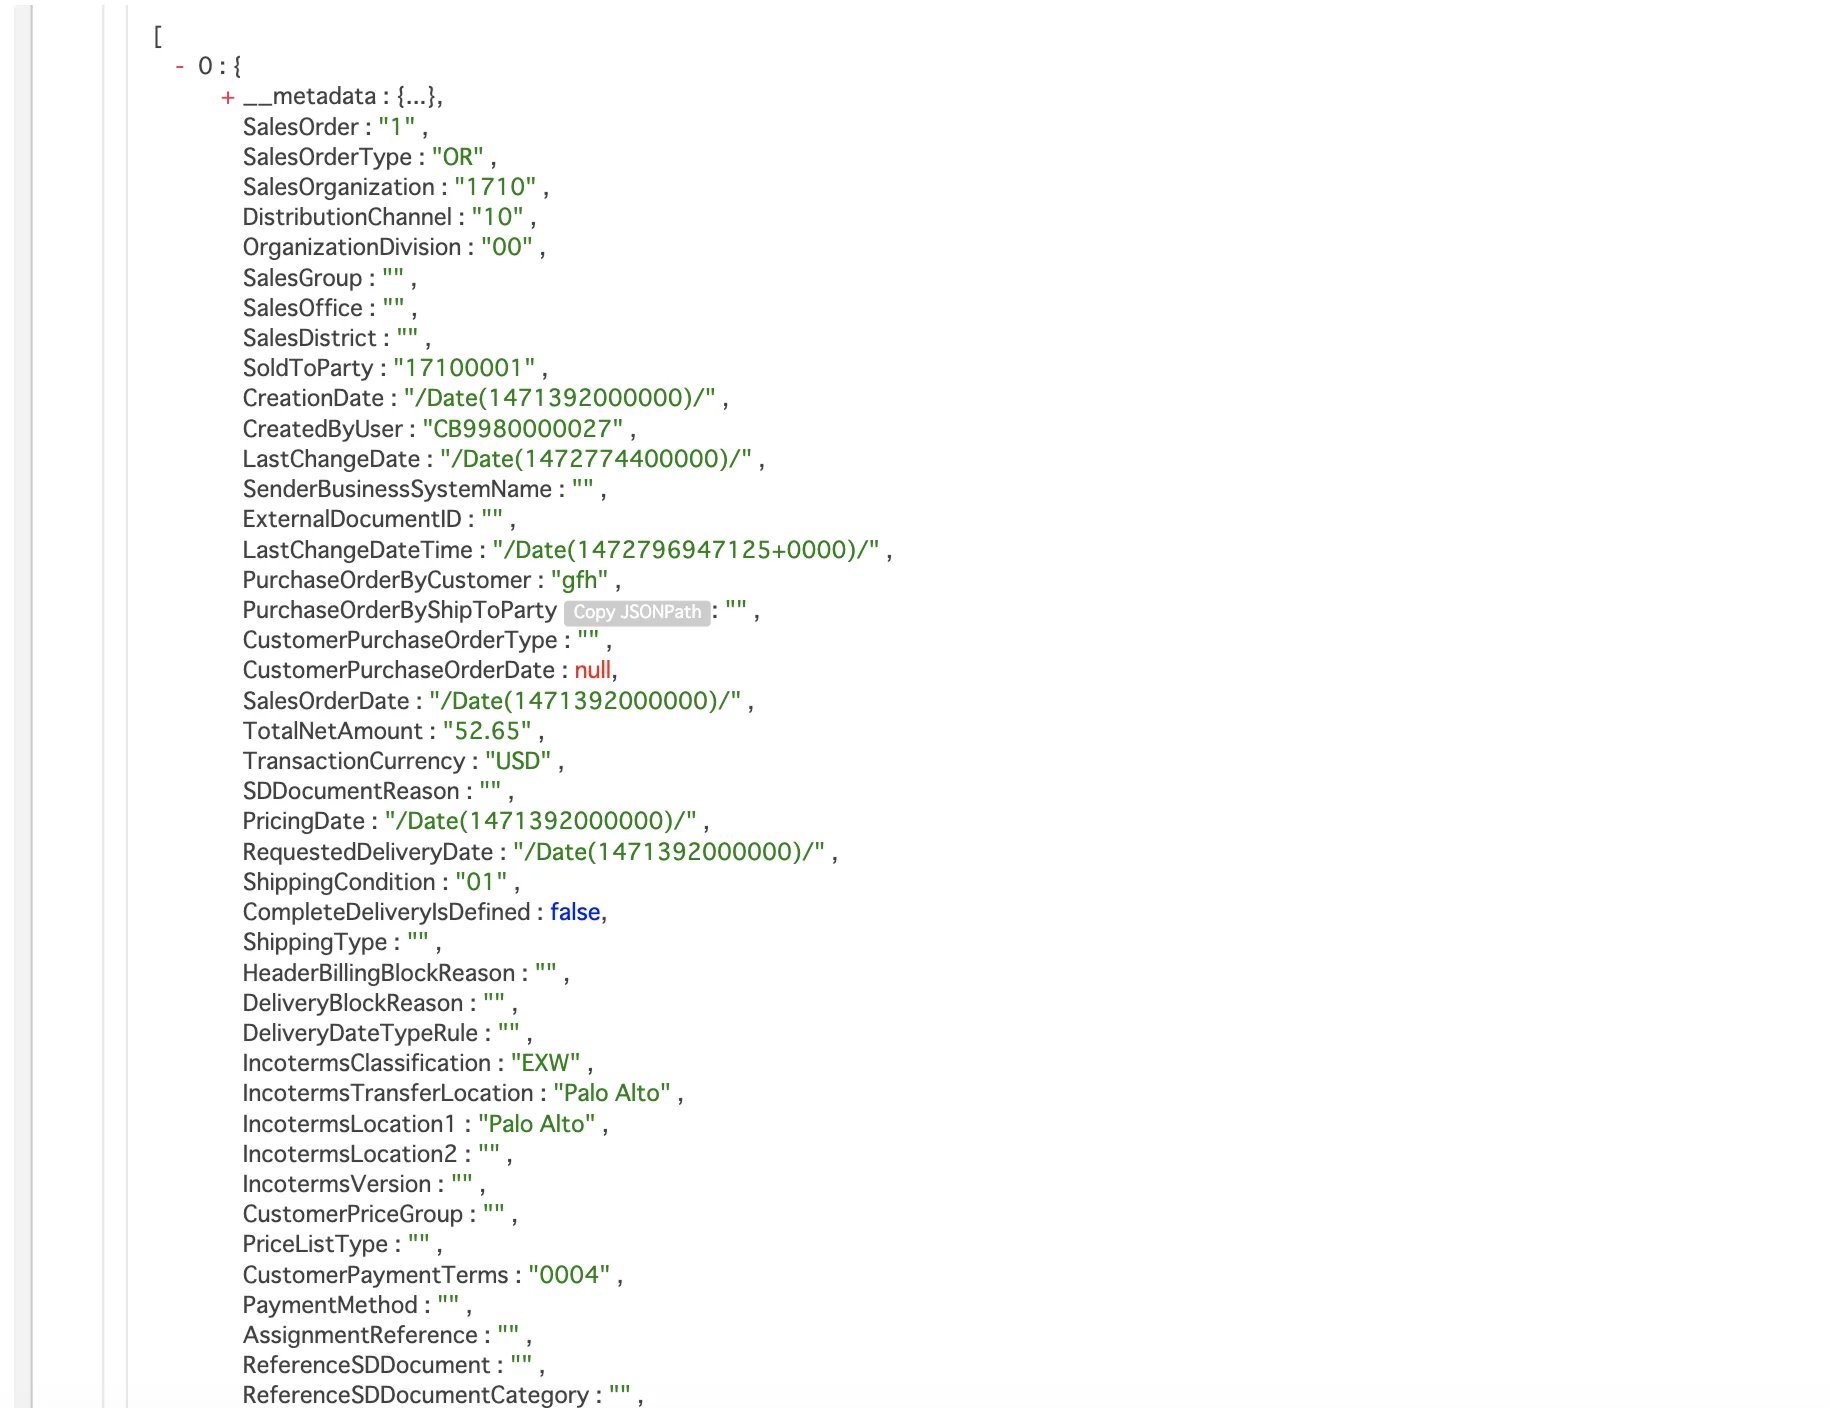
実際に取得したデータをプレビューすると非常にシンプルなJSONデータです。
4.取得した結果を確認
実際に取得したデータをプレビューすると非常にシンプルなJSONデータです。
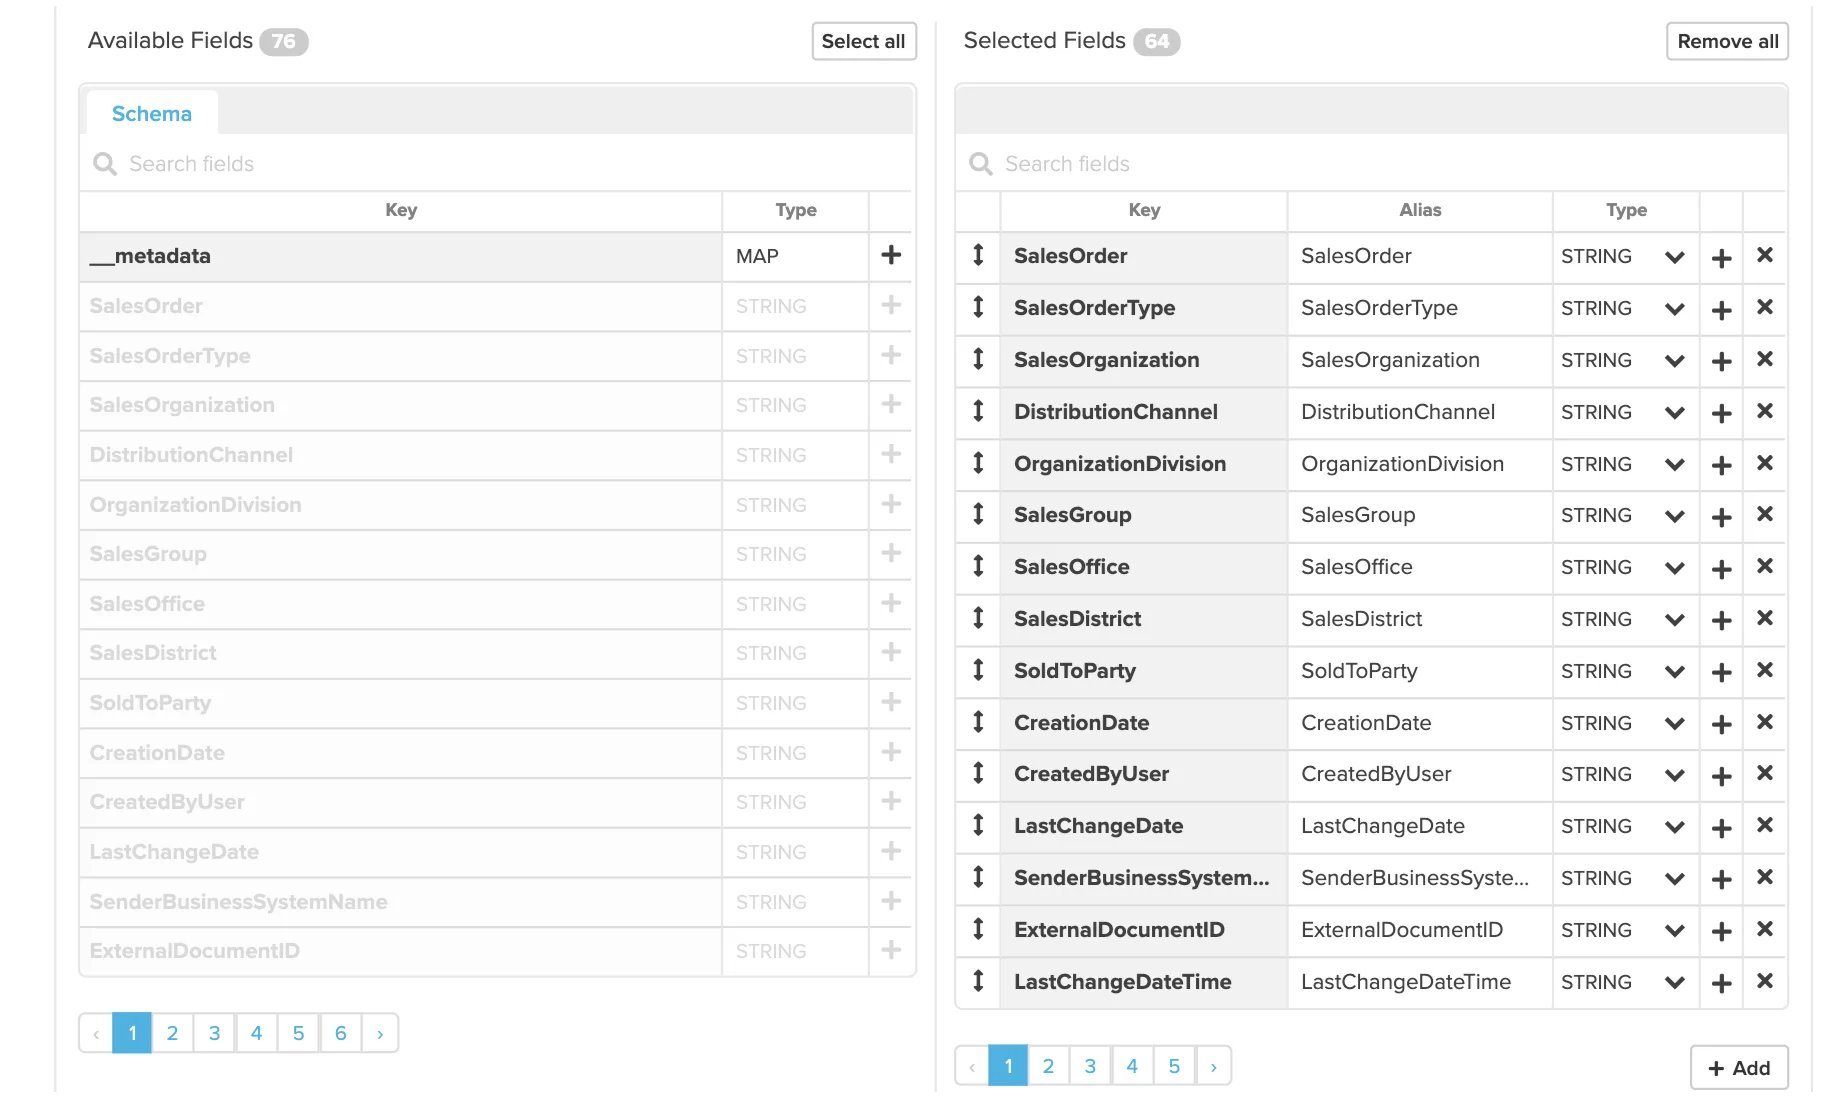
 全ての列を選択します。
 ### Xplenty データ加工
1.JSONデータの一部でデータの加工が必要なため、Selectコンポーネントで加工を行う。
**変換処理その1:日時データの変換**
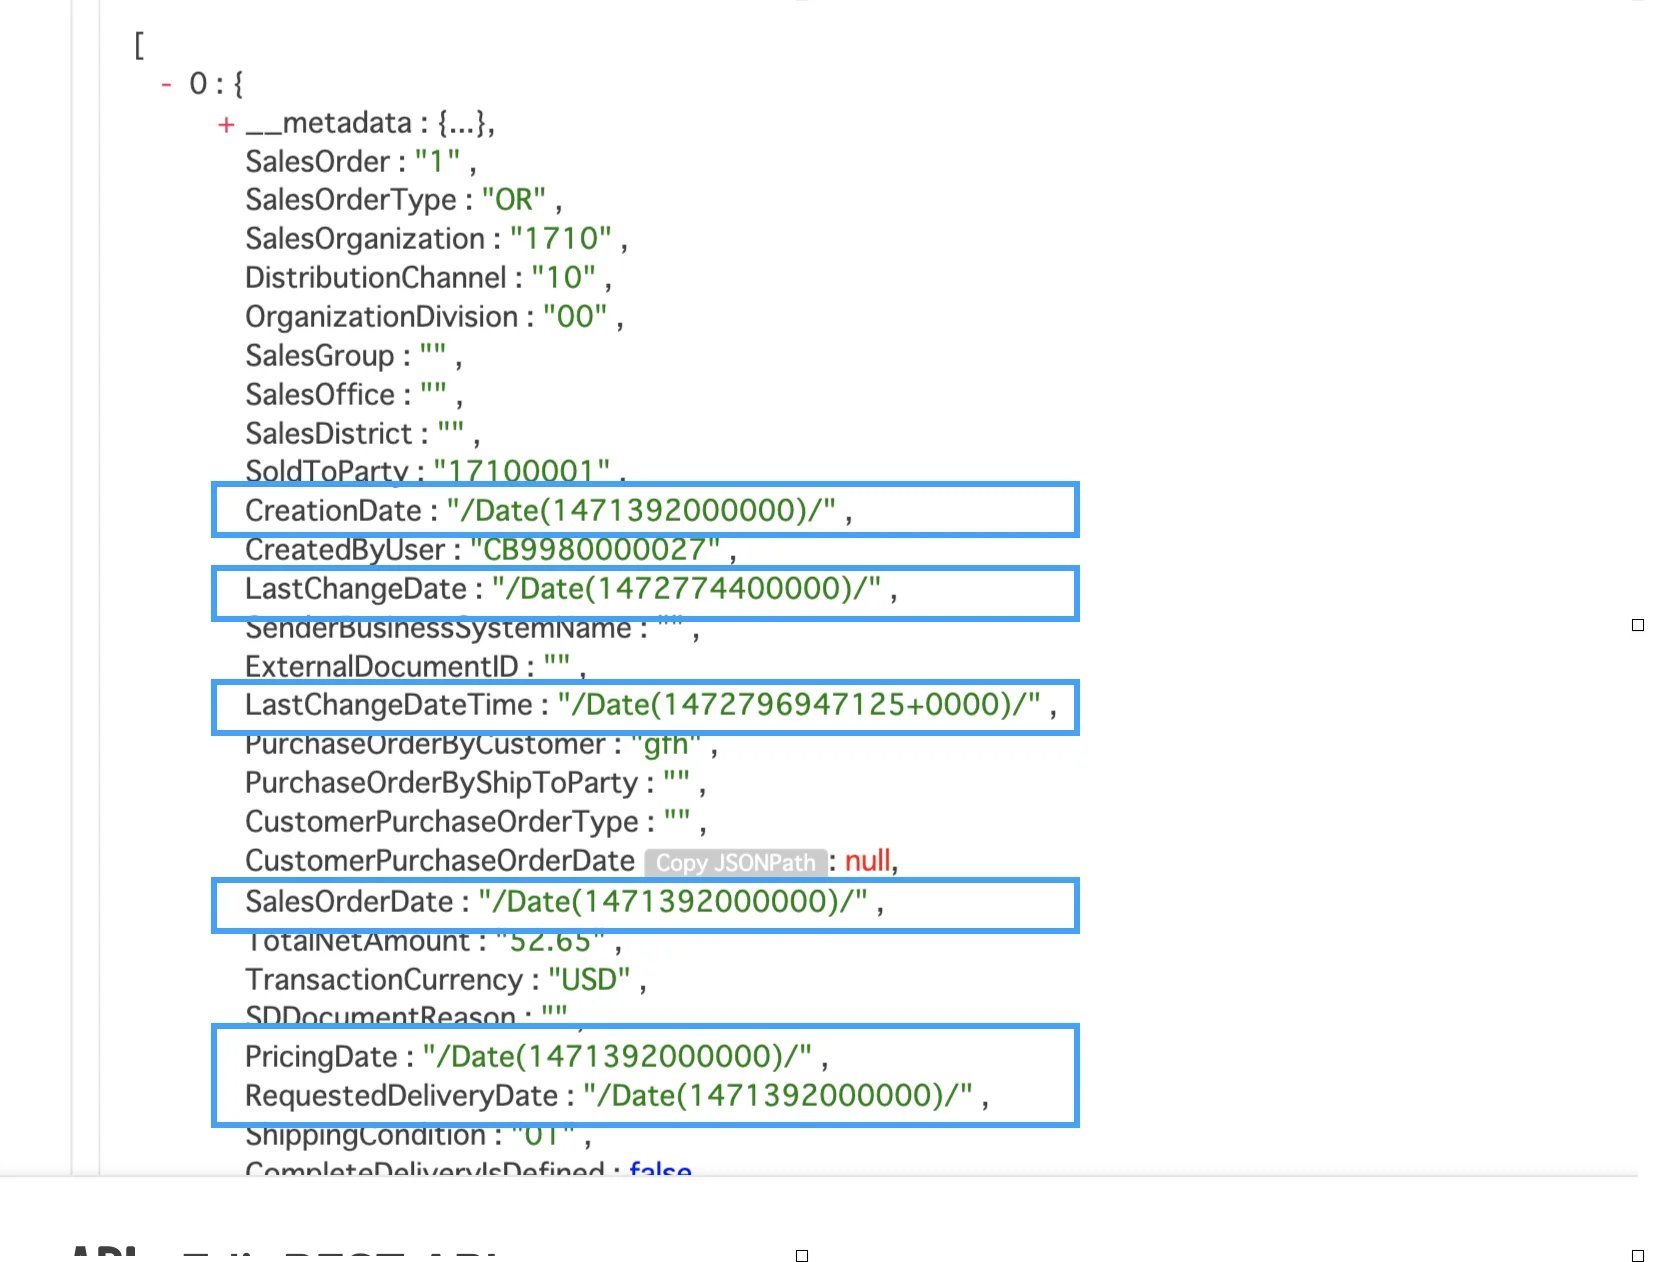
取得されたJSONをみると日付データが以下のように取得されます。
### Xplenty データ加工
1.JSONデータの一部でデータの加工が必要なため、Selectコンポーネントで加工を行う。
**変換処理その1:日時データの変換**
取得されたJSONをみると日付データが以下のように取得されます。
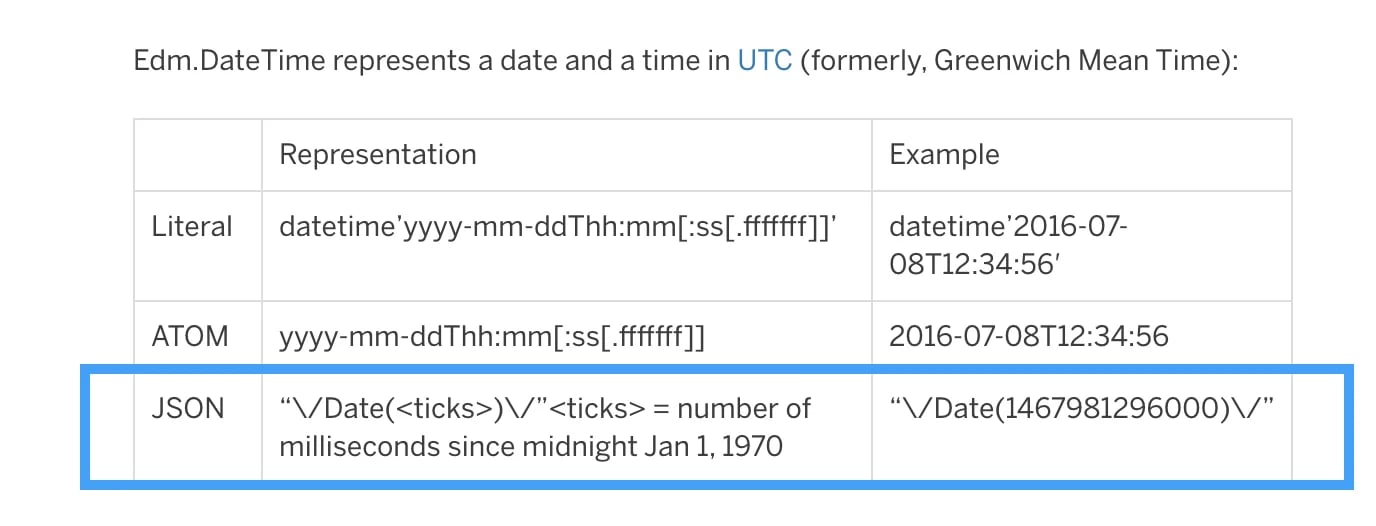
 [こちらの投稿](https://blogs.sap.com/2017/01/05/date-and-time-in-sap-gateway-foundation/)によると、以下のようなルールがあるようです。
 JSONでは**1970年1月1日午前0時**からのミリ秒で時間が表されているため、通常の日時フォーマットに変換するには、以下の加工を行う必要がある。
REGEX\_EXTRACT関数を使用した数値部分のみの取得例:
`REGEX_EXTRACT('/Date(1467981296000)/','([0-9]+)',1)`
上記の式をもとに日時フィールドを変換する
例)時間はUTCから日本時間(+9時間)に変更
`AddDuration(ToDate('1970-01-01T00:00:00.000Z'),CONCAT('PT',((chararray)((long)REGEX_EXTRACT(CreationDate,'([0-9]+)',1)/1000+(9*60*60))),'s'))`
JSONでは**1970年1月1日午前0時**からのミリ秒で時間が表されているため、通常の日時フォーマットに変換するには、以下の加工を行う必要がある。
REGEX\_EXTRACT関数を使用した数値部分のみの取得例:
`REGEX_EXTRACT('/Date(1467981296000)/','([0-9]+)',1)`
上記の式をもとに日時フィールドを変換する
例)時間はUTCから日本時間(+9時間)に変更
`AddDuration(ToDate('1970-01-01T00:00:00.000Z'),CONCAT('PT',((chararray)((long)REGEX_EXTRACT(CreationDate,'([0-9]+)',1)/1000+(9*60*60))),'s'))`
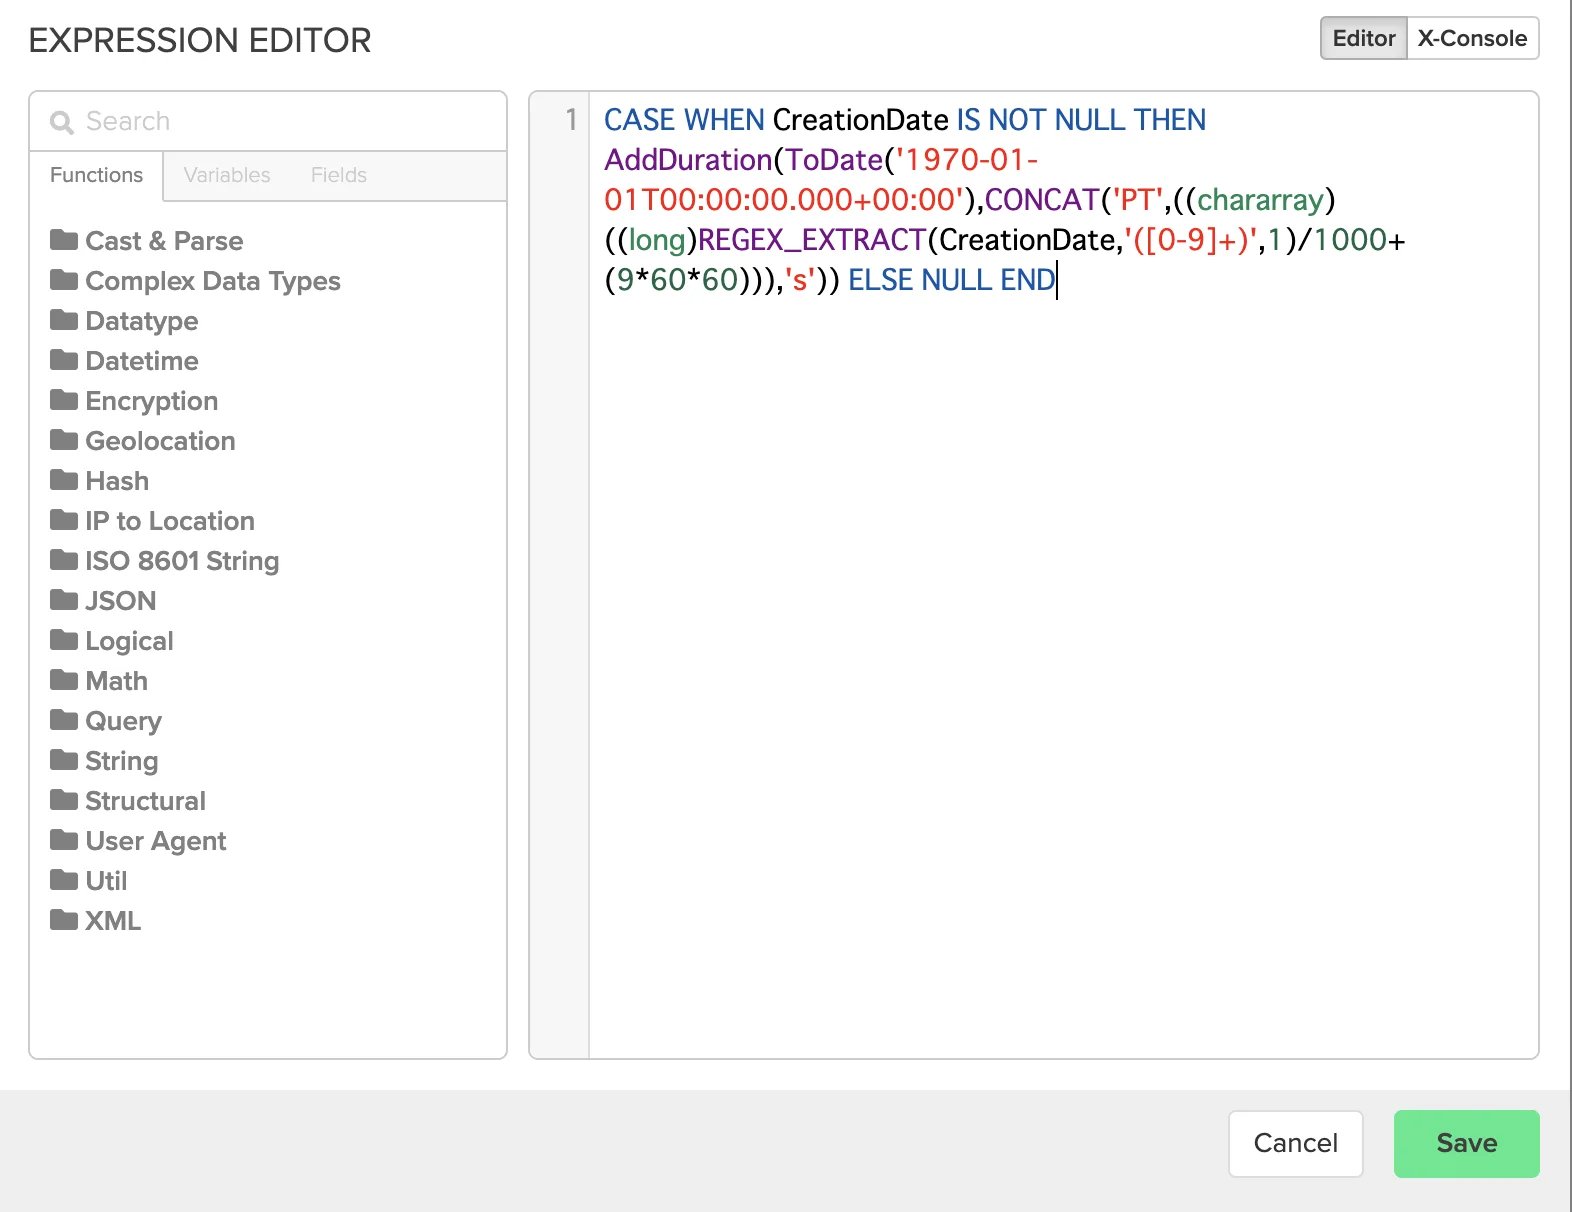 **上記関数式の説明:**
`ToDate`:DateTime型へ変換
`(long)`:long型への変換 **>>注意**:ここで`Double`型を指定した場合は、Round関数を使用し少数点のけた数を3桁までに調整する必要がある)
`(chararray)`:文字列型への変換
`/1000`:`AddDuration`関数が秒単位でしか加算できないため(ただし、0.003のように小数点でミリ秒を表現することは可能です)、ミリ秒の単位の数値を秒単位に変換
`9*60*60`:9時間を秒数に変換
**CASE文使用時の注意点**
CASE文を使用する場合、必ずELSE条件も明記する必要がある
**変換処理その2: ネストされたJSONから必要な値を抽出**
**上記関数式の説明:**
`ToDate`:DateTime型へ変換
`(long)`:long型への変換 **>>注意**:ここで`Double`型を指定した場合は、Round関数を使用し少数点のけた数を3桁までに調整する必要がある)
`(chararray)`:文字列型への変換
`/1000`:`AddDuration`関数が秒単位でしか加算できないため(ただし、0.003のように小数点でミリ秒を表現することは可能です)、ミリ秒の単位の数値を秒単位に変換
`9*60*60`:9時間を秒数に変換
**CASE文使用時の注意点**
CASE文を使用する場合、必ずELSE条件も明記する必要がある
**変換処理その2: ネストされたJSONから必要な値を抽出**
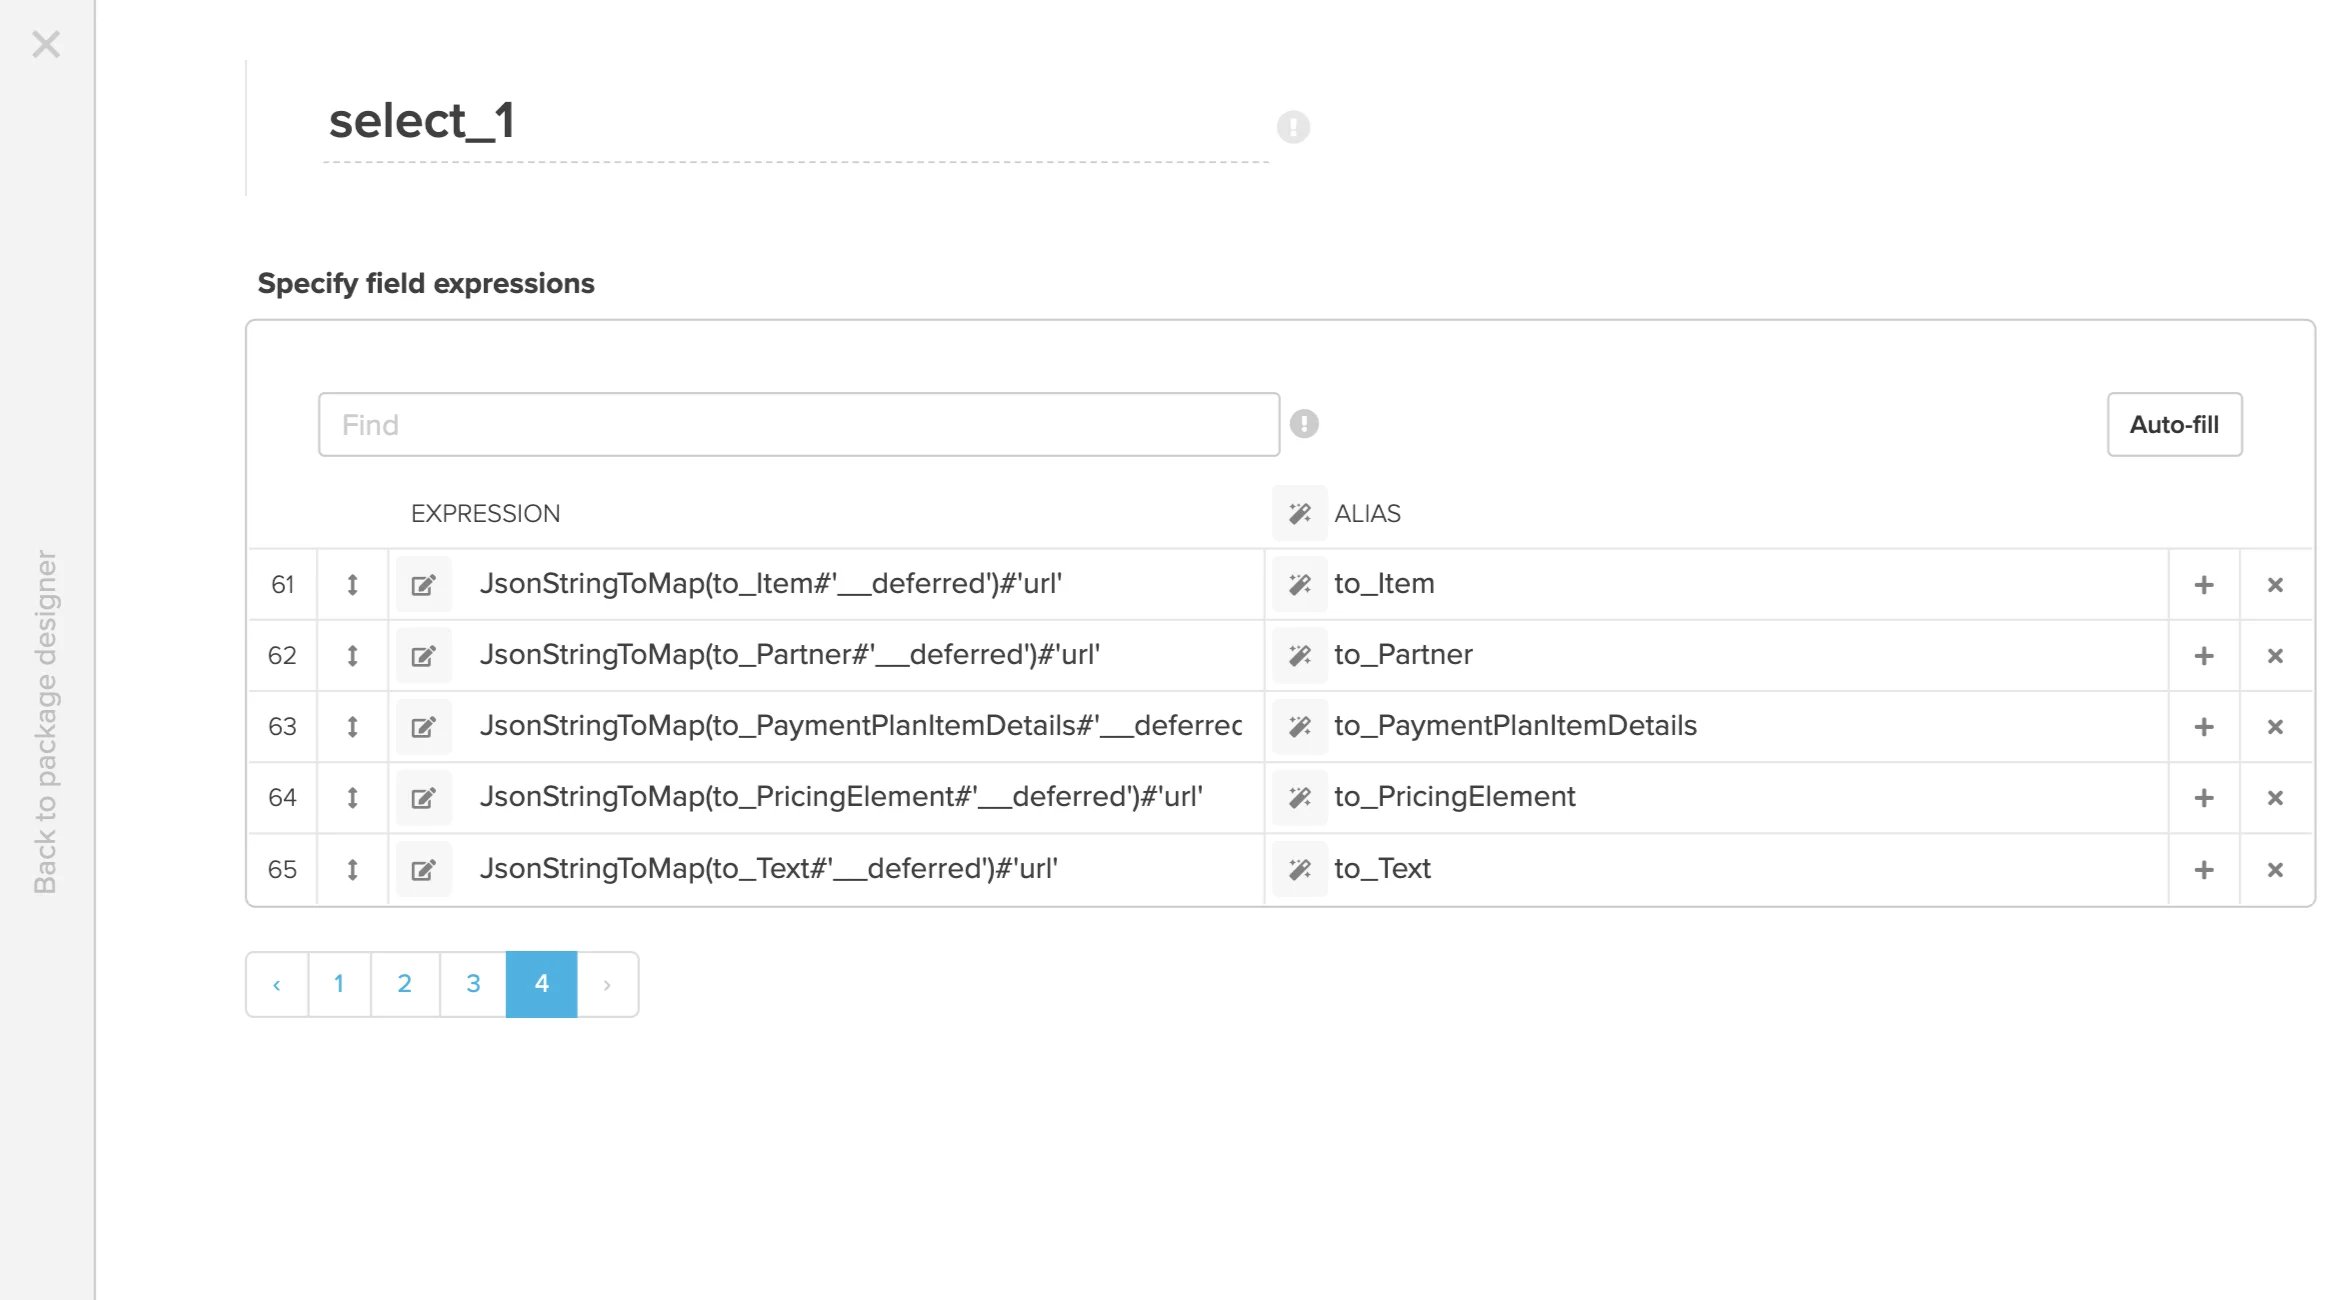
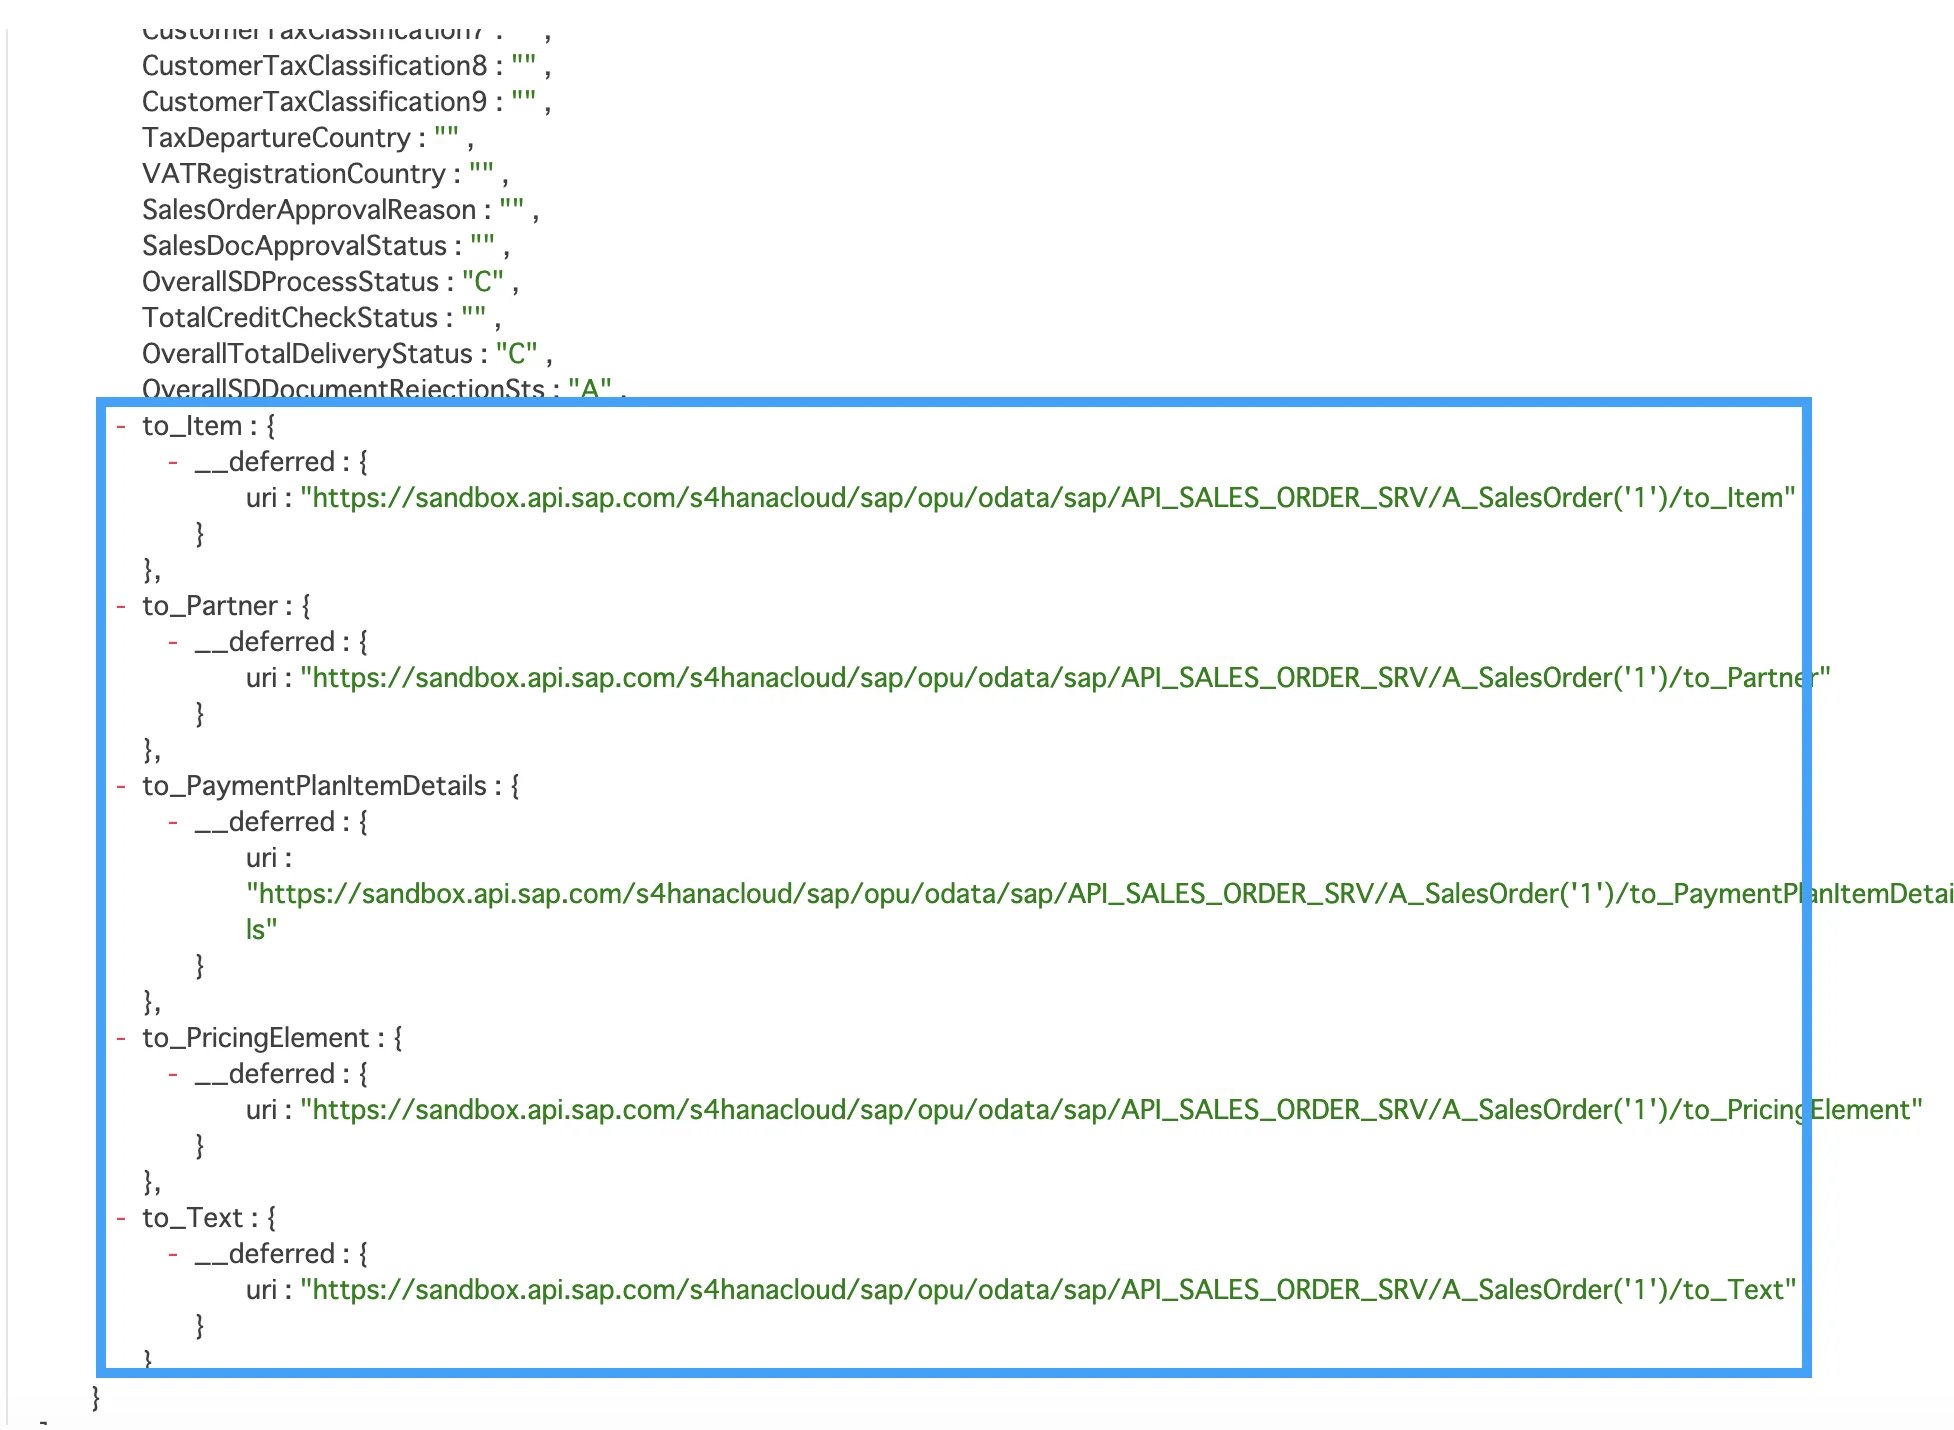 上記JSON部分を`JsonStringToMap`関数を使用し、Selectコンポーネントで変換する。
例)`JsonStringToMap(to_Item#'__deferred')#'uri'`
上記JSON部分を`JsonStringToMap`関数を使用し、Selectコンポーネントで変換する。
例)`JsonStringToMap(to_Item#'__deferred')#'uri'`
 ### Xplenty データロード先の設定およびジョブ実行
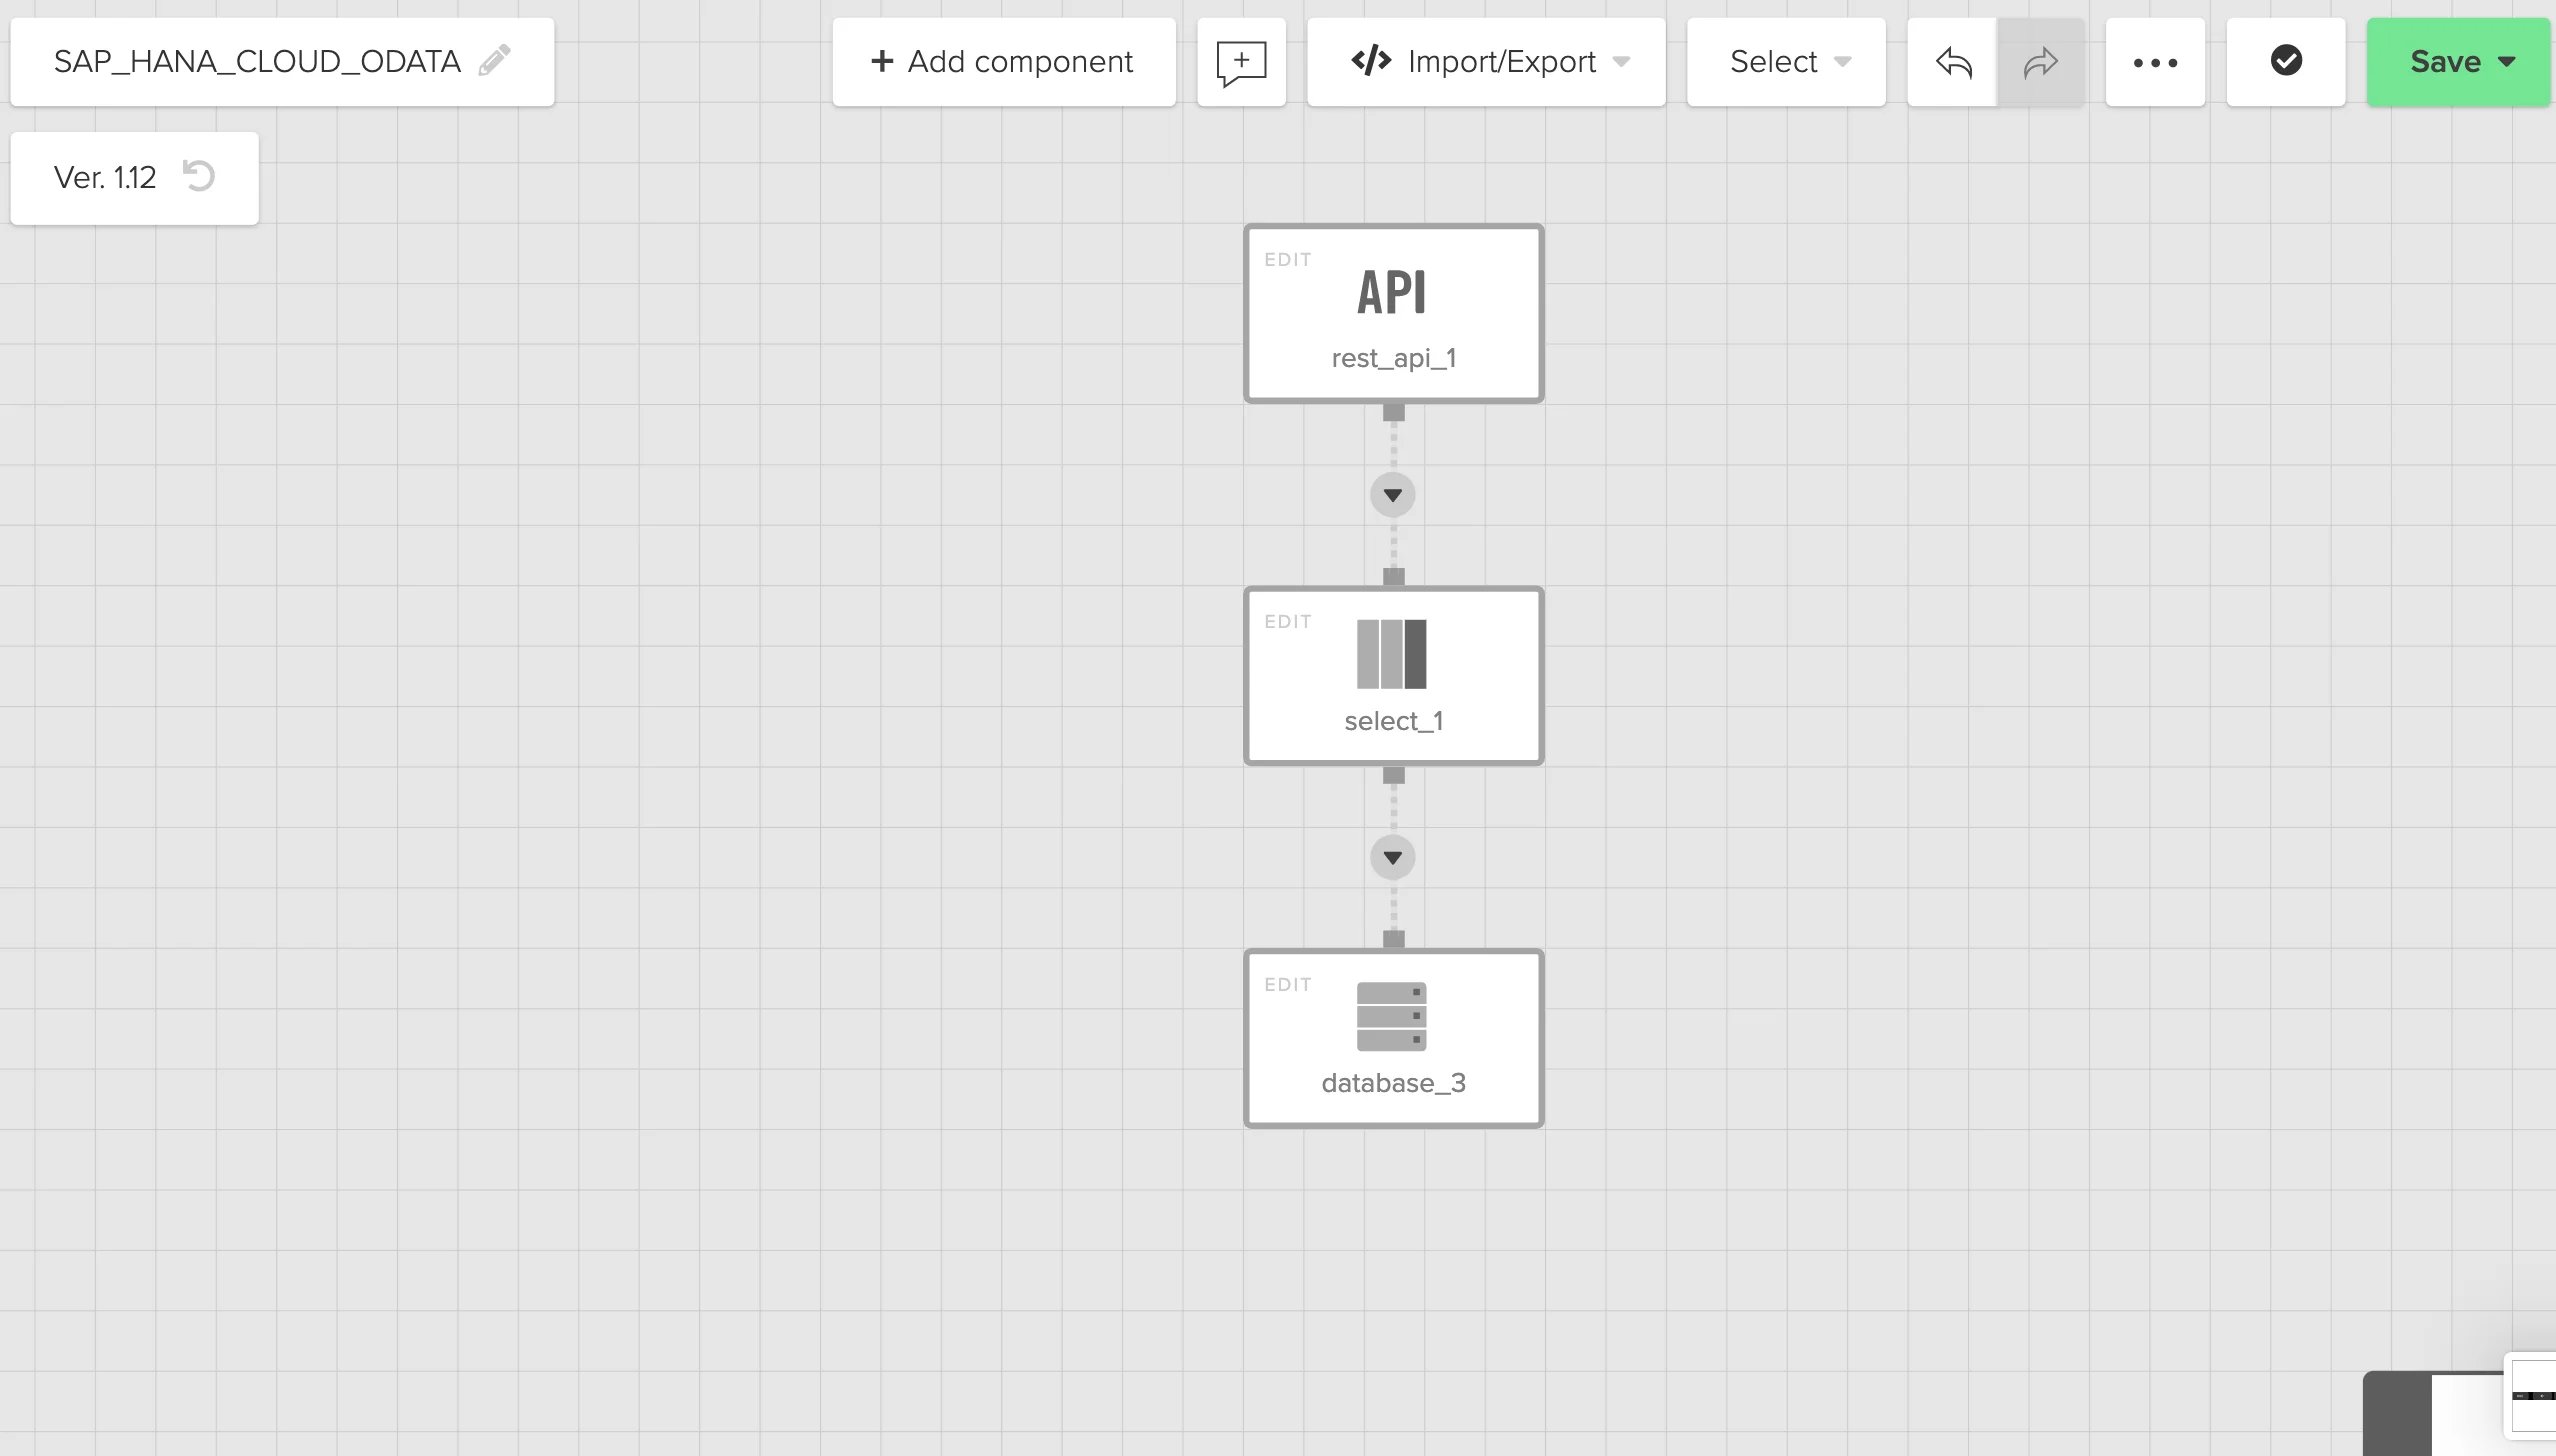
1.ロード先のデータベースを指定
データベースコンポーネントをDestinationに配置し、ロード先として設定します。
### Xplenty データロード先の設定およびジョブ実行
1.ロード先のデータベースを指定
データベースコンポーネントをDestinationに配置し、ロード先として設定します。
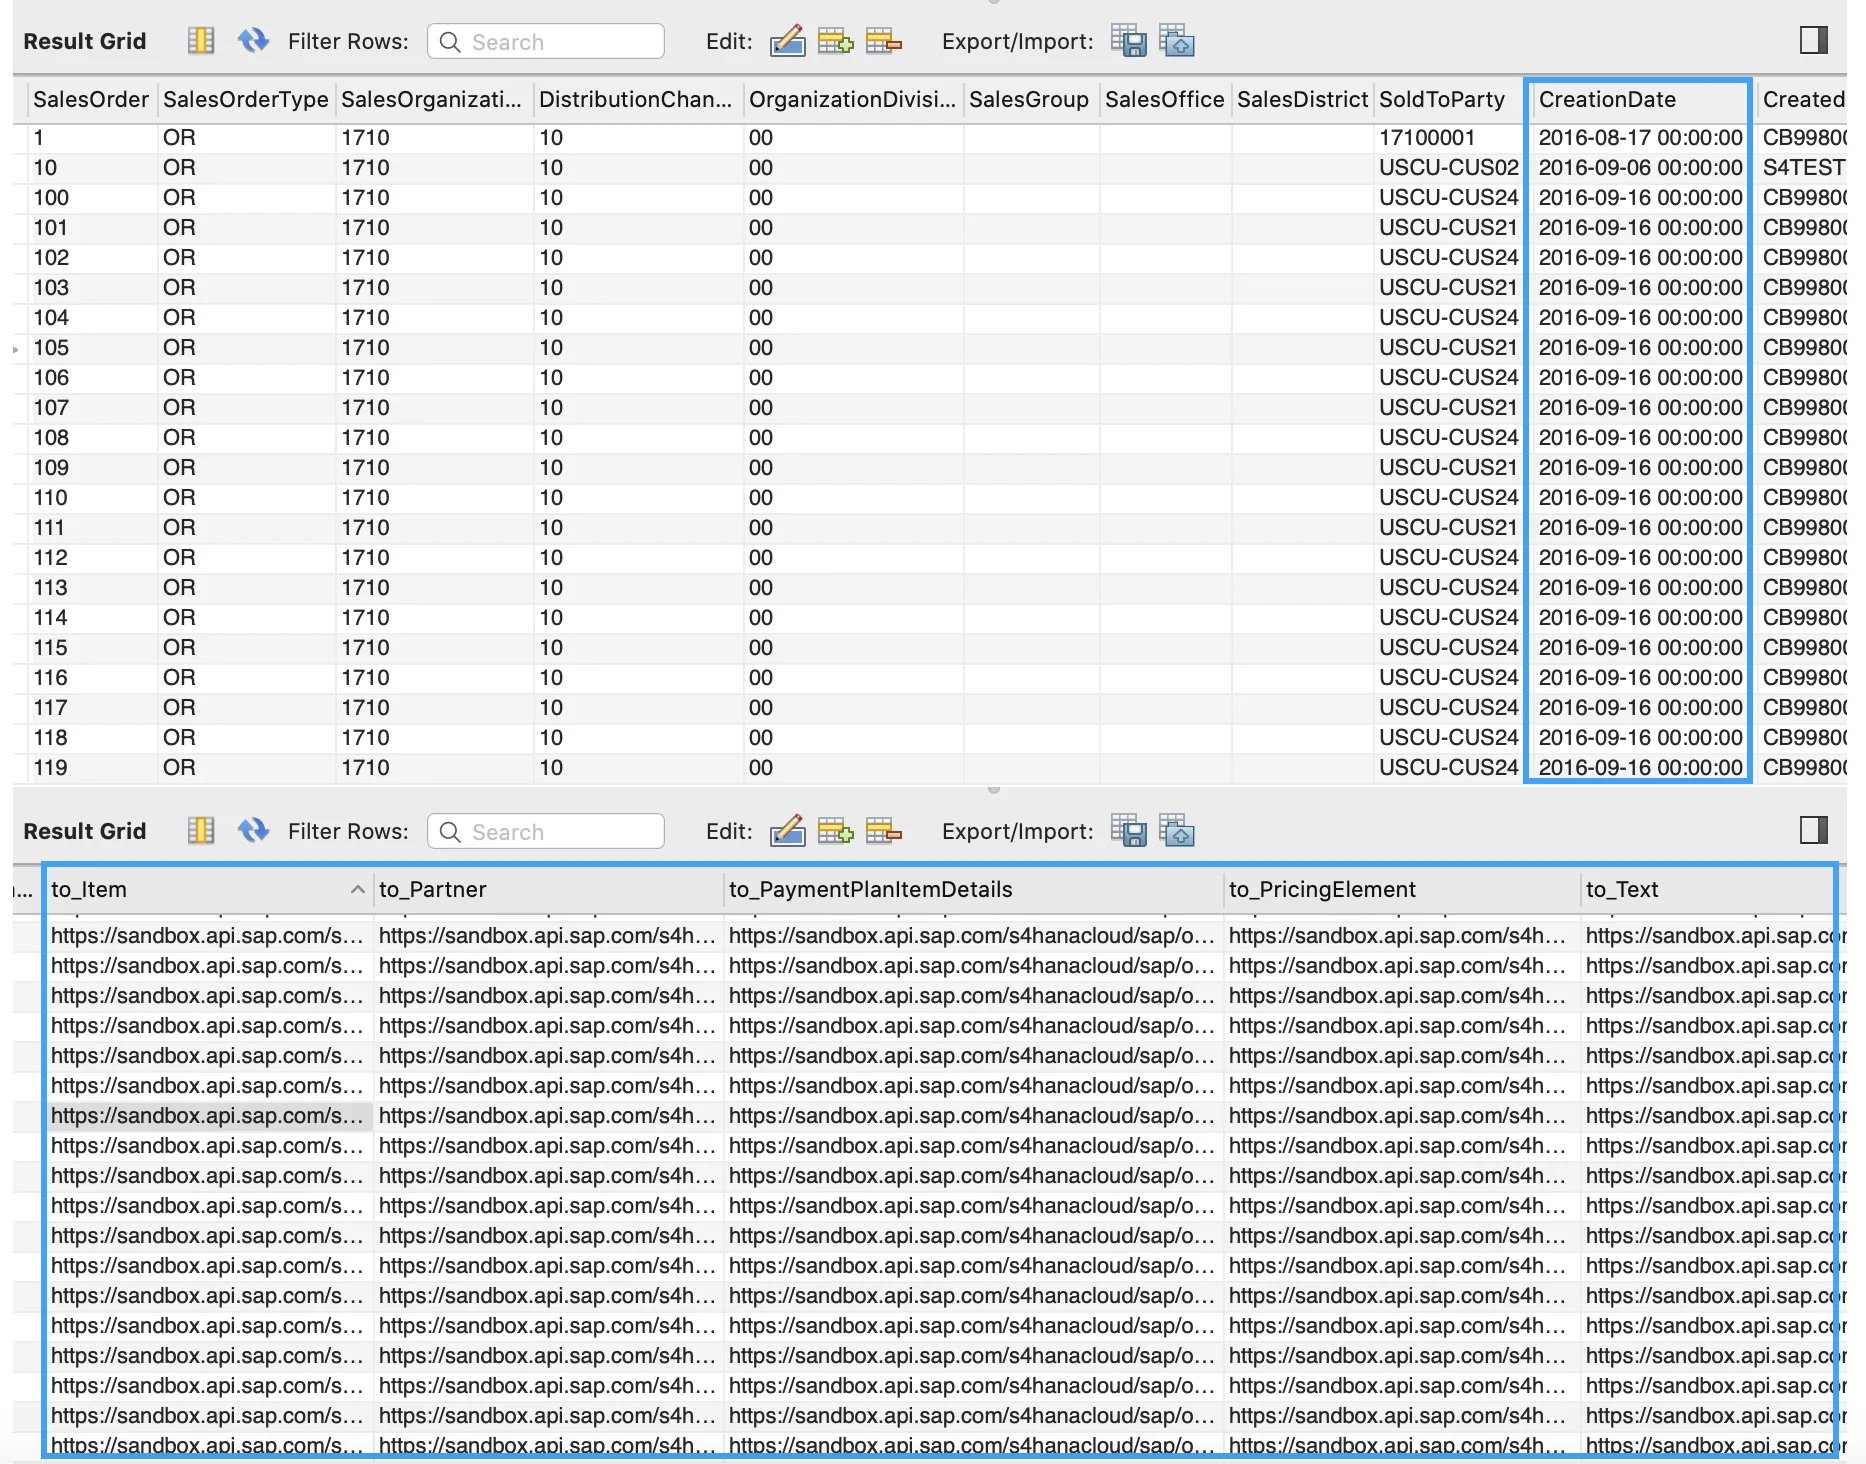
 2.ジョブを実行し、結果を確認する
先ほどのSELECTコンポーネントで実装したDatetimeの変換処理およびJsonStringToMapでデータが正しく変換、取得されていることをロード先のデータベース(MySQL)で確認します。
2.ジョブを実行し、結果を確認する
先ほどのSELECTコンポーネントで実装したDatetimeの変換処理およびJsonStringToMapでデータが正しく変換、取得されていることをロード先のデータベース(MySQL)で確認します。
 ## 最後に
今回はSAPの受注(Sales Order)データをODataサービス経由で取得しました。これ以外にも、購買発注(Purchase Order)や出荷(Outbound Delivery)、入庫(Inbound Delivery)などのデータも同様に取得することが可能です。また、HANA側で分析用のテーブルやビューを作成し、ODataサービスを介してデータを取得することも可能です。
実際に実戦で使う場合は、APIのPaginationの設定についてXplenty側で対応する必要があります。もし、ご興味のある方は、[XplentyのHP](https://www.xplenty.com/jp)からチャットもしくは「オンライン相談」でご相談ください。
## 最後に
今回はSAPの受注(Sales Order)データをODataサービス経由で取得しました。これ以外にも、購買発注(Purchase Order)や出荷(Outbound Delivery)、入庫(Inbound Delivery)などのデータも同様に取得することが可能です。また、HANA側で分析用のテーブルやビューを作成し、ODataサービスを介してデータを取得することも可能です。
実際に実戦で使う場合は、APIのPaginationの設定についてXplenty側で対応する必要があります。もし、ご興味のある方は、[XplentyのHP](https://www.xplenty.com/jp)からチャットもしくは「オンライン相談」でご相談ください。