> ## Documentation Index
> Fetch the complete documentation index at: https://www.integrate.io/docs/llms.txt
> Use this file to discover all available pages before exploring further.
# ETL: Curl Functionを使ったデータ更新
> Integrate.io ETLのCurl関数を使い、外部クラウドアプリケーションのAPIを呼び出して変換後のデータを保存先へ自動更新する連携方法を紹介します。
## シナリオ説明
今回のテーマは「多様なデータ連携」に関するトピックです。昨今クラウド時代の到来により、データの抽出方法や保存先へのデータ更新方法は非常に多様になりました。クラウドアプリケーションのほとんどがAPIによるデータ抽出や更新方法をサポートしていたりします。
今回は、APIを利用したデータ更新について紹介してみたいと思います。
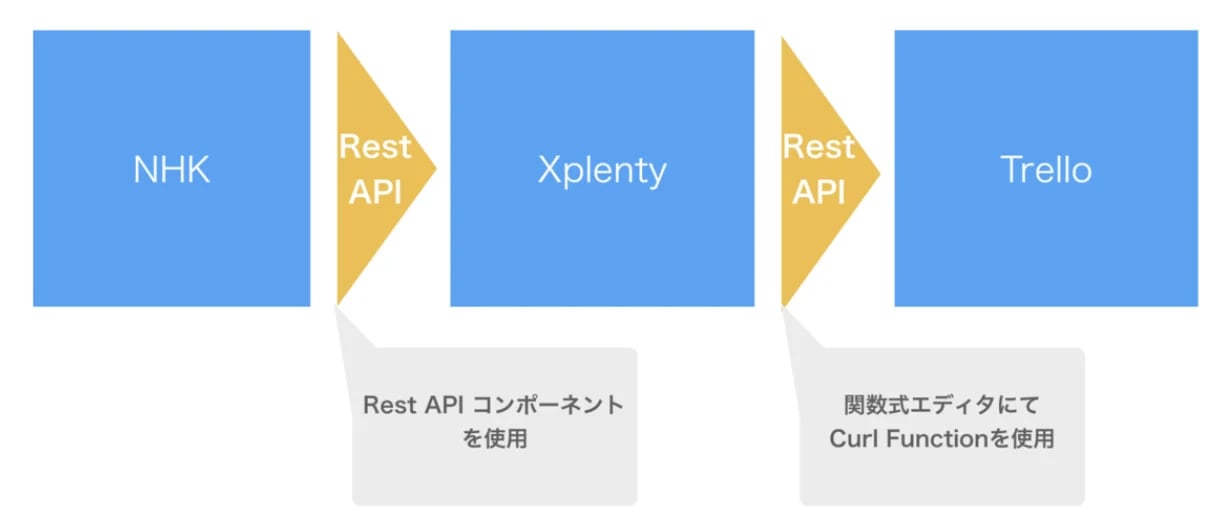 ETLツールがAPIの仕様に合わせて相手先アプリケーションにデータ書き込むことができるってご存知だったでしょうか?昨今のETLでは、それが可能な製品もいくつか出てきているのですが、意外と知らない方も多いのではないかと思います。
では、どうやってXplentyでは実現できるのでしょうか?
まず今回作るパッケージ(データ取得から更新までの一連の処理)の概要を紹介します。
早速、言い訳になりますが、この処理自体は、ビジネス的には全く意味がないデータ連携処理です。
ここでは、どのようにソースシステムからデータが連携され、データ保管先に書き込まれるかの流れを見ていただければと思います。
## パッケージ作成
**1.データ取得処理**
まずNHKのAPIに対してデータを取得するための設定です。
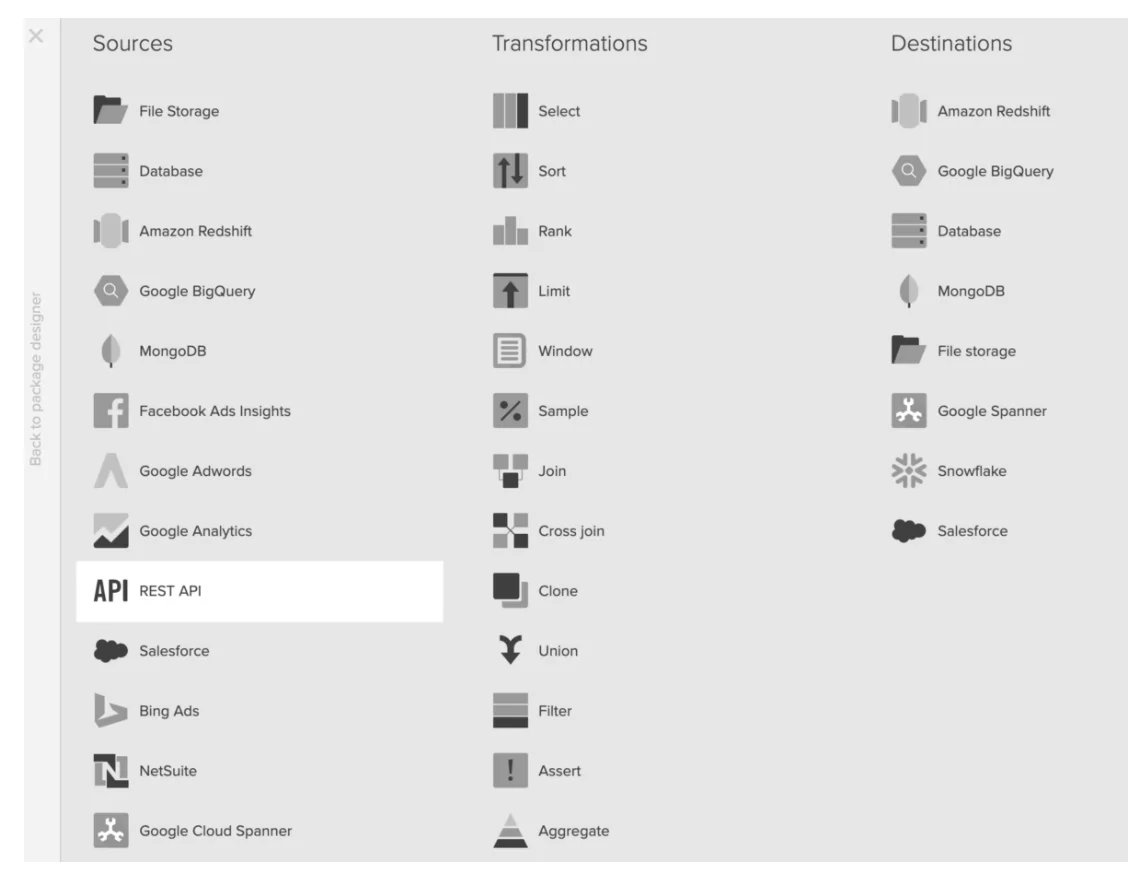
XplentyのSourceのリストにある「Rest API」コンポーネントを使用します。
ETLツールがAPIの仕様に合わせて相手先アプリケーションにデータ書き込むことができるってご存知だったでしょうか?昨今のETLでは、それが可能な製品もいくつか出てきているのですが、意外と知らない方も多いのではないかと思います。
では、どうやってXplentyでは実現できるのでしょうか?
まず今回作るパッケージ(データ取得から更新までの一連の処理)の概要を紹介します。
早速、言い訳になりますが、この処理自体は、ビジネス的には全く意味がないデータ連携処理です。
ここでは、どのようにソースシステムからデータが連携され、データ保管先に書き込まれるかの流れを見ていただければと思います。
## パッケージ作成
**1.データ取得処理**
まずNHKのAPIに対してデータを取得するための設定です。
XplentyのSourceのリストにある「Rest API」コンポーネントを使用します。
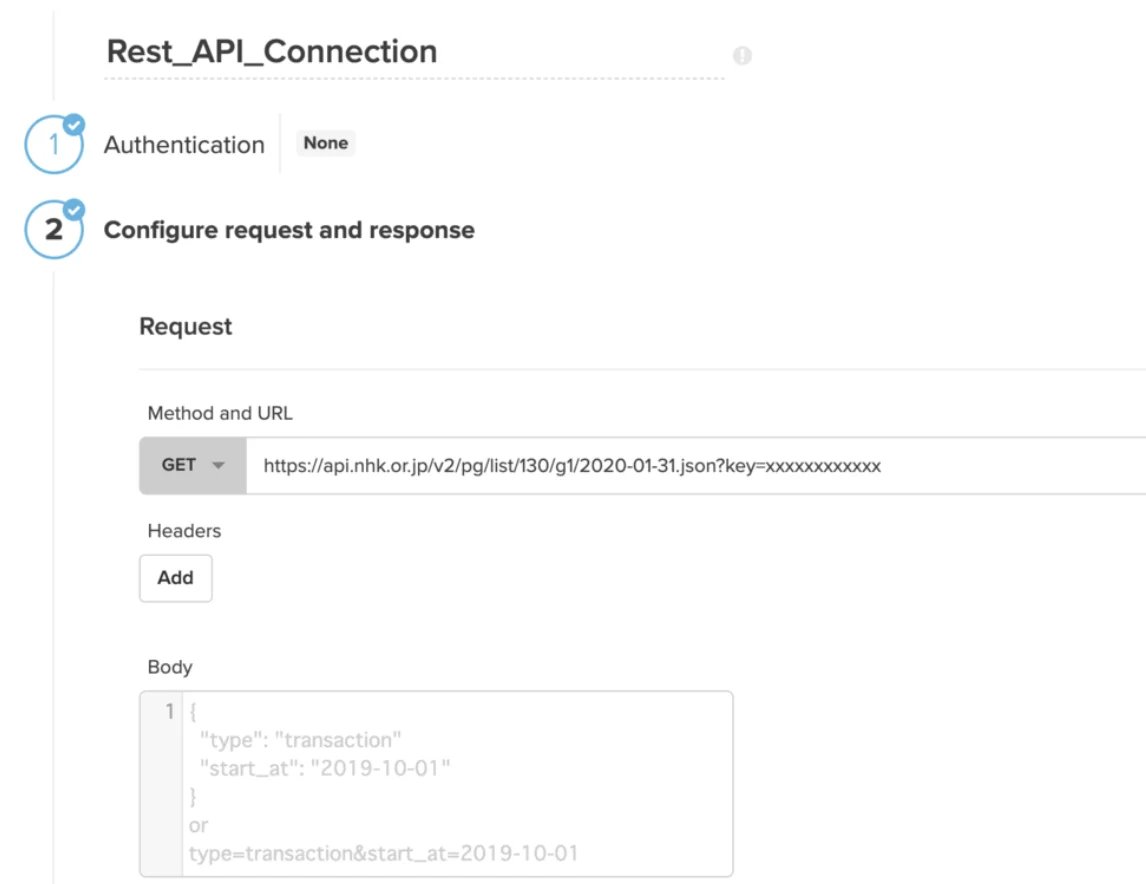
 コンポーネントで以下のようにURLを設定していきます。
 さらに取得する項目「title(番組名)」と「subtitle(番組サブタイトル)」をセットします。
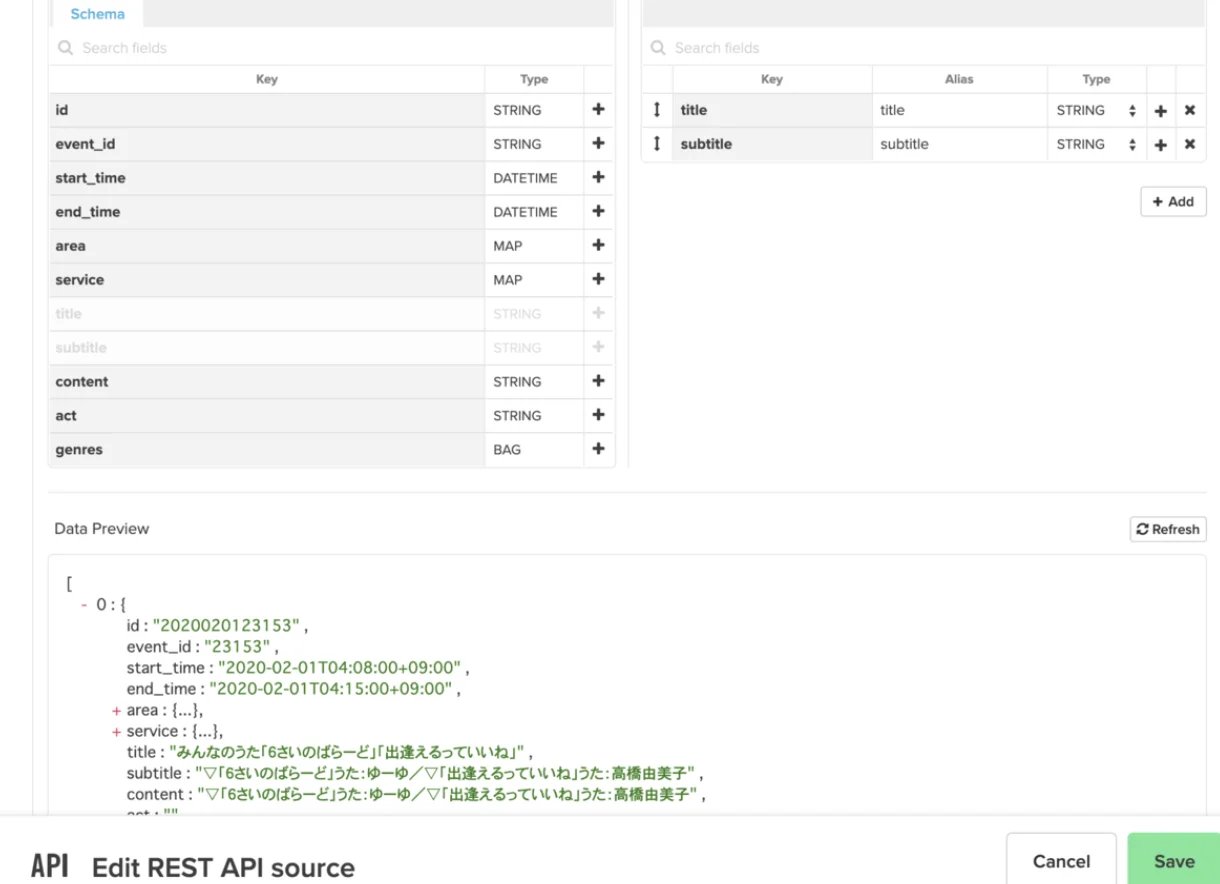 これでデータ取得側の設定は完了です。
**2.データ更新処理**
次はデータ更新処理を設定します。
Transformationで「Select」コンポーネントを選択します。
これでデータ取得側の設定は完了です。
**2.データ更新処理**
次はデータ更新処理を設定します。
Transformationで「Select」コンポーネントを選択します。
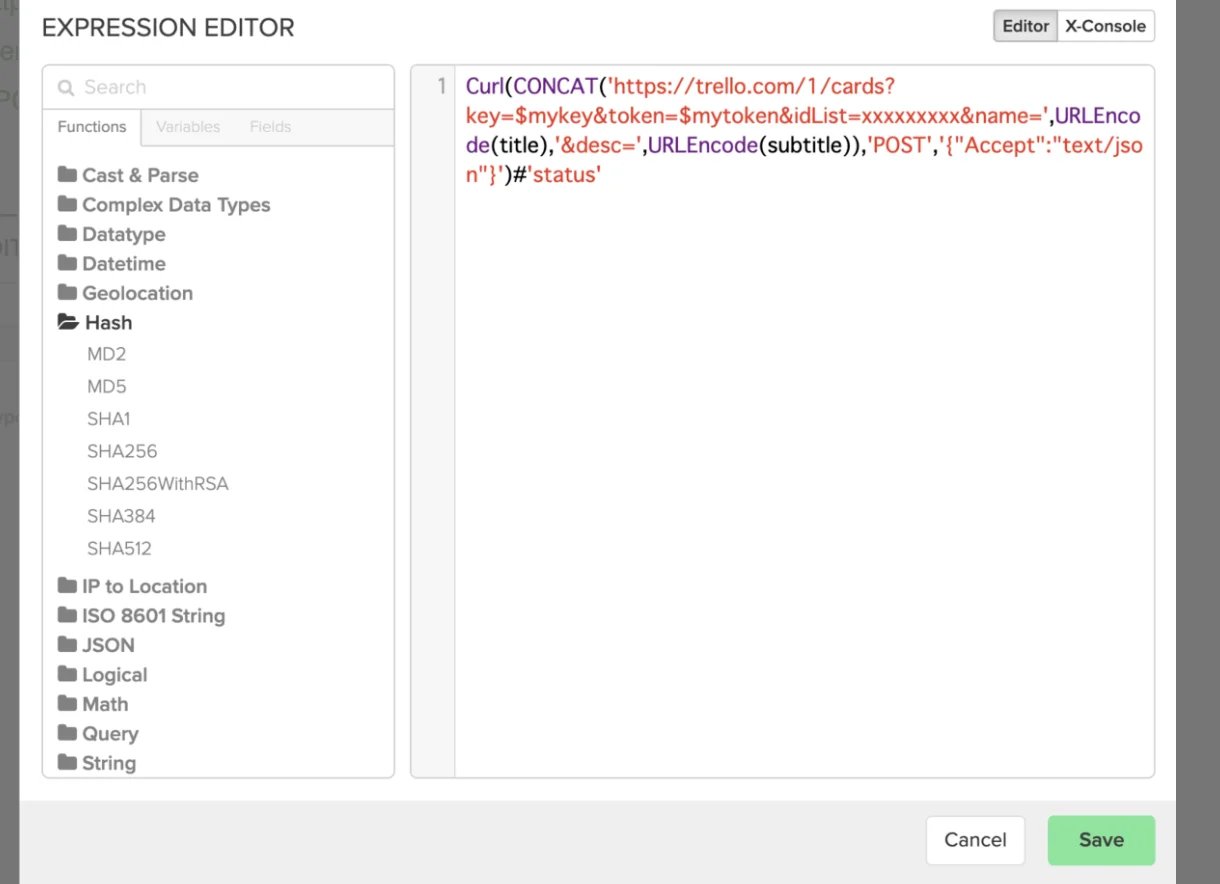
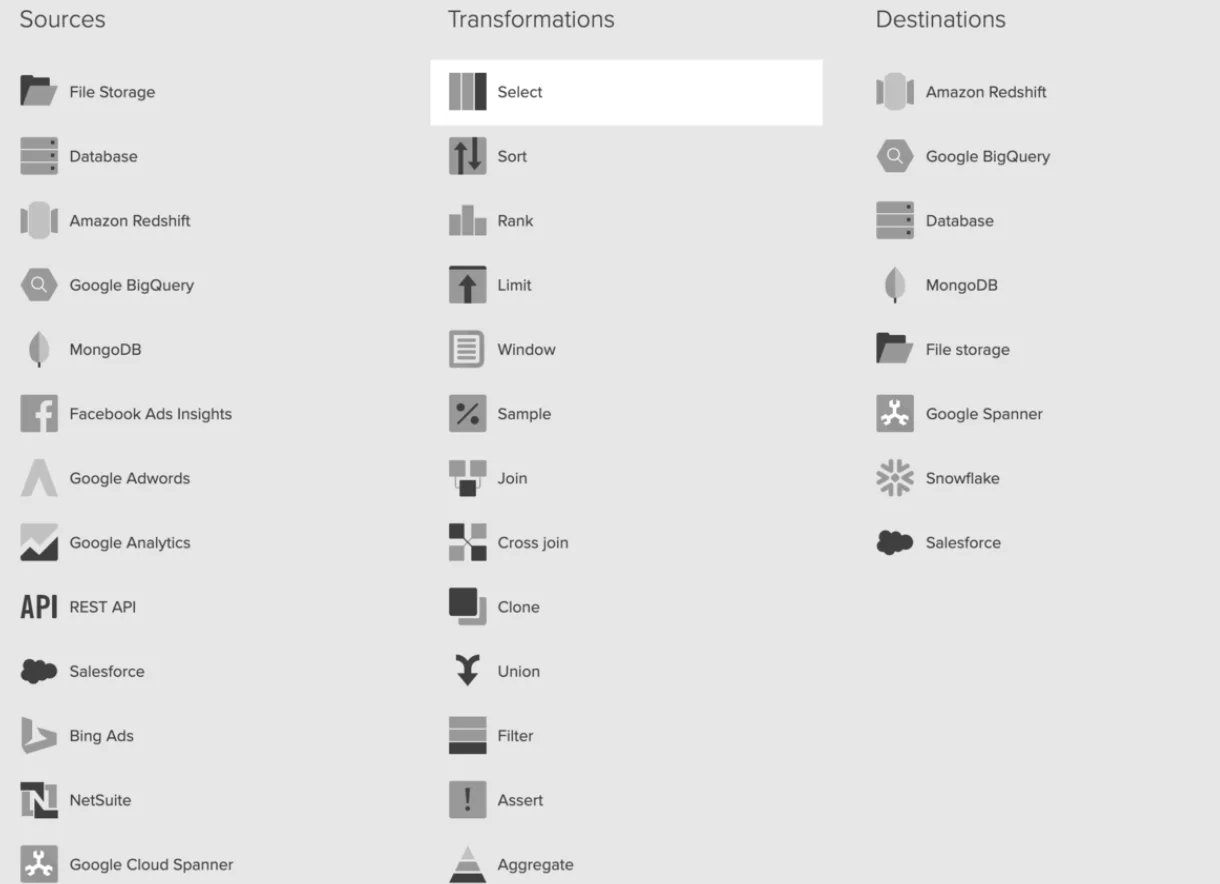 Selectコンポーネントの式エディタを開き、Trello側のAPIの仕様に合わせて、以下の式をセットします。
コマンドとしては以下のようになります。
`Curl(CONCAT('https://trello.com/1/cards?key=$mykey&token=$mytoken&idList=xxxxxxxxx&name=',URLEncode(title),'&desc=',URLEncode(subtitle)),'POST','{"Accept":"text/json"}')`
さらにCurlコマンドの結果のうち、 Status部分を取得し、ログとして出力できるように上記の式にプラスで赤字部分を設定しています。
`Curl(CONCAT('https://trello.com/1/cards?key=$mykey&token=$mytoken&idList=xxxxxxxxx&name=',URLEncode(title),'&desc=',URLEncode(subtitle)),'POST','{"Accept":"text/json"}')#'status'`
Selectコンポーネントの式エディタを開き、Trello側のAPIの仕様に合わせて、以下の式をセットします。
コマンドとしては以下のようになります。
`Curl(CONCAT('https://trello.com/1/cards?key=$mykey&token=$mytoken&idList=xxxxxxxxx&name=',URLEncode(title),'&desc=',URLEncode(subtitle)),'POST','{"Accept":"text/json"}')`
さらにCurlコマンドの結果のうち、 Status部分を取得し、ログとして出力できるように上記の式にプラスで赤字部分を設定しています。
`Curl(CONCAT('https://trello.com/1/cards?key=$mykey&token=$mytoken&idList=xxxxxxxxx&name=',URLEncode(title),'&desc=',URLEncode(subtitle)),'POST','{"Accept":"text/json"}')#'status'`
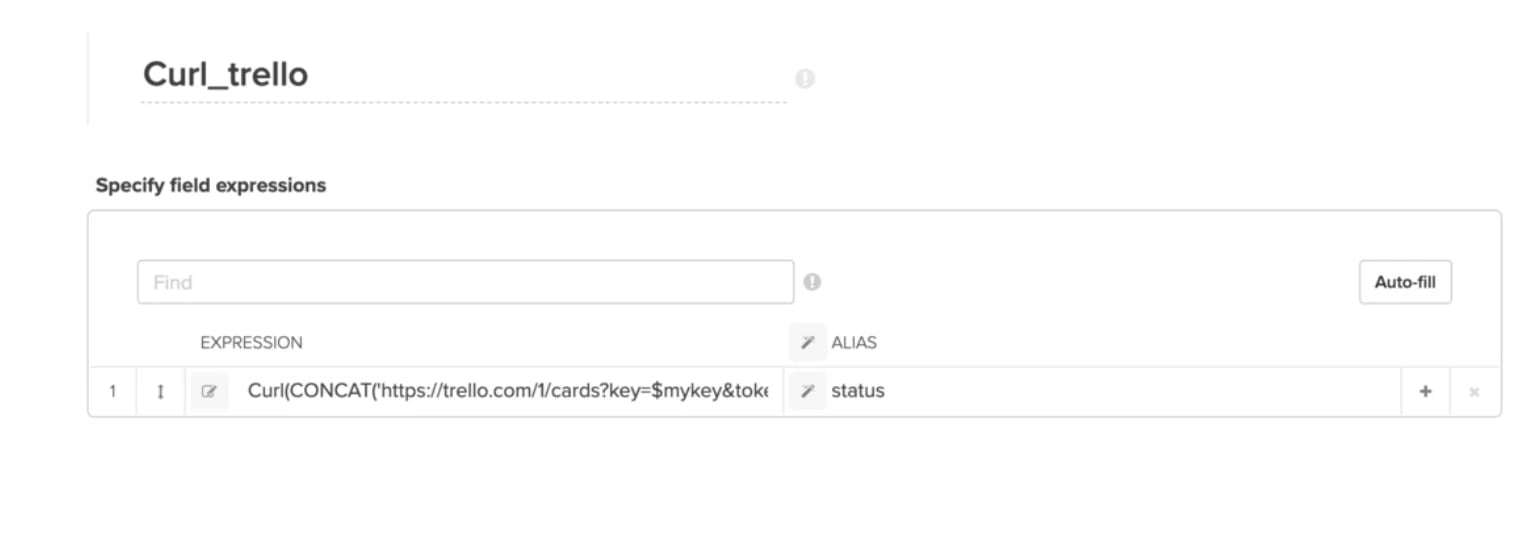
 リクエスト結果(statusのみ取得)をセットする列の名称をALIASにセットします。
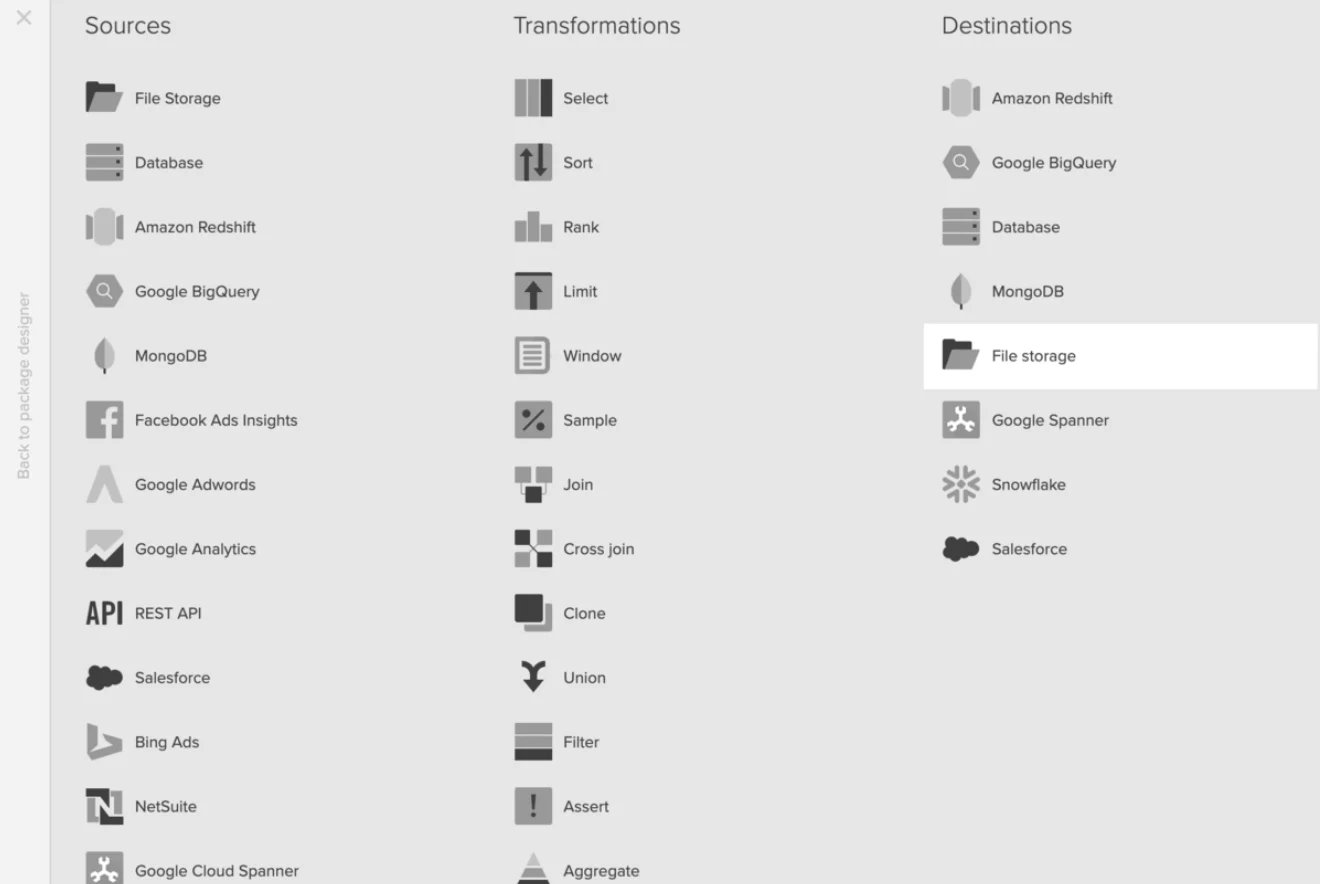
 あとは結果をストレージなど、Destinationにある任意のコンポーネントを選択し、Curlの結果ログ(今回は「Status」のみ)を保存するだけです。
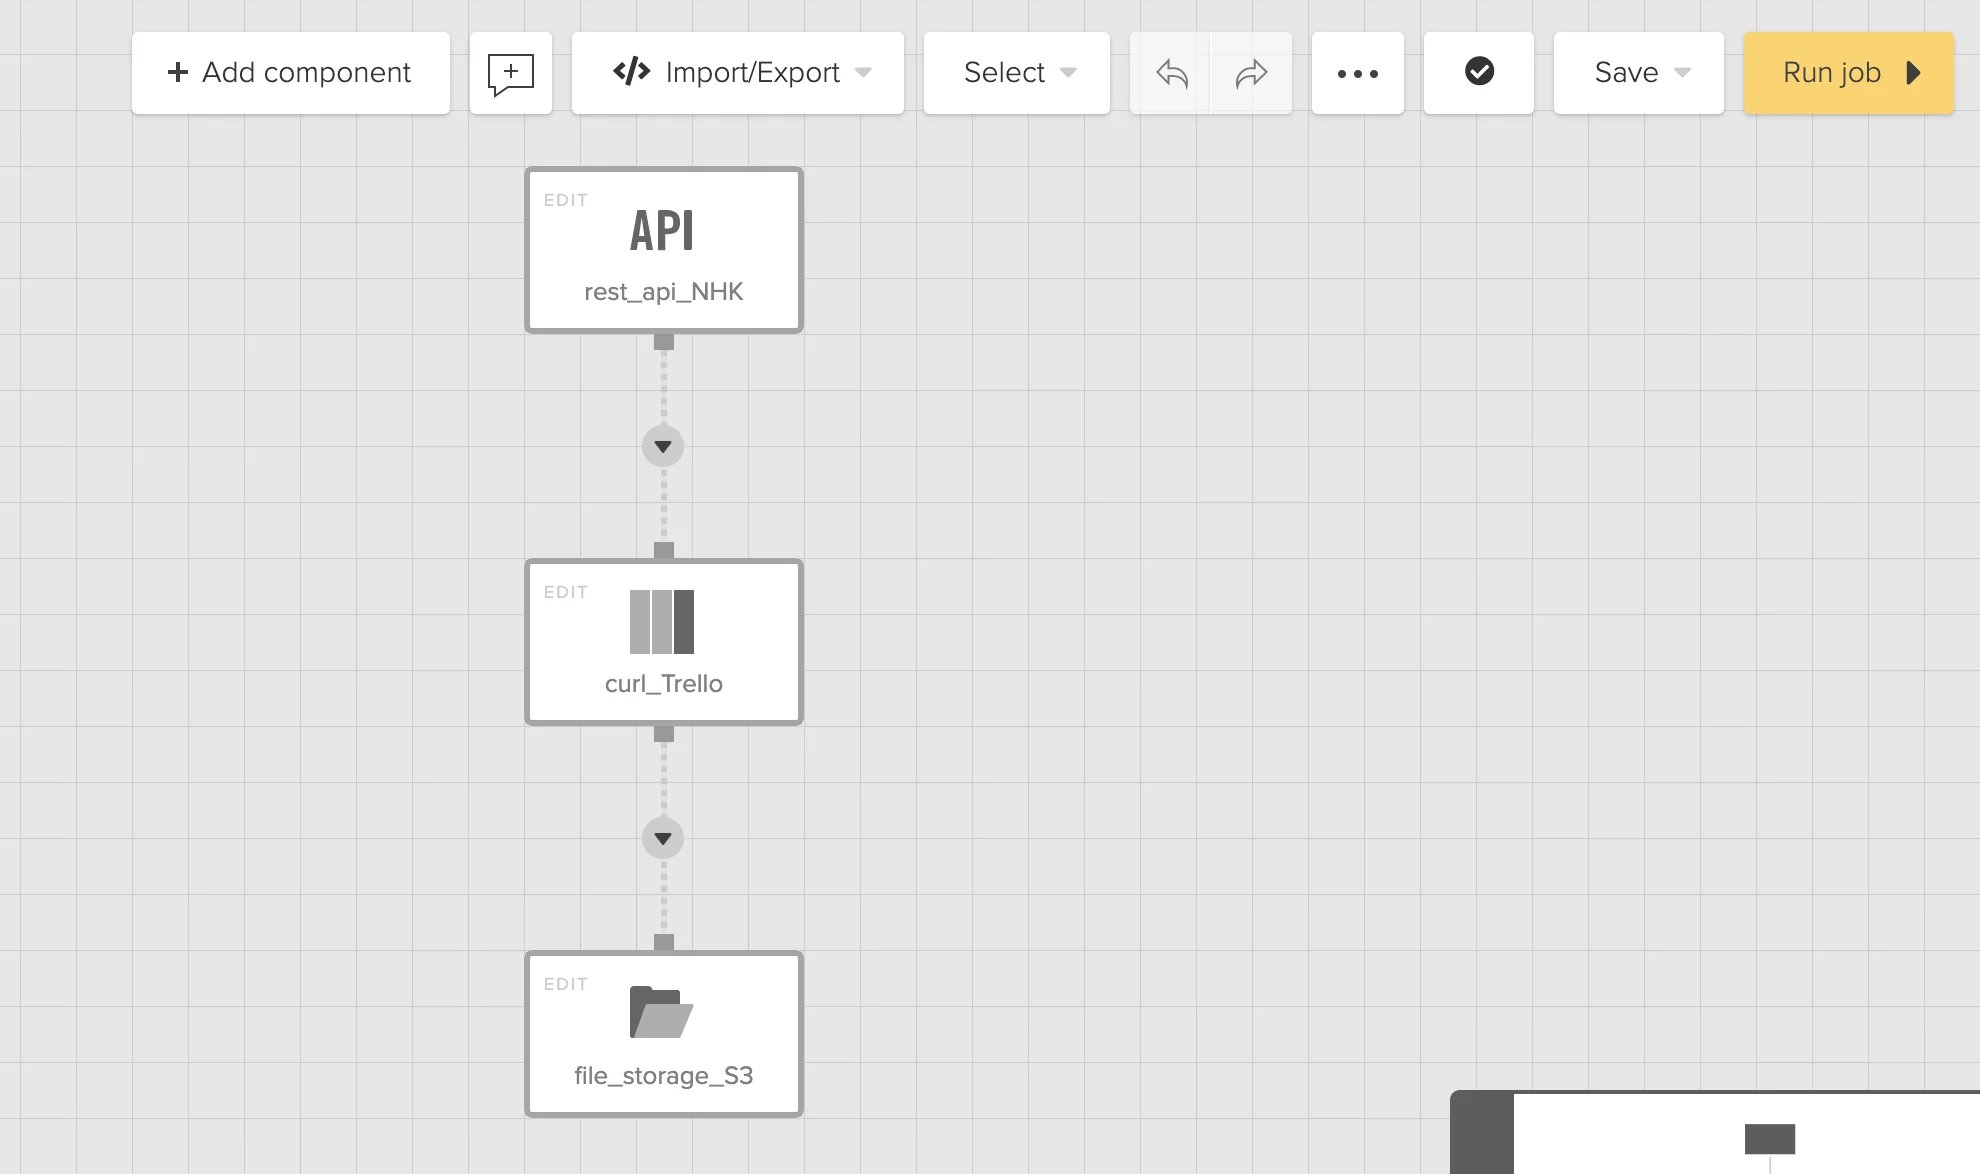
 最終的なパッケージは以下のようになります。
 **3.結果を確認**
実際にデータを実行してみましょう。
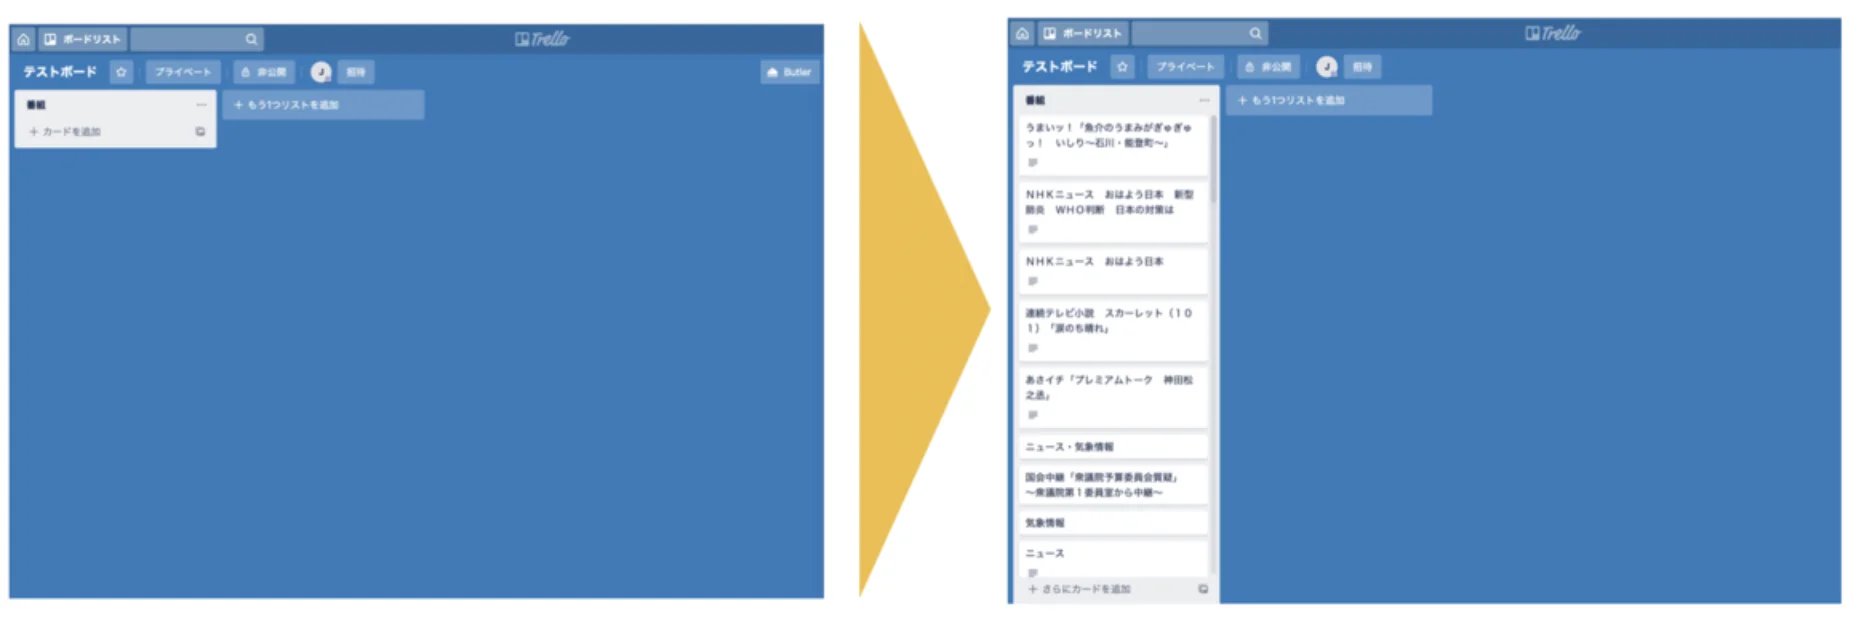
狙い通り、指定したリストに連携したデータに基づいて作成されたカードががセットされていることを確認できます。
**3.結果を確認**
実際にデータを実行してみましょう。
狙い通り、指定したリストに連携したデータに基づいて作成されたカードががセットされていることを確認できます。
 ## 最後に
今回はRest APIで取得したデータをRest APIを使って更新してみました。
[Xplenty](https://www.xplenty.com/jp/)はG2 Crowdにて2020年SpringのETLツールカテゴリにおいて「Leader」に選ばれています。(G2 Crowdのレビューページでは、ユーザーの声がビデオで紹介されており、変換の多様性、すぐに使えるコネクタの豊富さ、サポートのレスポンスの良さ、学習が容易といった点を評価していただいてます。)
是非、この機会にクラウドETL「Xplenty」を[1ヶ月間無償トライアル](https://try.xplenty.com/jp/)で体験してみてください。
## 最後に
今回はRest APIで取得したデータをRest APIを使って更新してみました。
[Xplenty](https://www.xplenty.com/jp/)はG2 Crowdにて2020年SpringのETLツールカテゴリにおいて「Leader」に選ばれています。(G2 Crowdのレビューページでは、ユーザーの声がビデオで紹介されており、変換の多様性、すぐに使えるコネクタの豊富さ、サポートのレスポンスの良さ、学習が容易といった点を評価していただいてます。)
是非、この機会にクラウドETL「Xplenty」を[1ヶ月間無償トライアル](https://try.xplenty.com/jp/)で体験してみてください。