SSH tunneling provides a versatile and robust method for establishing secure connections between systems, even over untrusted networks such as the internet. By encapsulating your data within SSH protocols, you can securely access resources, databases, APIs, or any other services hosted on remote servers, without exposing them directly to the public internet.
Creating Integrate.io ELT Connection
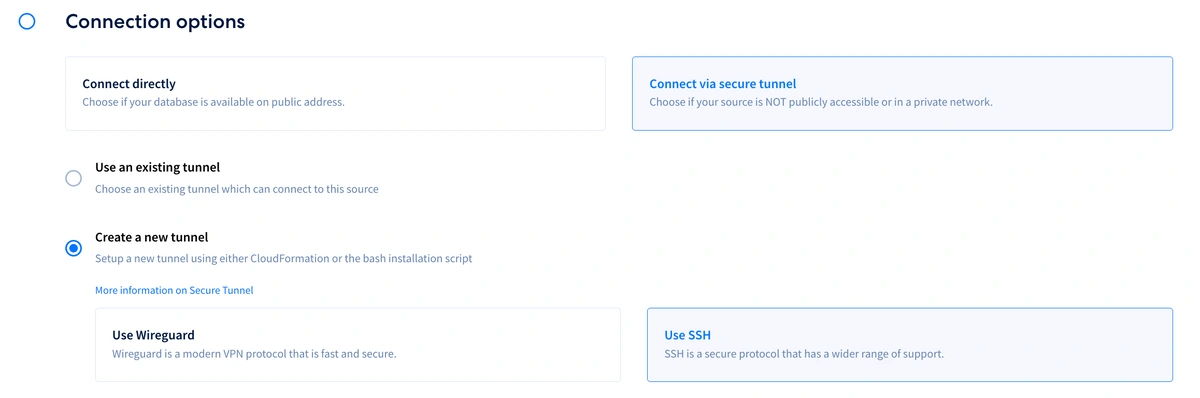
- On Connection options of Source or Destination creation, select Connect via secure tunnel. Select Create a new tunnel and click Use SSH

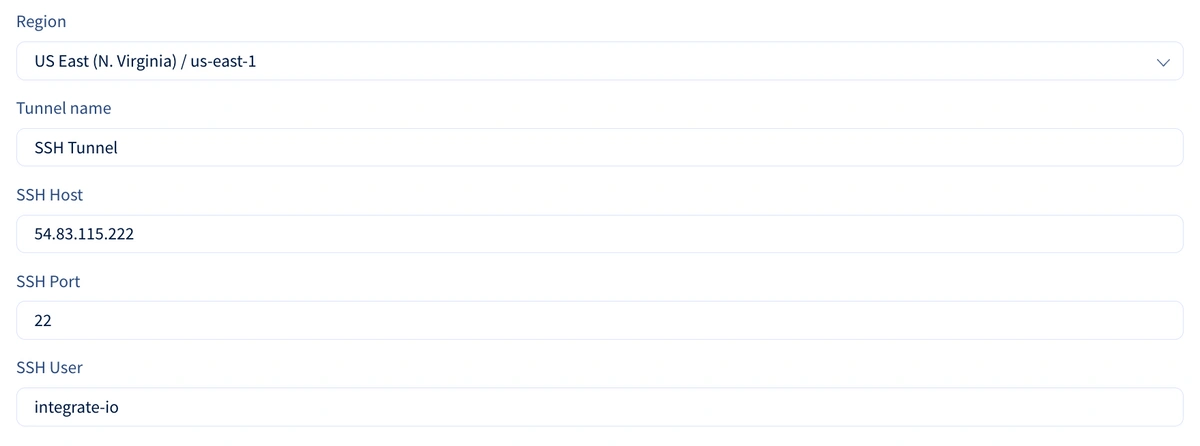
- Supply the region, tunnel name and the SSH tunnel details. Click Create SSH Tunnel to create the tunnel

- Copy the SSH Public Key by clicking the Copy button and prepare your tunnel host for access.

- Once your tunnel host is prepared, click Test Tunnel Connection to test the connection. If connection is successful, you should see the Active check.

For Linux - Preparing the tunnel host
You will need to prepare your host (either bastion host or tunnel server) by creating an integrate.io ELT user. Here’s how:
- Create group integrate.io ELT
sudo groupadd integrate-io
- Create user integrate.io ELT and its home directory:
sudo useradd -m -g integrate-io integrate-io
- Switch to the integrate.io ELT user
sudo su - integrate-io
- Create the .ssh directory and change permission
mkdir ~/.ssh && chmod 700 ~/.ssh
- Create the authorization_keys file and change permission
touch ~/.ssh/authorized_keys && chmod 600 ~/.ssh/authorized_keys
- Add the previously copied public key to the authorized_keys
echo '<SSH public key>' >> ~/.ssh/authorized_keys
- Allow access to your server's host and port from Integrate.io ELT's IP addresses.
For Windows - Preparing the tunnel host
We will use the Administrator
user for this guide. If you are using a different user, please make sure that it belongs to the Adminstrator
group.
Run the following commands in Powershell as Administrator.
-
Check if SSH features are enabled
Get-WindowsCapability -Online | Where-Object Name -like 'OpenSSH*'

-
Enable SSH features if they are not installed
# Install the OpenSSH Client
Add-WindowsCapability -Online -Name OpenSSH.Client~~~~0.0.1.0
# Install the OpenSSH Server
Add-WindowsCapability -Online -Name OpenSSH.Server~~~~0.0.1.0

-
Enable public key authentication in SSH server configuration file
Add-Content -Force -Path $env:ProgramData\ssh\sshd_config -Value "`nPubkeyAuthentication yes"
You can also open the file using notepad and look for PubkeyAuthentication
notepad.exe $env:ProgramData\ssh\sshd_config
-
Start the SSH server service
# Start the sshd service
Start-Service sshd
# Make the SSH service automatically start on startup
Set-Service -Name sshd -StartupType 'Automatic'
-
Create a firewall rule for the SSH port
if (!(Get-NetFirewallRule -Name "Allow SSH Port (22)" -ErrorAction SilentlyContinue | Select-Object Name, Enabled)) {
Write-Output "Firewall Rule 'Allow SSH Port (22)' does not exist, creating it..."
New-NetFirewallRule -Name 'Allow SSH Port (22)' -DisplayName 'OpenSSH Server (sshd)' -Enabled True -Direction Inbound -Protocol TCP -Action Allow -LocalPort 22
} else {
Write-Output "Firewall rule 'Allow SSH Port (22)' has been created and exists."
}

-
Add the public key from Integrate.io. Replace ssh-rsa ...
with the public key content
$authorizedKey = "ssh-rsa ..."
Add-Content -Force -Path $env:ProgramData\ssh\administrators_authorized_keys -Value $authorizedKey
# Apply the necessary permission changes
icacls.exe ""$env:ProgramData\ssh\administrators_authorized_keys"" /inheritance:r /grant ""Administrators:F"" /grant ""SYSTEM:F""
-
Allow access to your server's host and port from Integrate.io ELT's IP addresses.
Notes:
- If the database is hosted inside the Windows machine and accessible locally, use the local IP of the Windows machine as the database host in Integrate.io. You can get it by running
ipconfig
.
- The SSH tunnel username is
Administrator
for this guide.