

Introduction
Integrate.io’s universal REST API source component gives you the ability to access data from an infinite number of applications and systems. This guide will walk you through the process of accessing your API data. We will start by reading the documentation for the API you are trying to extract data from, finding the pertinent information you need, and showing you how to configure the REST API source component with that information. For APIs that use OAuth 2.0, Client Credentials, or other token-based authentication, Integrate.io now supports Universal OAuth connections, which handle token retrieval, storage, and refresh automatically, with no Curl functions or package variables required. See the examples below for when to use each approach, and refer to Allowing Integrate.io ETL access to any API with OAuth for full setup instructions.Steps for accessing API data
1
Find the API documentation. Many APIs have their documentation publicly available on the internet, although occasionally some will only be accessible to users after logging in to the platform/console. If you can’t find it, reach out to the customer support of your application.
2
Seek out the particular information and credentials you need. We need a few pieces of information from the documentation. They can typically be found in an Authentication section and a section that describes the different types of data that are available from the API and the specific locations where that data is available (i.e. endpoints) along with instructions for how to ask for the data:
-
How does the API require us to pass our authentication credentials?
Note:If the API uses OAuth 2.0, Client Credentials, or a custom token endpoint, you may be able to use a Universal OAuth connection rather than configuring authentication manually. Check whether your API is covered by a pre-built connection or can be configured with Universal OAuth before proceeding. See Allowing Integrate.io ETL access to any API with OAuth.
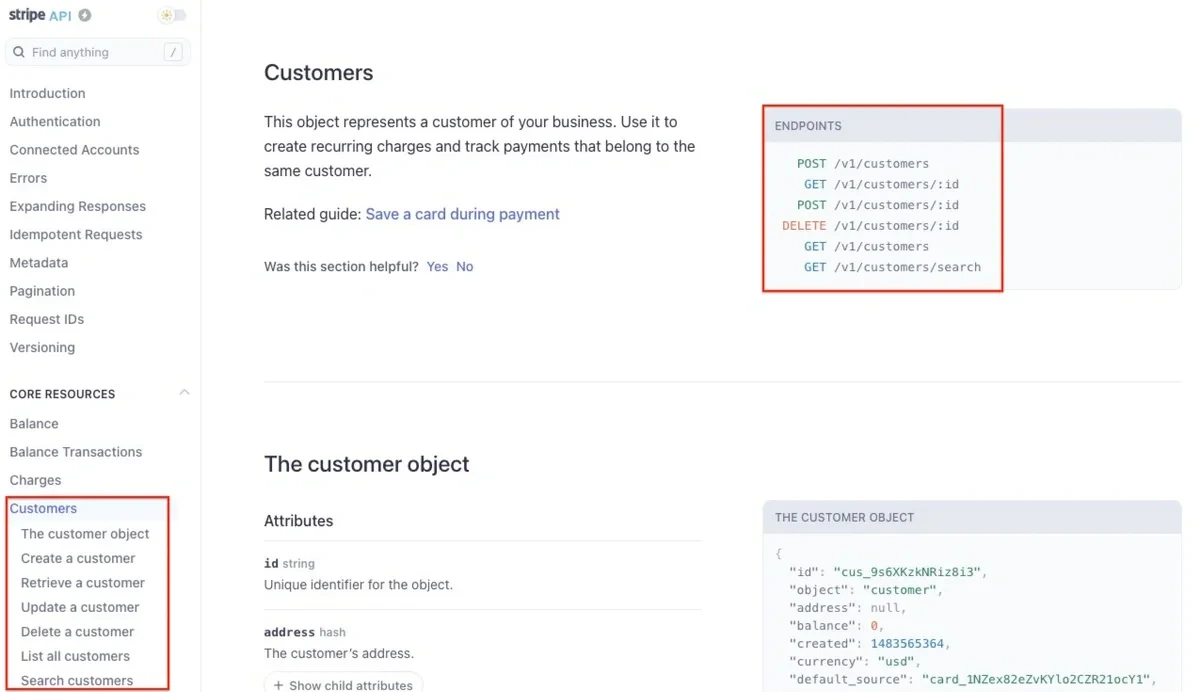
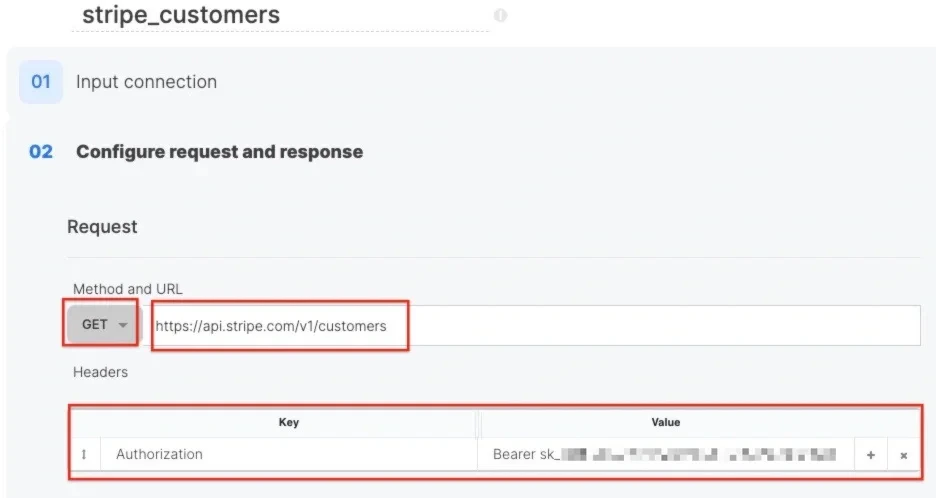
- What is the URL of the API endpoint (i.e. the specific location) we want to retrieve data from? For reference, the URL for an API endpoint is typically comprised of the base API URL along with the endpoint. In our Stripe API example below, the base URL is https://api.stripe.com and the endpoint we’re going to use is /v1/customers. The full URL of the API endpoint we’re going to access is https://api.stripe.com/v1/customers.
- What method does that endpoint use? (Such as GET, POST, PUT, etc)
- Does the API require any headers, query parameters, or body?
- How is the data returned?
3
Configure the REST API source component inside an Integrate.io ETL package. See the following examples for instructions.
Ingesting API data in Integrate.io ETL - Tutorial
The following three sample API calls build upon one another in complexity while demonstrating the flexibility of the REST API source component and covering the majority of the types of APIs that Integrate.io customers call within the platform. We will refer to the steps above as we walk through the process of accessing the data from each of the following APIs.#1 Stripe API - GET method with an API key
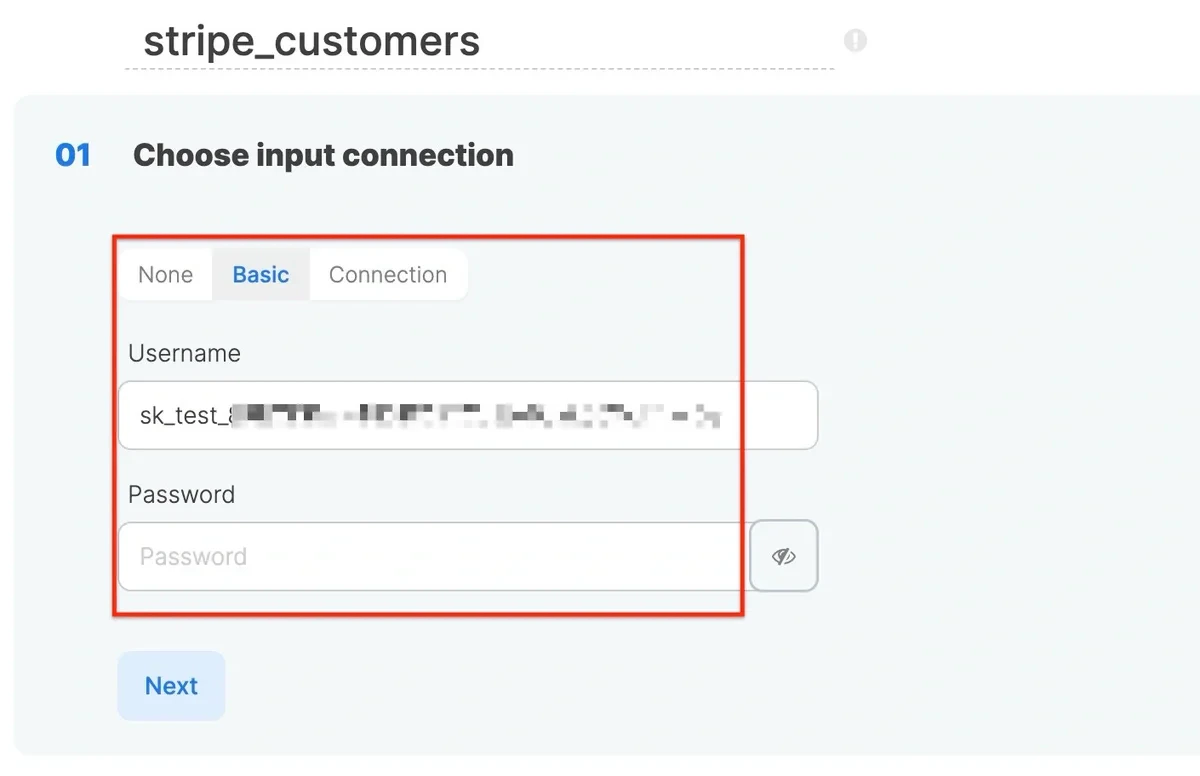
My company uses Stripe for billing and I’m trying to ingest that data into my data warehouse for better visibility for my Customer Success team. I search for “Stripe API documentation” and find it at stripe.com/docs/api. I see “Authentication” in the left sidebar. This section of the documentation gives us the information I need. It explains that Stripe uses an API key for authentication, and that there are two ways you can pass that API key to the API:- Using Basic Authentication it is the username and no password is required.
- Or you can pass it as the token in an Authorization header like this: Authorization : Bearer
<your API key>
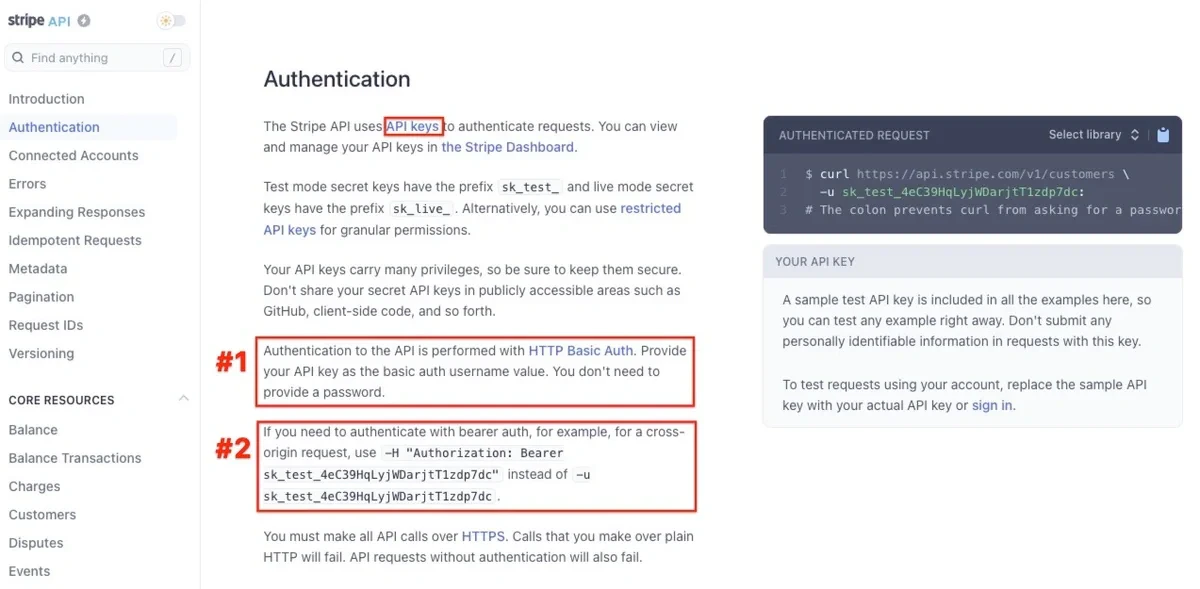
- The URL is https://api.stripe.com/v1/customers
- The method is GET
- There are no required parameters or headers (they would show on the right hand dark gray box in the Curl function as -h). All of the parameters that are listed on the left are optional.
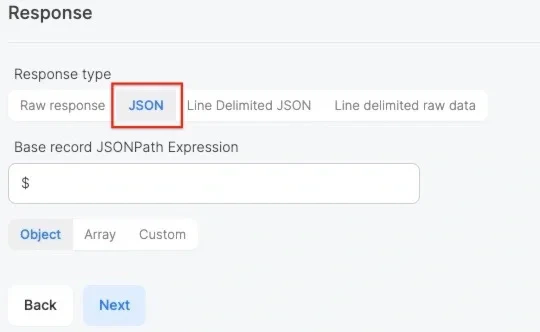
- The data from the API is returned in a JSON object (indicated by the curly brackets). However, you can verify that in the Introduction section of the Stripe API documentation as well.
<my API key> on the value side. This is also where I’ll place the URL and select GET in the method dropdown:
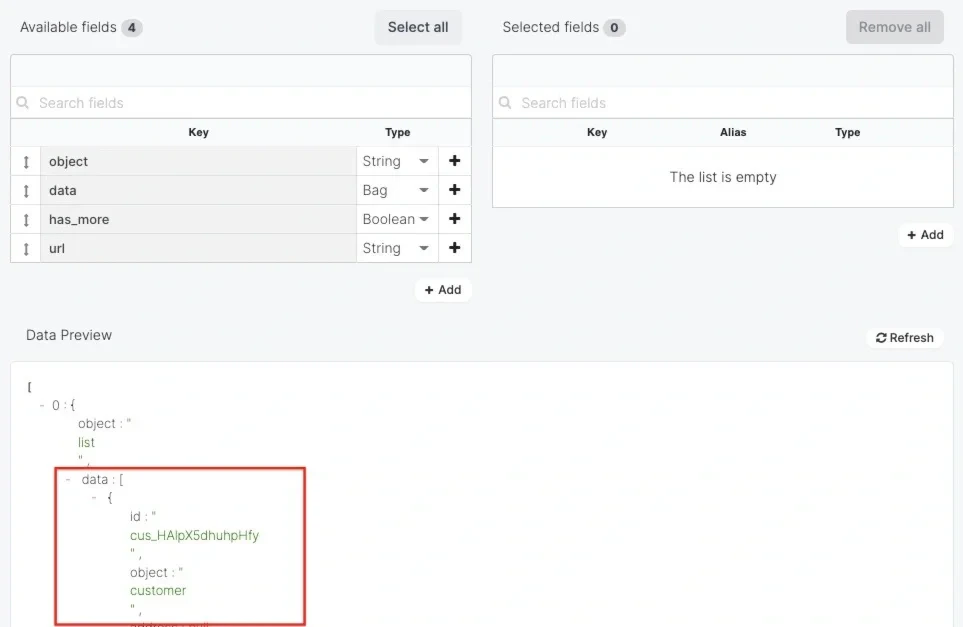
$.data[*] to the field. This path tells the component to parse all the fields inside the data bag/array. Click Next.
![Custom JSONPath expression set to $.data[*] for parsing the array](https://mintcdn.com/integrateio/HSGmKiO3soPLENmi/images/how-do-i/StripeAPIJSONPath.webp?fit=max&auto=format&n=HSGmKiO3soPLENmi&q=85&s=98b53d0a79d18f65d3c6a97035fb9e1d)
#2 Pendo API - POST method with an API key
In this next example, I need to extract data from Pendo. I search for “Pendo API documentation” on the internet and find it at https://engageapi.pendo.io. I see “Getting Started” in the left sidebar. This section of the documentation tells me that I need an Integration Key in order to access the API and walks me through the steps I need to follow to get one.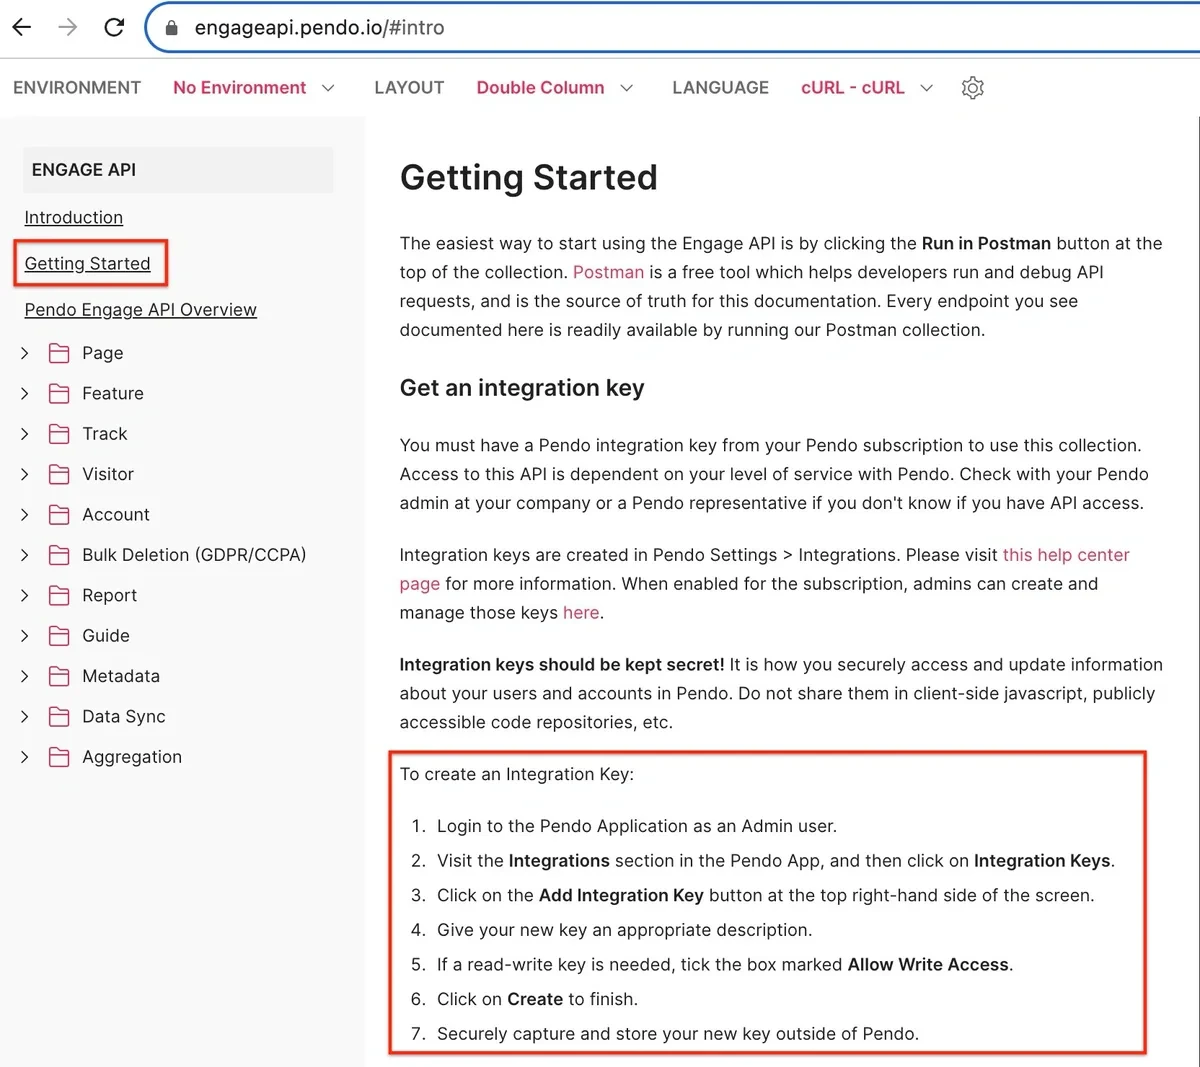
- The API key is passed in a X-Pendo-Integration-Key header.
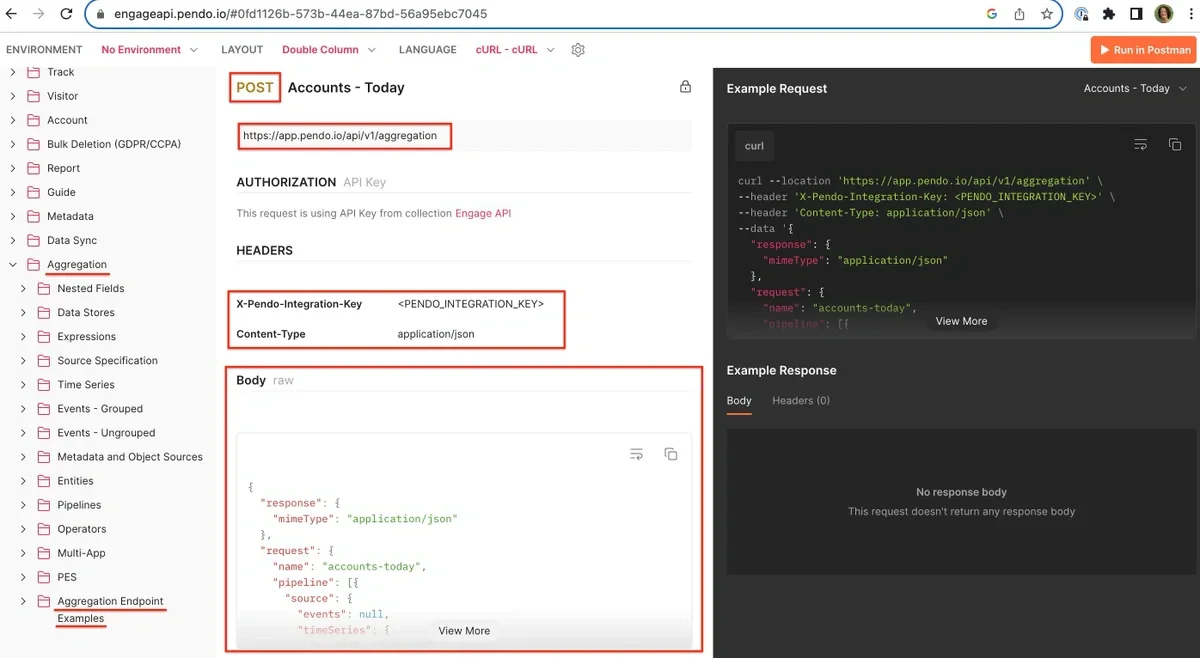
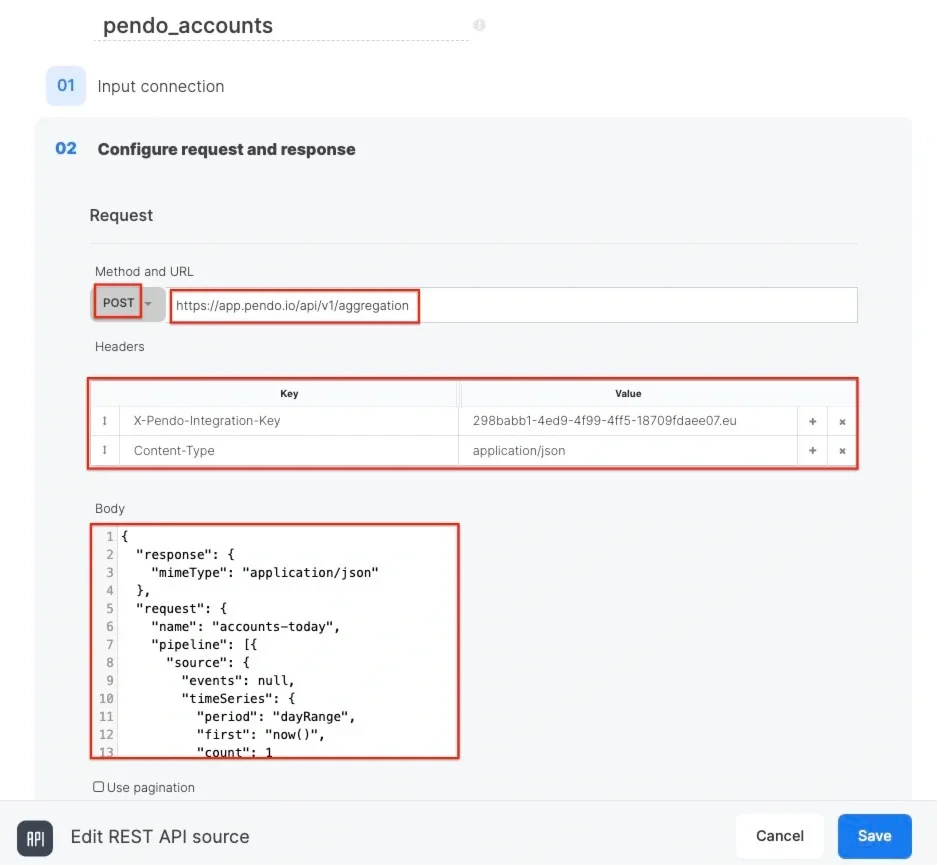
- The URL is https://app.pendo.io/api/v1/aggregation
- The method is POST. A POST method means we are sending data to the API. This will mean that you are sending a Body field and a Content-type header to tell the API what format to expect the data in the Body field to take. Common types are:
- JSON which requires an application/json content-type header
- Url-encoded which requires an application/x-www-form-urlencoded content-type header
- There are two required headers and a body field:
- X-Pendo-Integration-Key :
<PENDO_INTEGRATION_KEY> - Content-type : application/json
- You can click on View More to see the entire Body field of this example call.
- X-Pendo-Integration-Key :
- Within the Body field, we are passing a request to return the data in JSON format.
#3 & 4 Dataloop API - OAuth2.0 with an expiring JWT
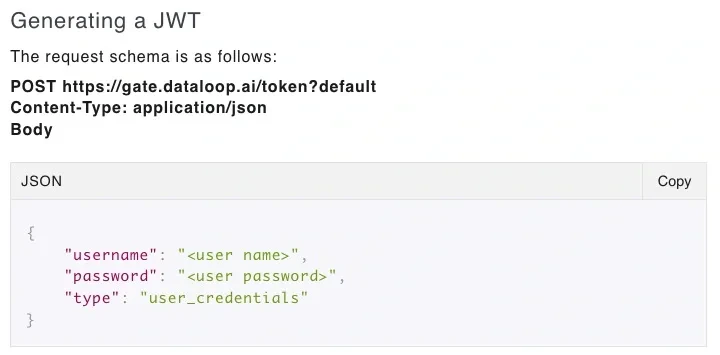
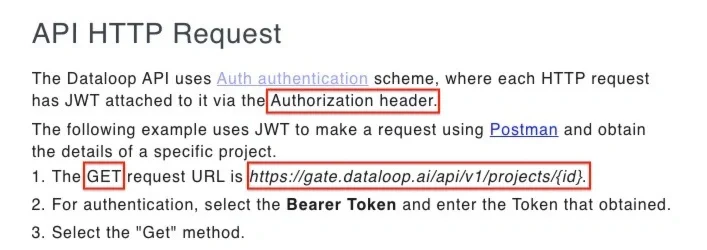
In these examples, the Dataloop API requires a JWT that expires every 24 hours. We’ll handle this manually using package variables and a Curl function. I search for “Dataloop API documentation” on the internet and find it at https://dataloop.ai/docs/rest-api-connection. The Dataloop API documentation opens right up to API Authentication. I read that for a M2M (machine to machine) login from an external system (like Integrate.io ETL) the API requires a JWT (JSON web token) to be passed with every request for data. The documentation tells me that I need an Integration Key in order to access the API and walks me through the steps I need to follow to get one.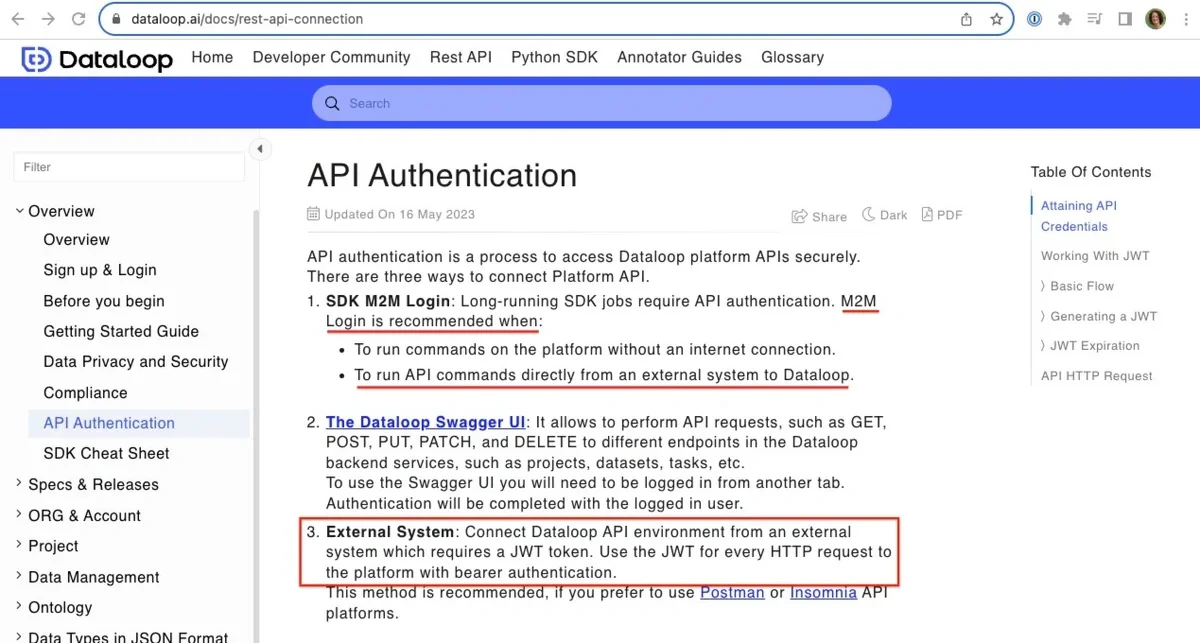
1
The Client requests authorization (authorization request) from the Authorization server, supplying the client id and secret as identification and defining the grant type. Grants are the set of steps a Client has to perform to get resource access authorization. A system like Integrate.io ETL platform will often use the Client Credentials grant type which is used for non-interactive applications e.g., automated processes, microservices, etc.
2
The Authorization server authenticates the Client and responds with either an Authorization Code or Access Token, depending on the grant type. With the Client Credentials grant type it will be an access token.
3
With the Access Token, the Client requests access to the resource from the Resource server.
#3 Dataloop API: OAuth 2.0 Using a Universal OAuth Connection (Recommended)
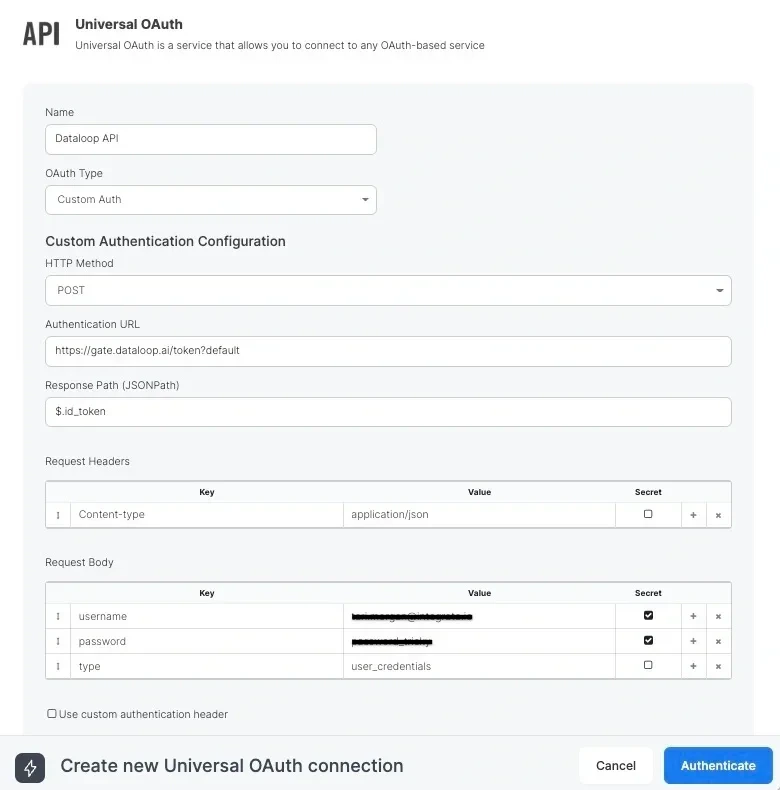
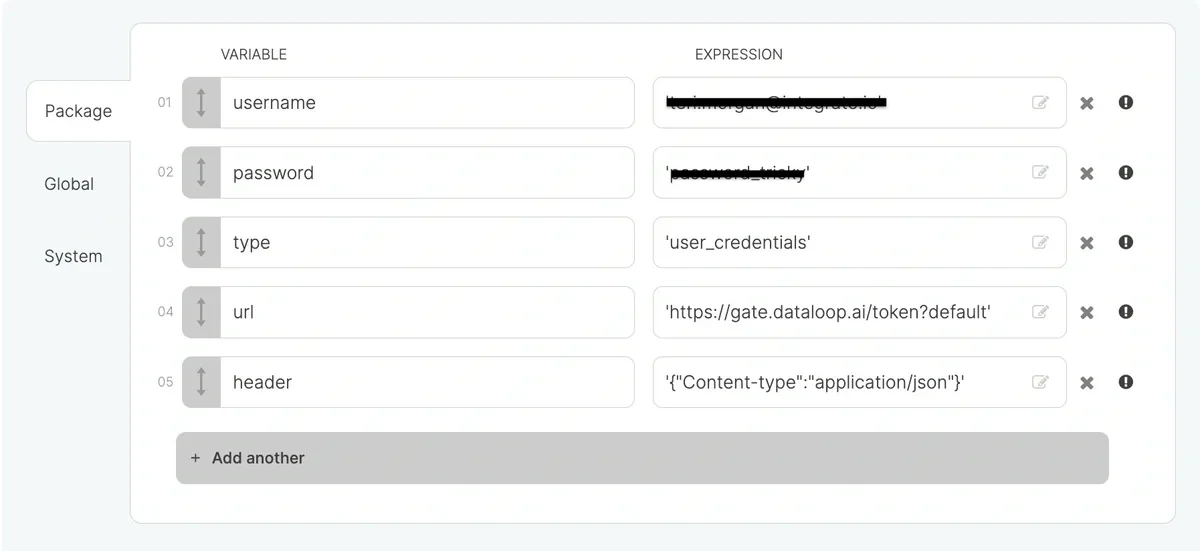
In these examples, I need to extract data from the Dataloop API. As we saw when researching the API documentation, Dataloop requires a JWT (JSON web token) that expires every 24 hours. It obtains this token by posting credentials to an authentication endpoint and extracting the token from the response, a pattern that maps directly onto Integrate.io’s Custom Auth Universal OAuth connection type. Step 1: Create a Universal OAuth connection Before configuring the REST API source component, I set up a connection in Integrate.io:1
Navigate to Connections in your Integrate.io account and create a new connection.
2
Select Universal OAuth as the connection type, then select Custom Auth.
3
Configure the following fields based on the Dataloop API documentation:
- HTTP Method: POST
- Authentication URL: the Dataloop token endpoint URL
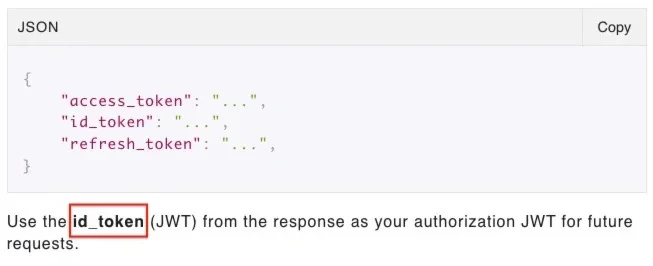
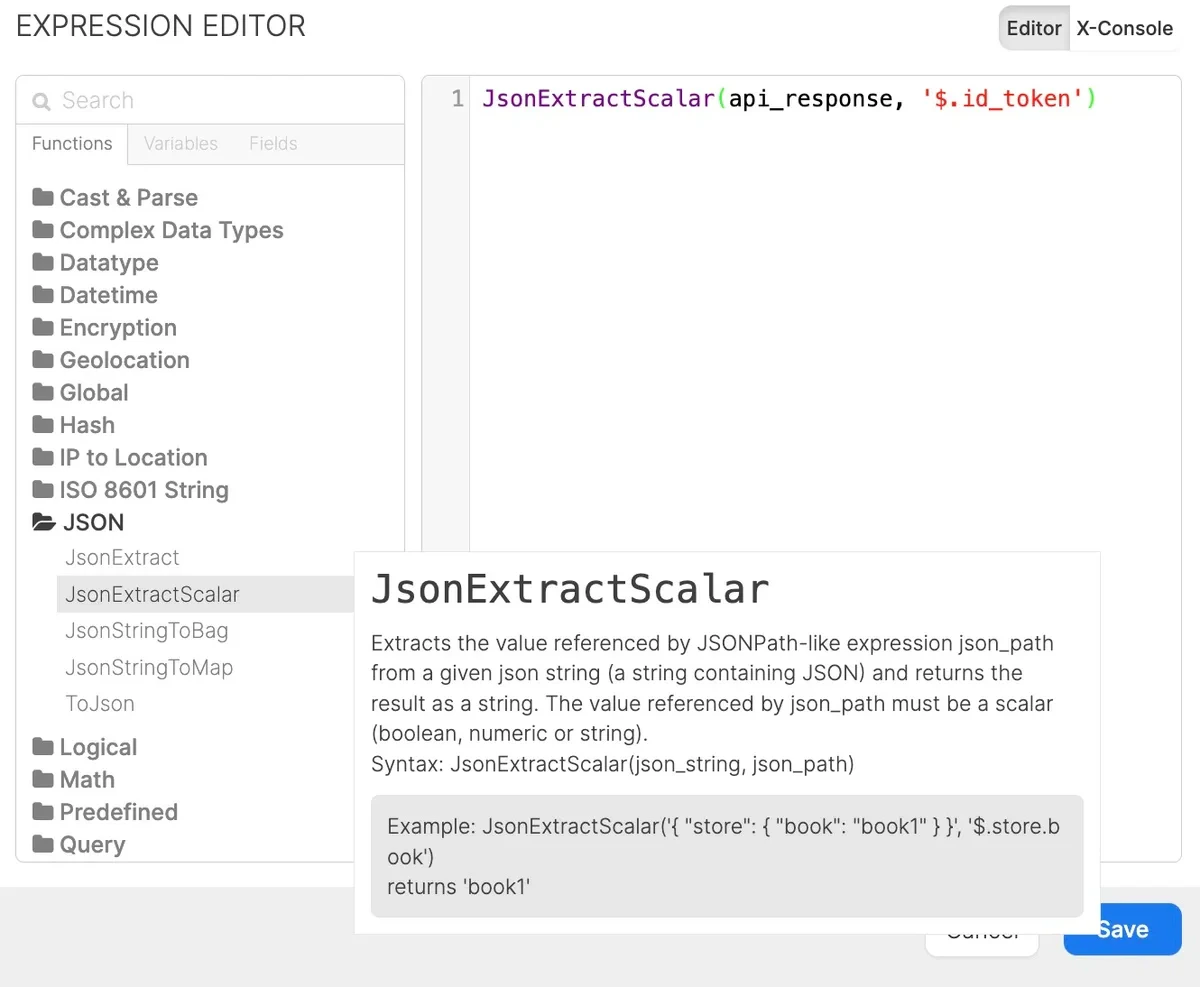
- Response Path (JSONPath):
$.id_token(this tells the connection where to find the token in the response) - Request Headers:
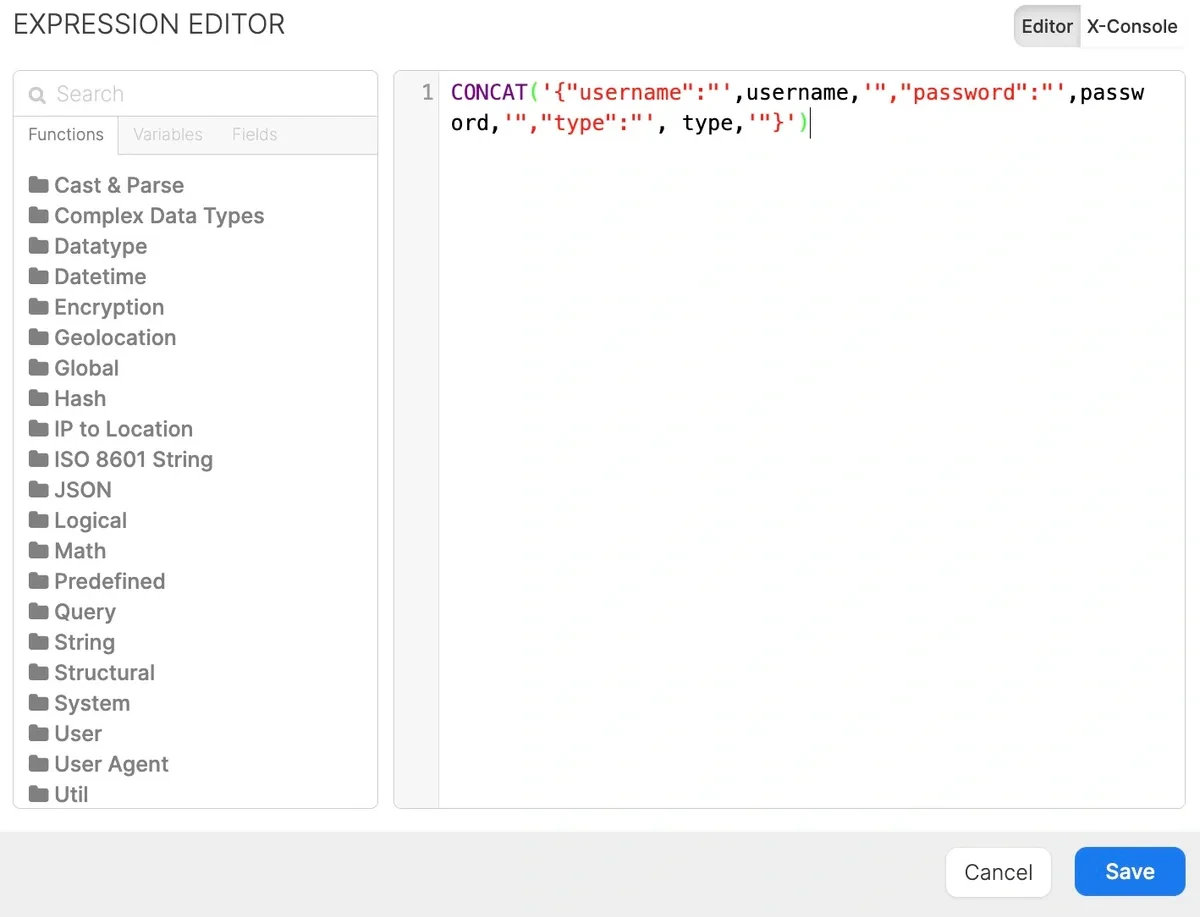
Content-Type: application/json - Request Body: your Dataloop username, password, and type credentials as key-value pairs
4
Click Authenticate to confirm the connection retrieves a valid token, then save it.
1
In Step 1 of the REST API source component, select Connection.
2
In the Choose connection dropdown, select the Universal OAuth connection you just created.
3
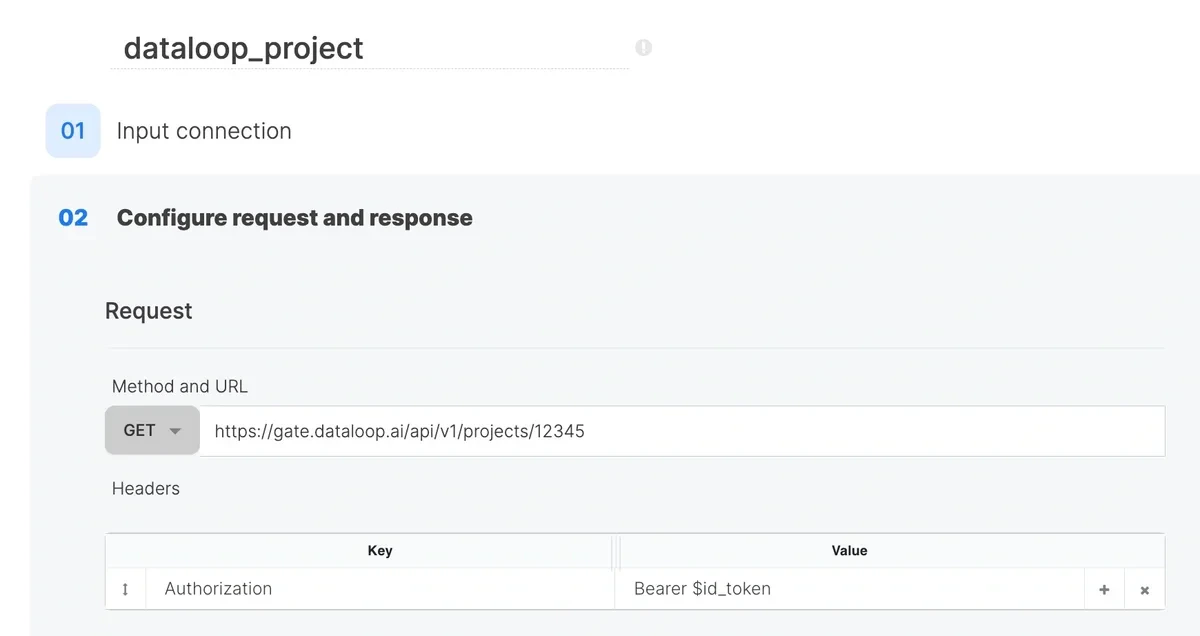
Configure the URL, method, headers, and response settings for the Dataloop data endpoint as normal.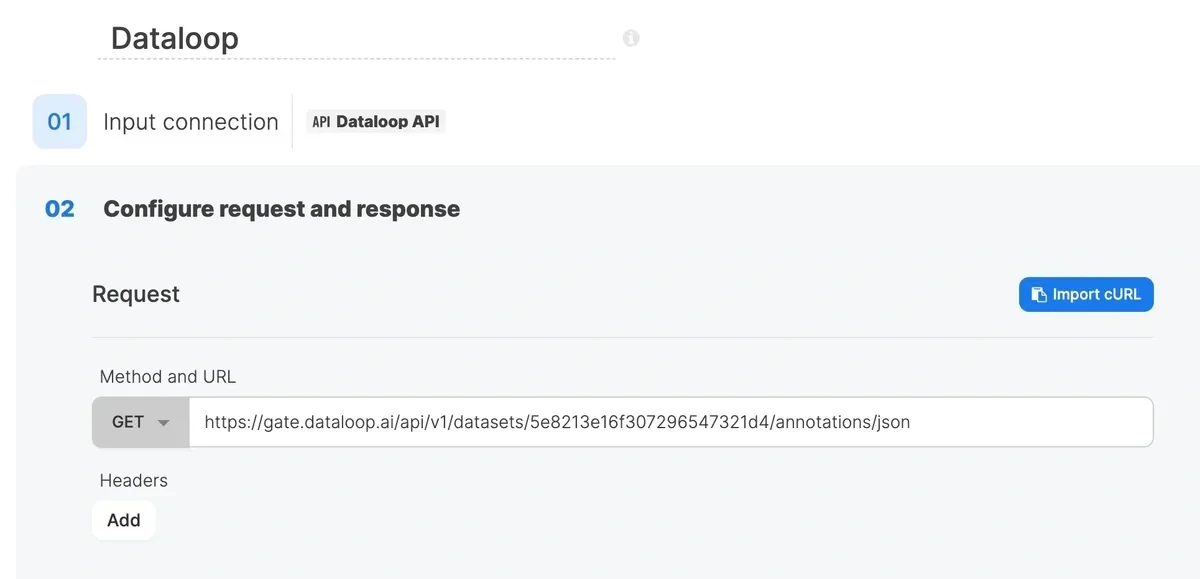
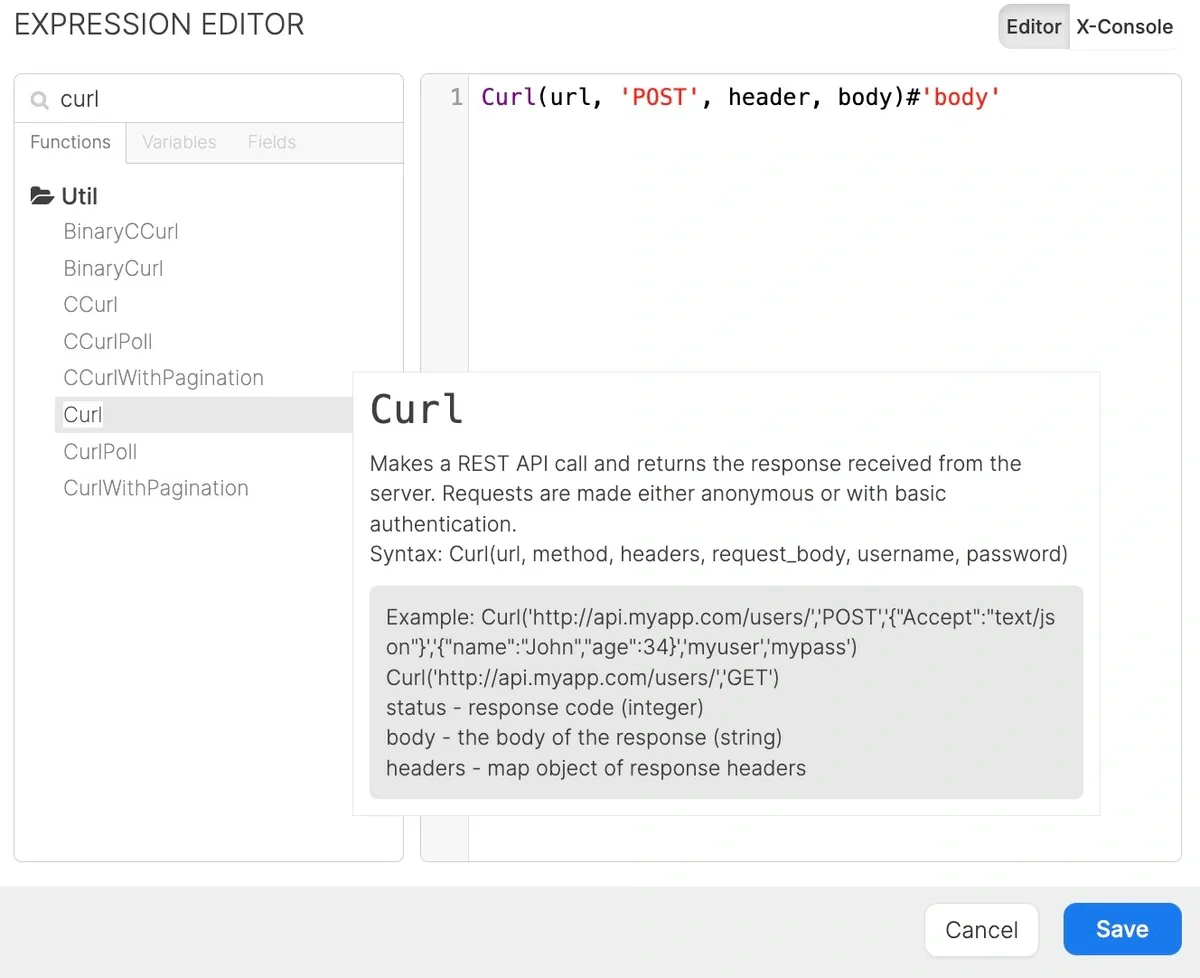
#4 Dataloop API: OAuth 2.0 Manually via Curl Functions (Advanced)
Note:This example shows the same Dataloop API integration as example #3, but configured manually using package variables and Curl functions. This approach is best suited for highly non-standard authentication flows that cannot be expressed through Universal OAuth’s configuration options, or for cases where you need fine-grained control over how the token request is constructed. If Universal OAuth’s Custom Auth method covers your use case, we recommend example #3 instead.
{"key":"value"}

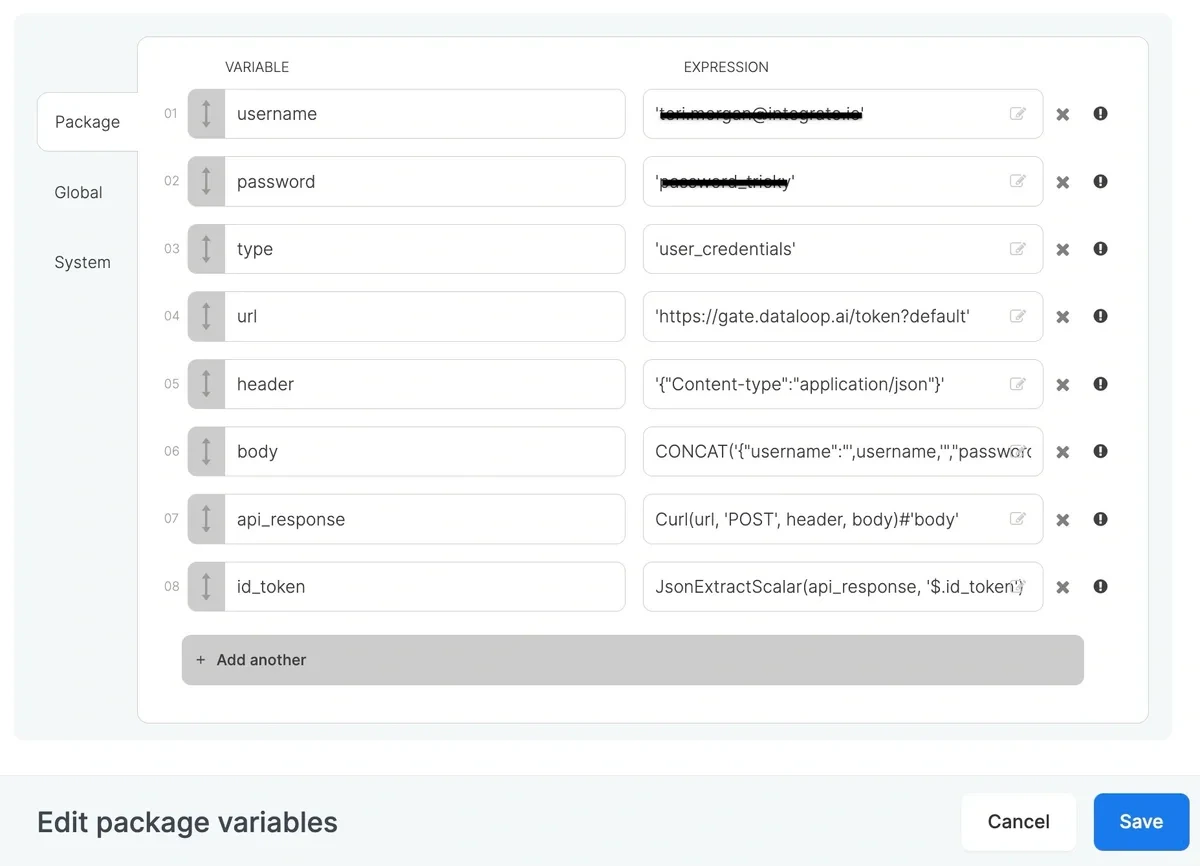
$ is used in the Integrate.io ETL platform to indicate that something is a variable.
$id_token so that the component will load. Then once you are finished building the package, go back and replace the hardcoded value with the variable name and re-save.